1) Welcome + privacy policy + terms of use
The very first screen introduces the offline-first promise and asks the user to continue. The screen includes links to:
- Privacy policy (opens in the browser)
- Terms of use (opens in the browser)

Pennie turns everyday finance notifications into a clean financial timeline, while keeping your data offline and on-device. A key differentiator is automatic parsing: Pennie extracts the amount and context from finance messages so you don’t have to manually type amounts — you review and confirm. This page documents the real app flow and the Dashboard experience.
 Available only on Android
Start with onboarding, then use the links below to jump across the full Pennie experience: tabs overview, Dashboard, Transactions, Add Transaction, Categories/Budget, EMI Planner, Reports, Settings, and the notification/SMS review flows.
Core features work without internet. Permissions are explained in plain language so the user stays in control.
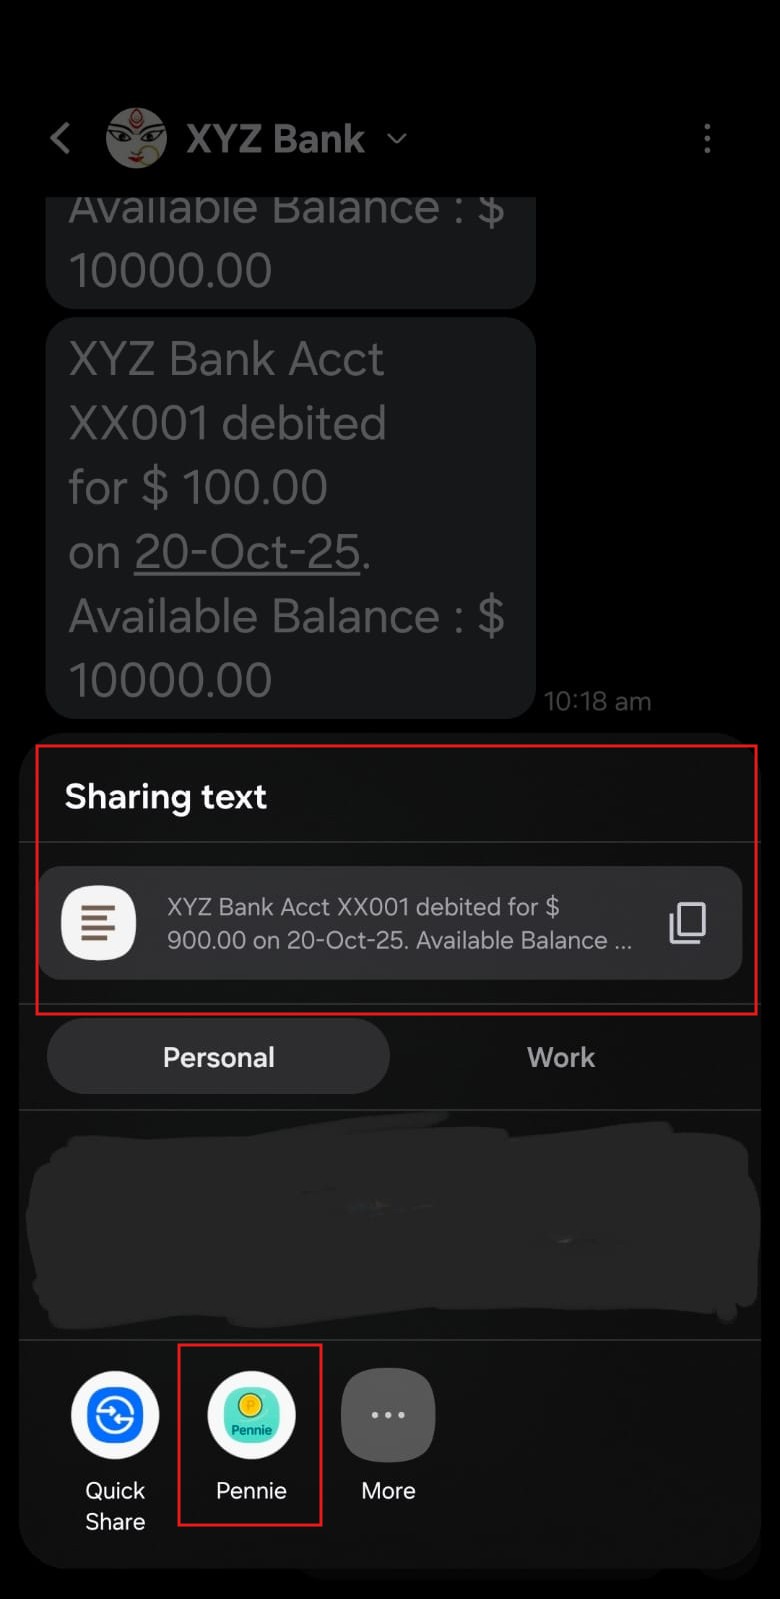
Amounts are auto-parsed from finance messages: review the staged transaction, tweak category if needed, and save — no manual amount entry for every payment.
The Dashboard prioritises trend and composition: expense breakdown + last 6 months net trend.
Pennie is organised around five primary tabs. The app uses a Shell TabBar with these destinations.
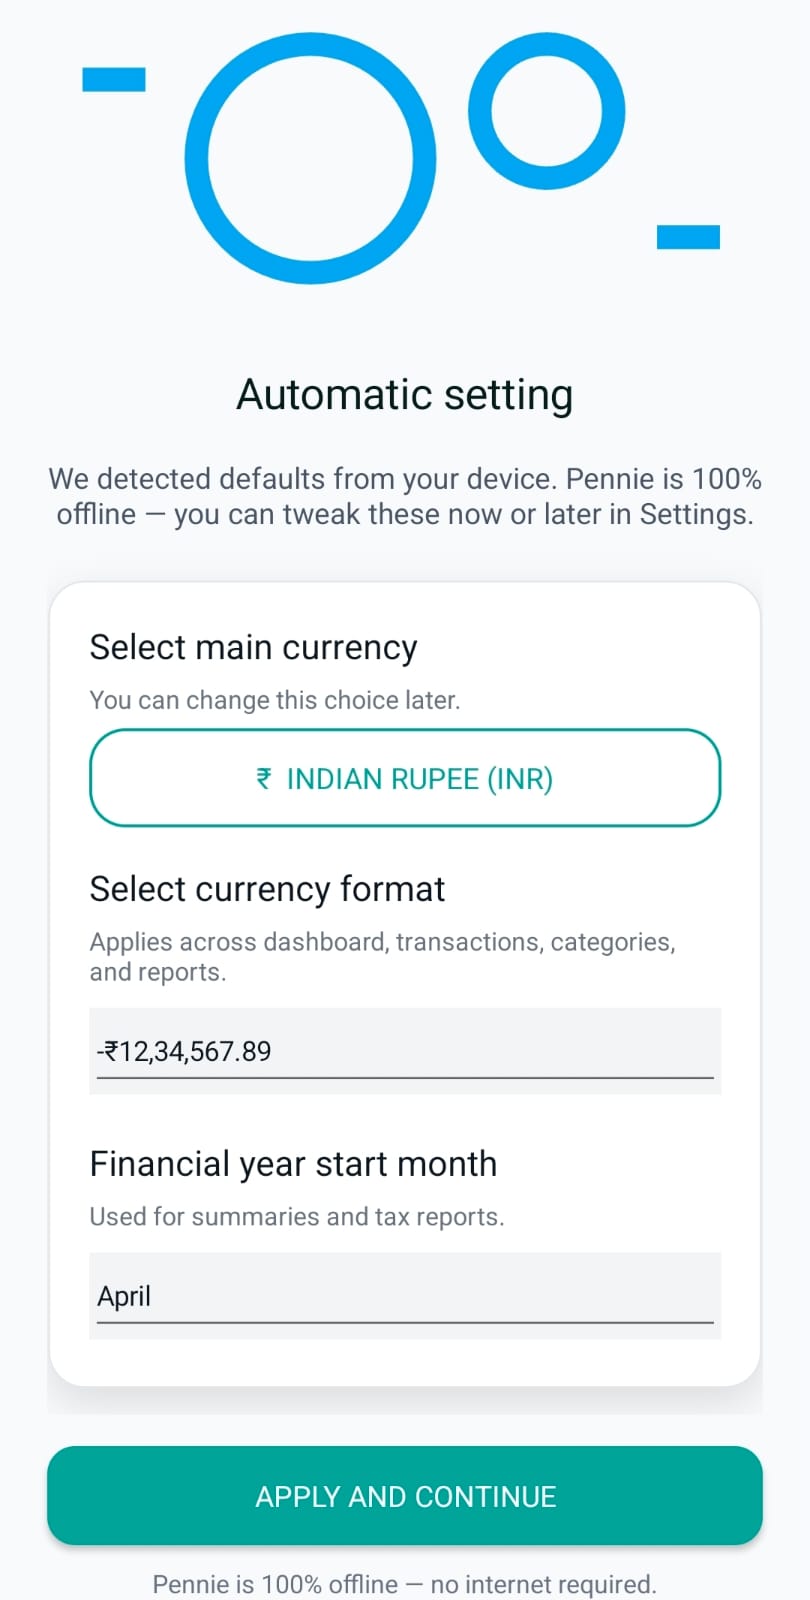
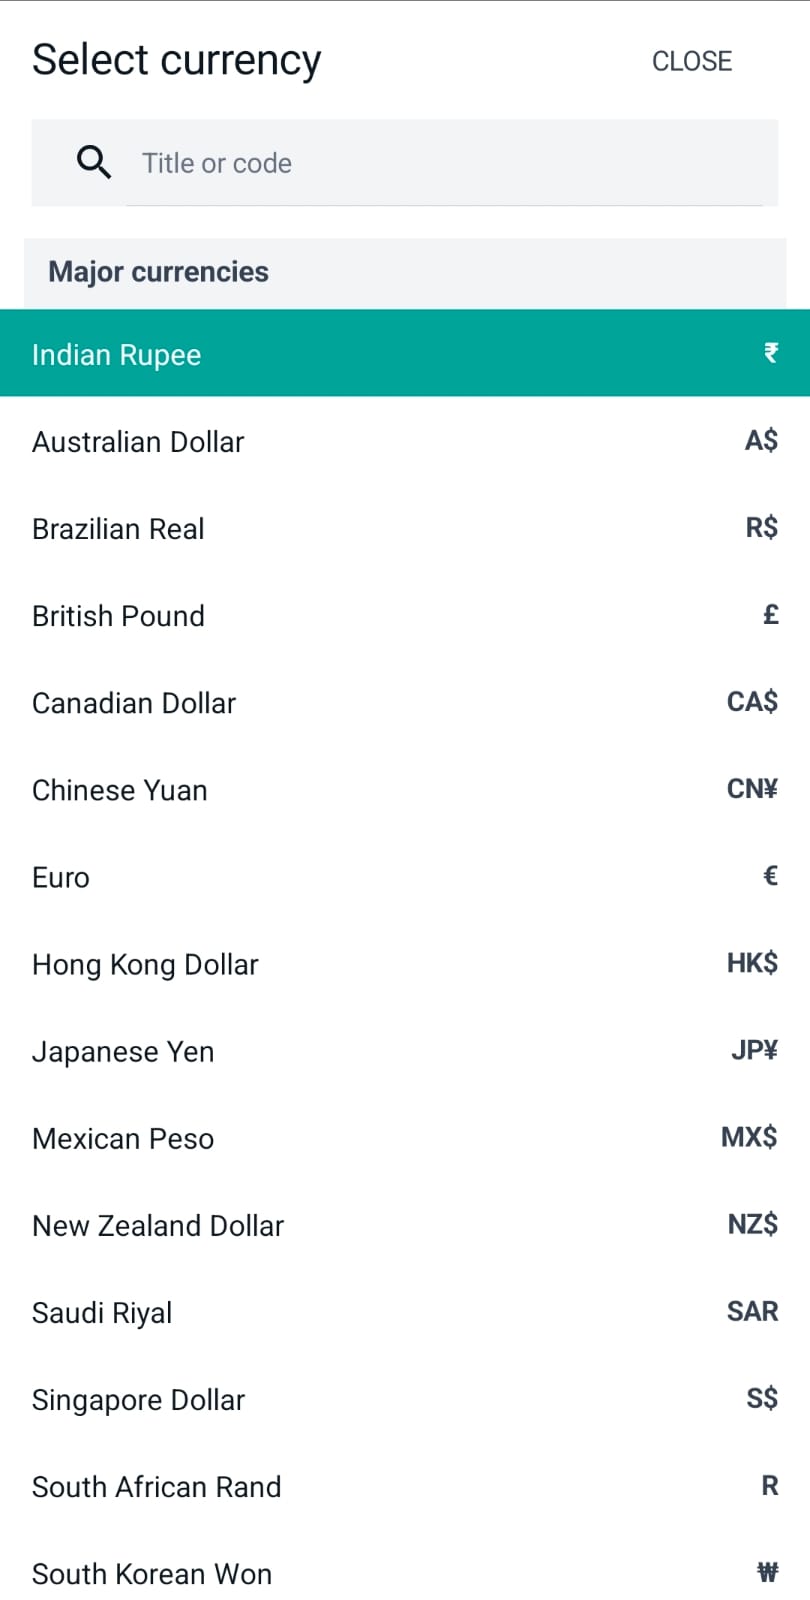
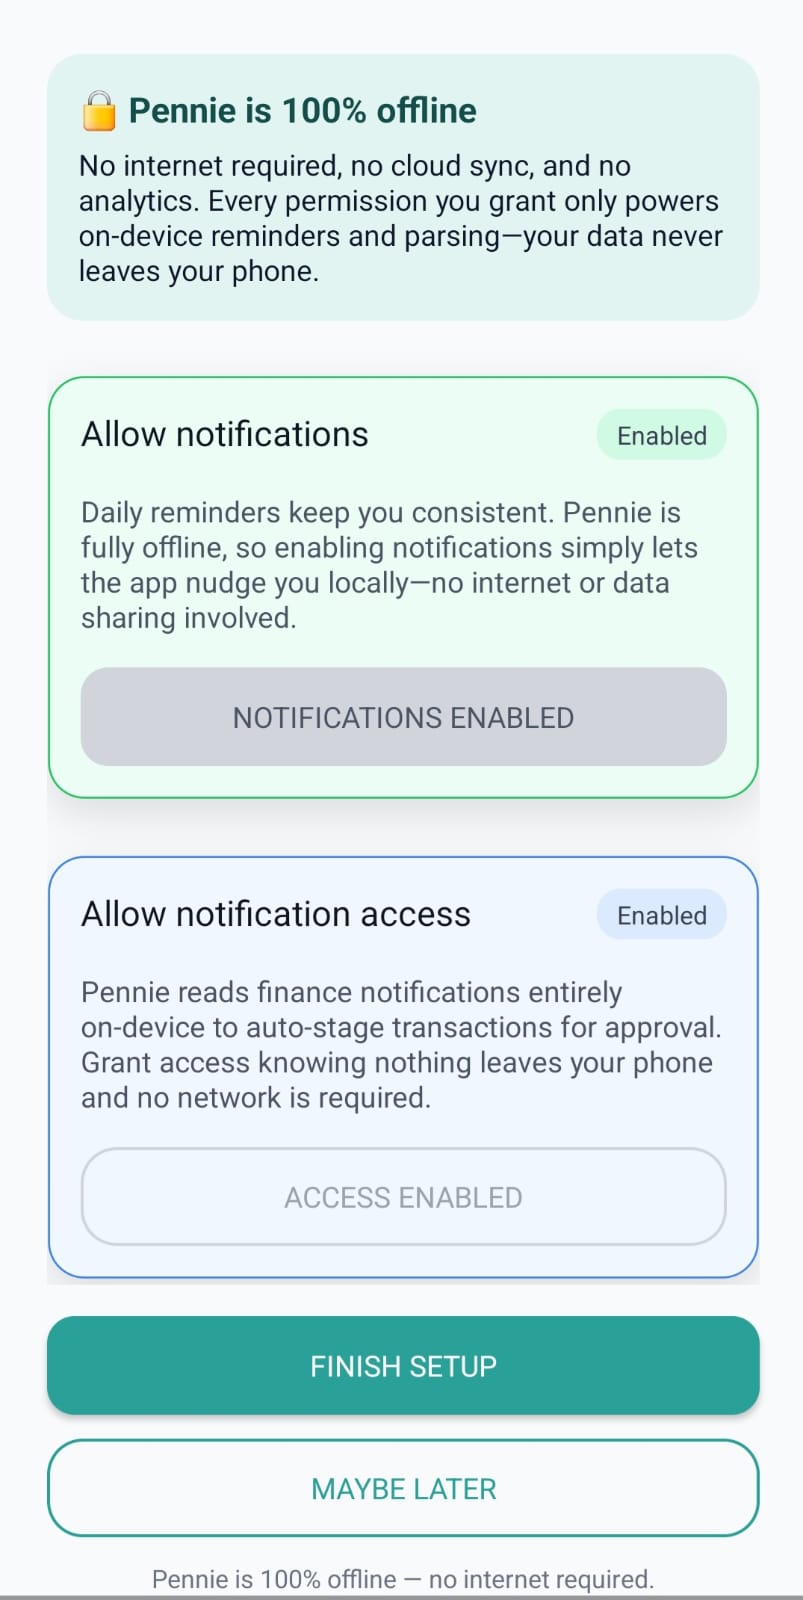
On first launch, Pennie guides users through consent + defaults so the app feels local immediately: privacy/terms → currency → permissions (Android).
The very first screen introduces the offline-first promise and asks the user to continue. The screen includes links to:
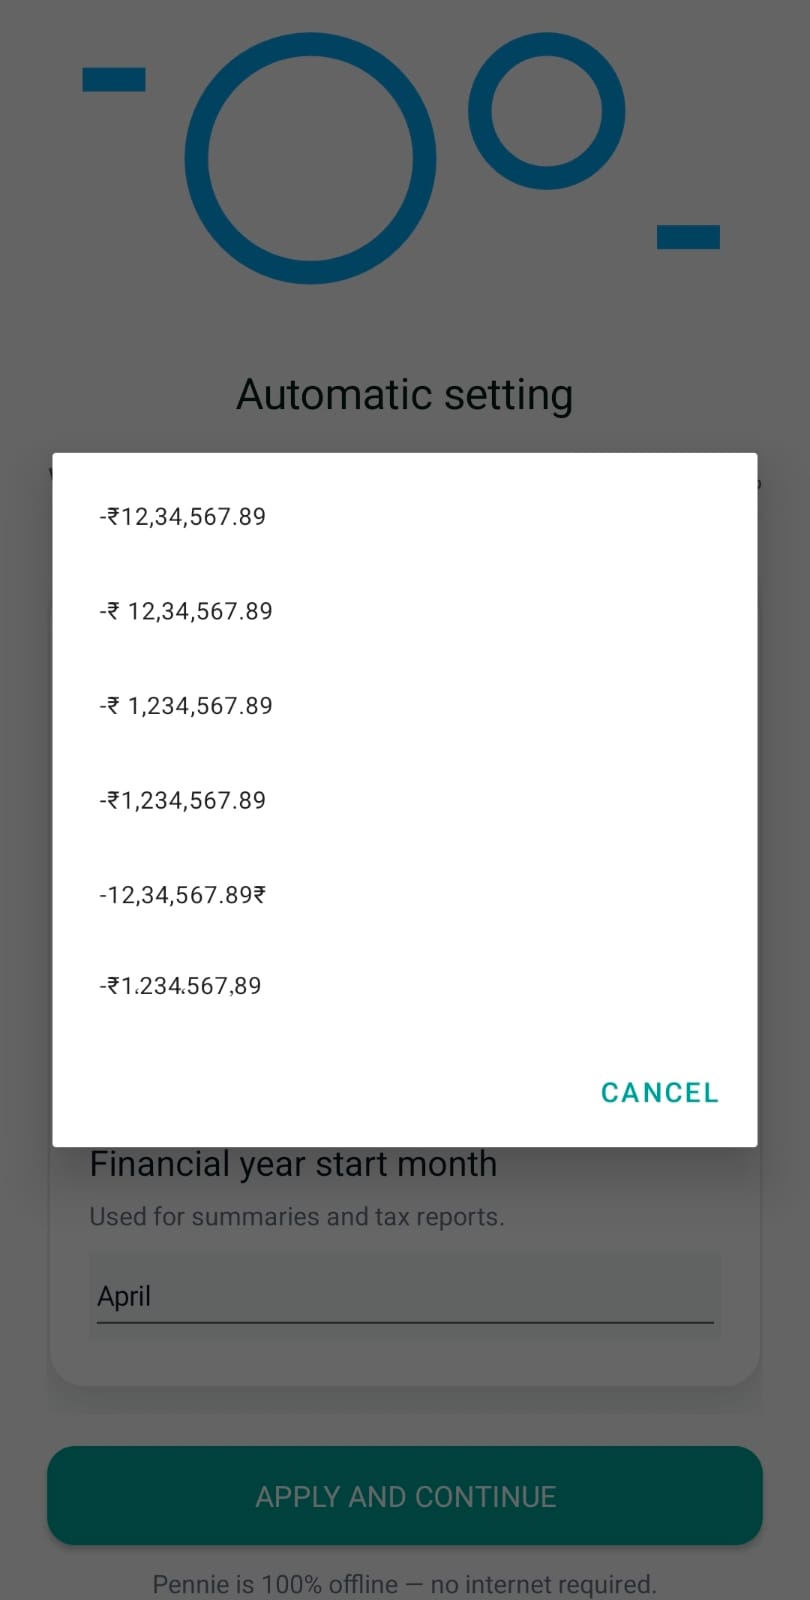
Pennie detects defaults from the device locale and preselects:
This is designed to remove setup friction — most users can simply tap “Apply and continue”.
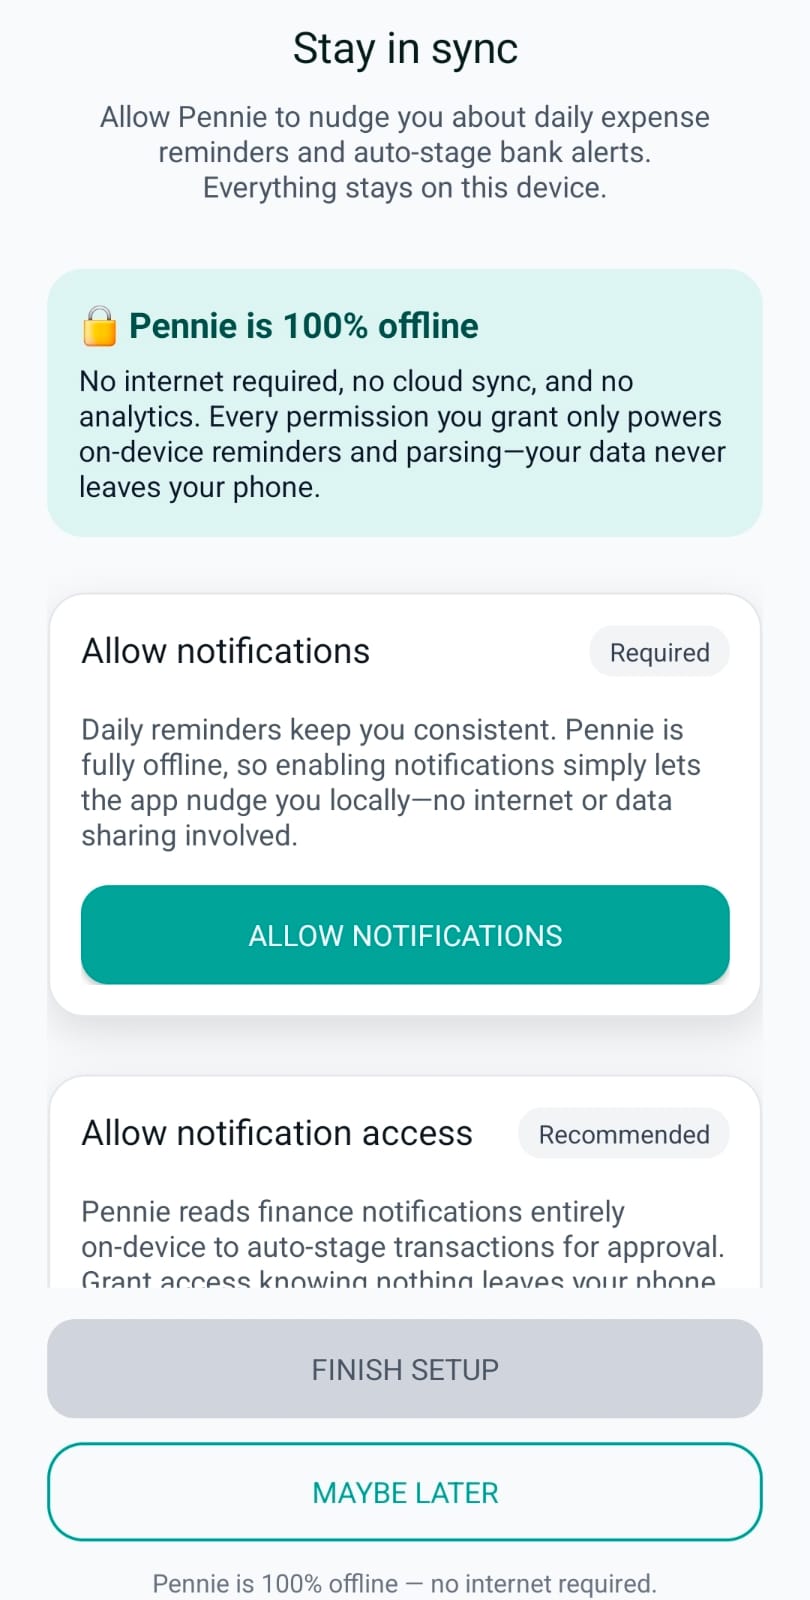
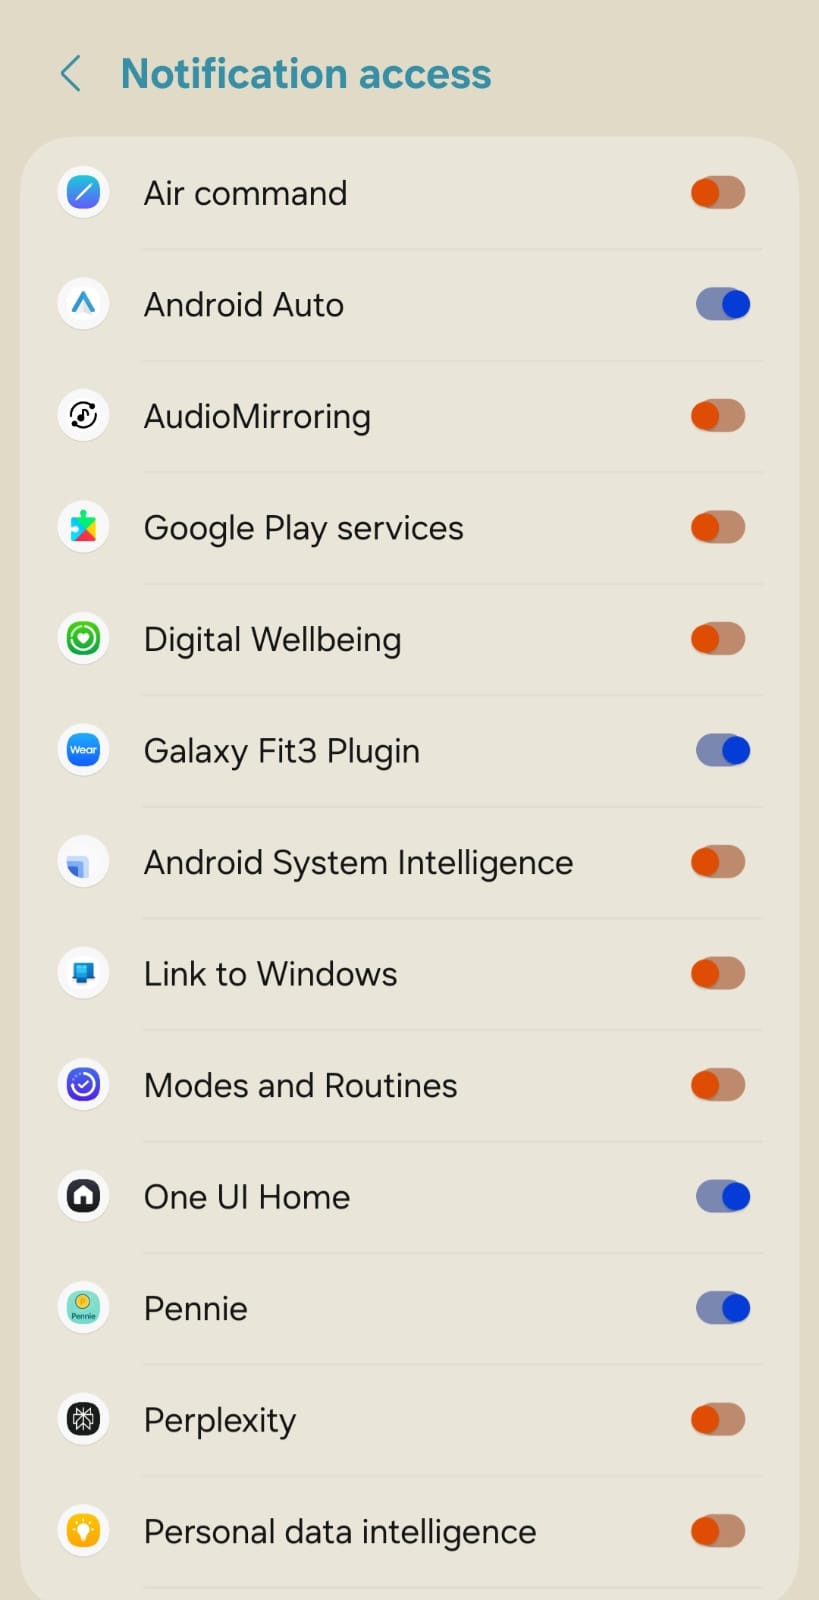
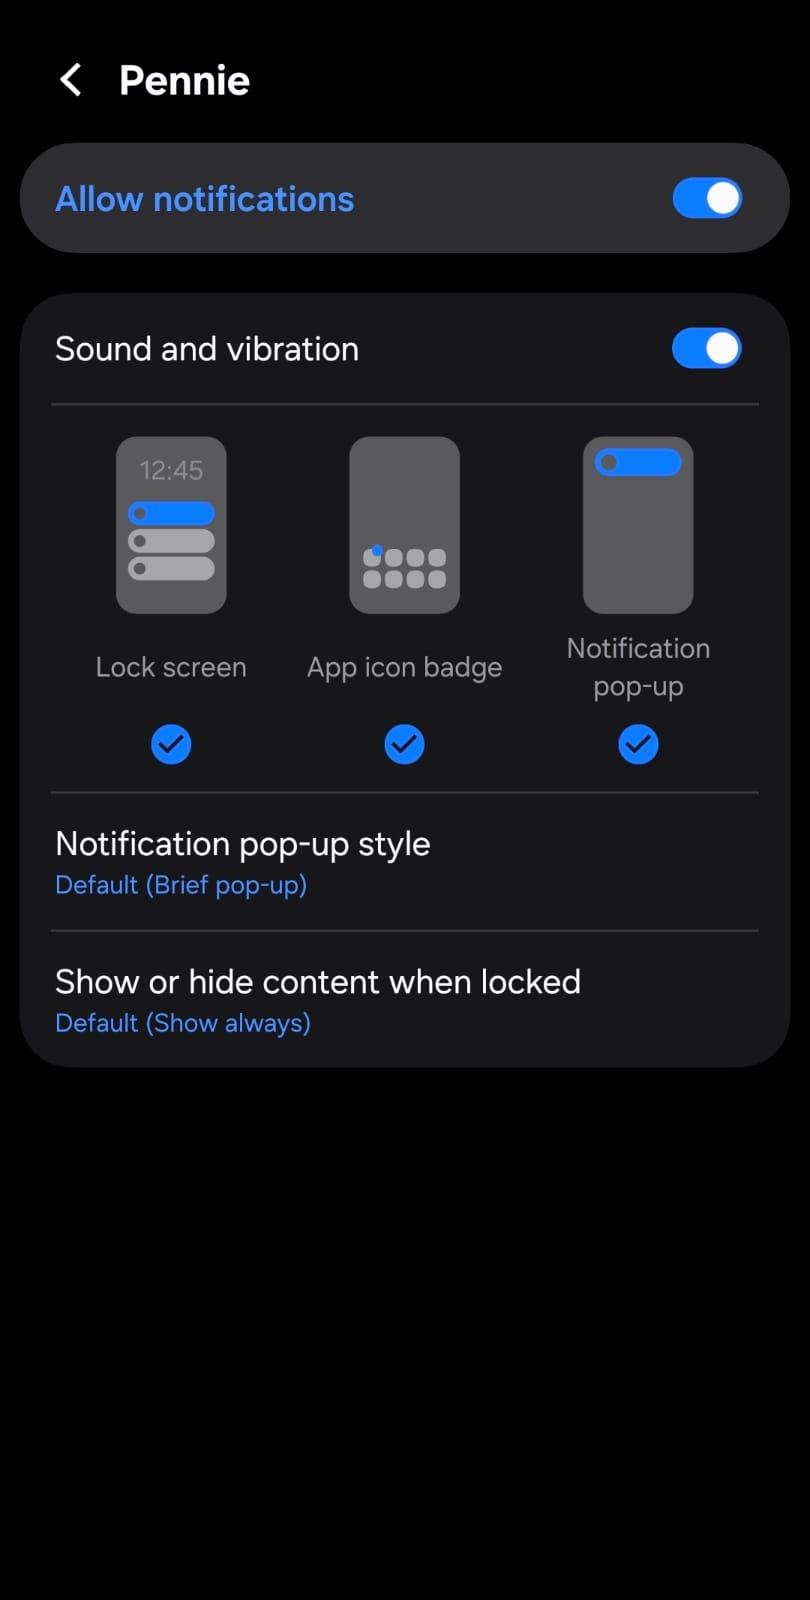
On Android, Pennie asks for two related permissions, with clear rationale:
Key feature: once notification access is enabled, Pennie can automatically parse finance messages to extract the amount and context, then pre-fill a “review” item. The user typically just confirms (or edits category/type) instead of typing amounts manually.
Users can finish setup or choose “Maybe later” — the app remains usable either way.
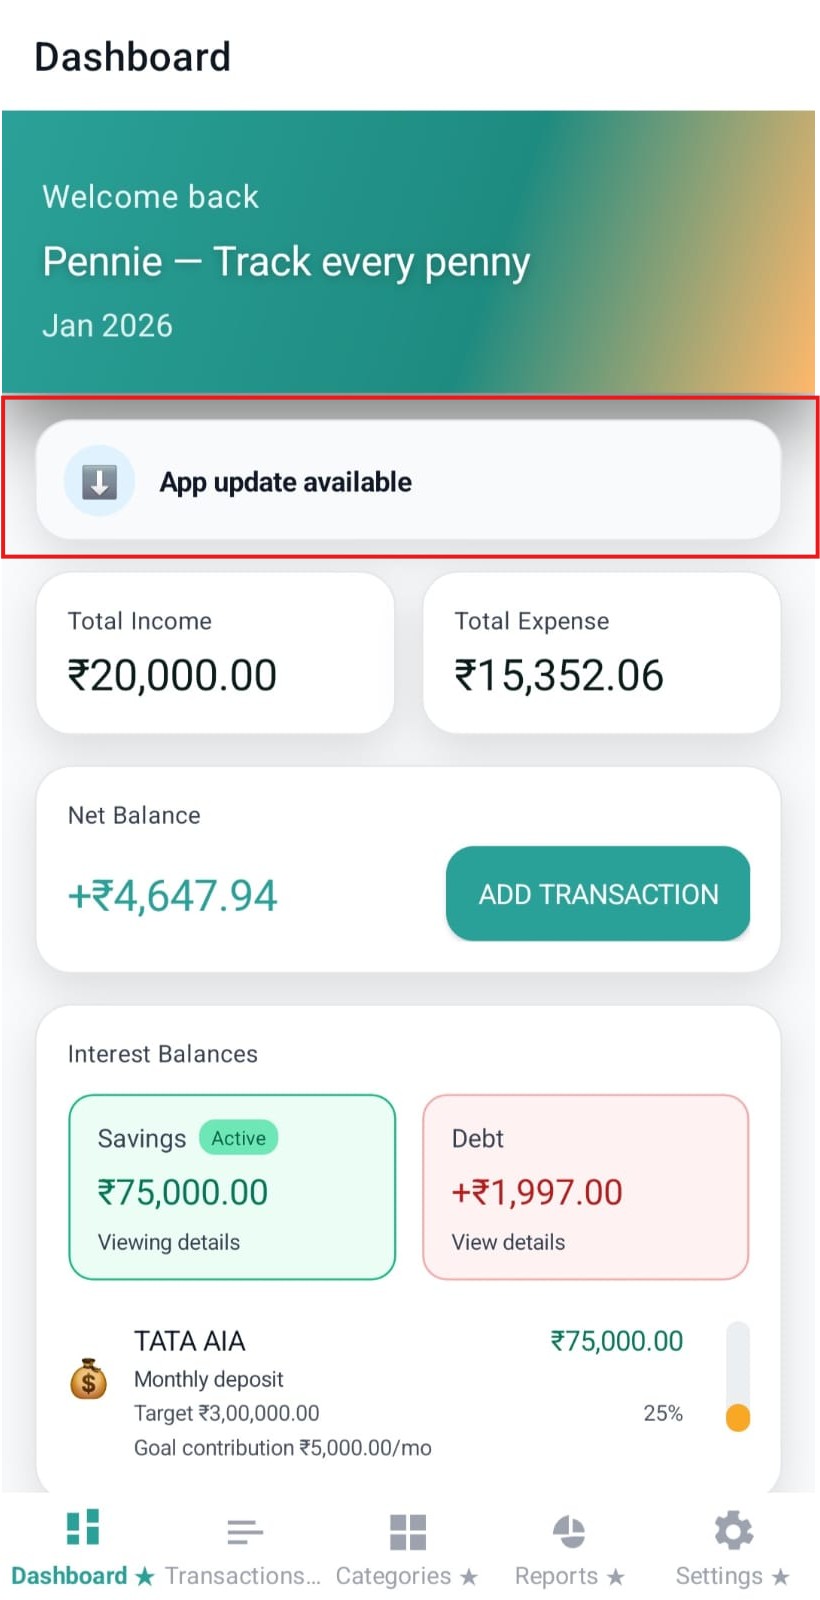
The Dashboard is the “money home” screen: it summarises the current month, surfaces automation (reminders/subscriptions), and provides quick charts for clarity.
The top header anchors users with a friendly greeting and the current month (e.g., “Jan 2026”). This keeps the rest of the metrics easy to interpret.
Pennie computes month totals from the transaction list and shows them as:
Insight: interest-accrual transactions are excluded from these top-level totals so the “true” budget/expense picture stays clean.
When an update is available, the dashboard surfaces a small banner. Tapping it takes the user to the marketplace/web listing to update.
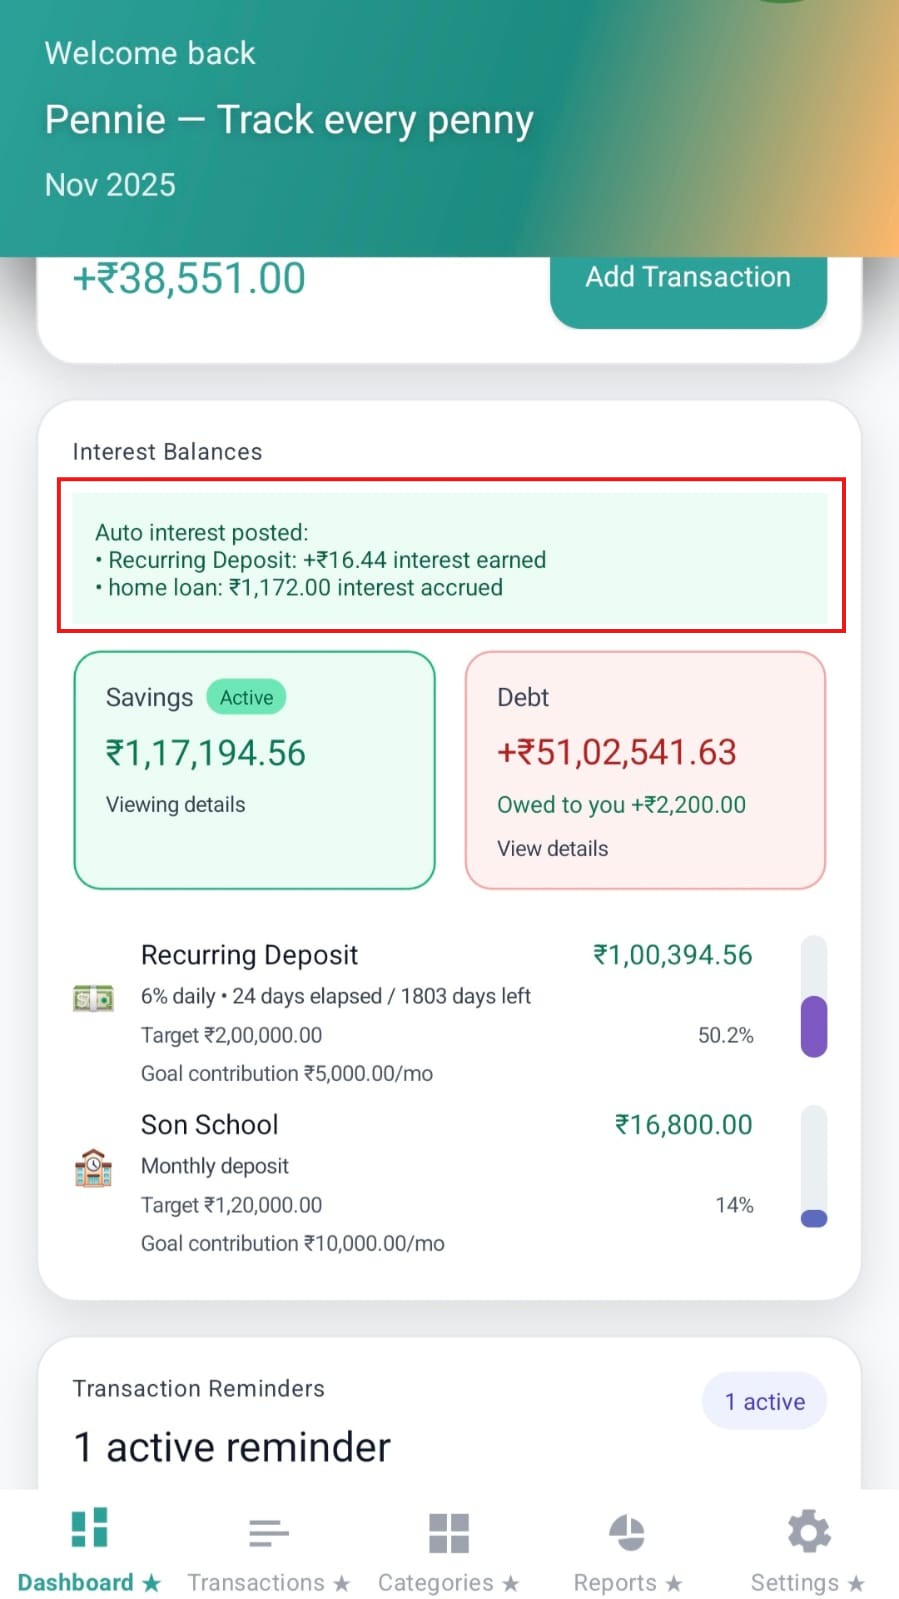
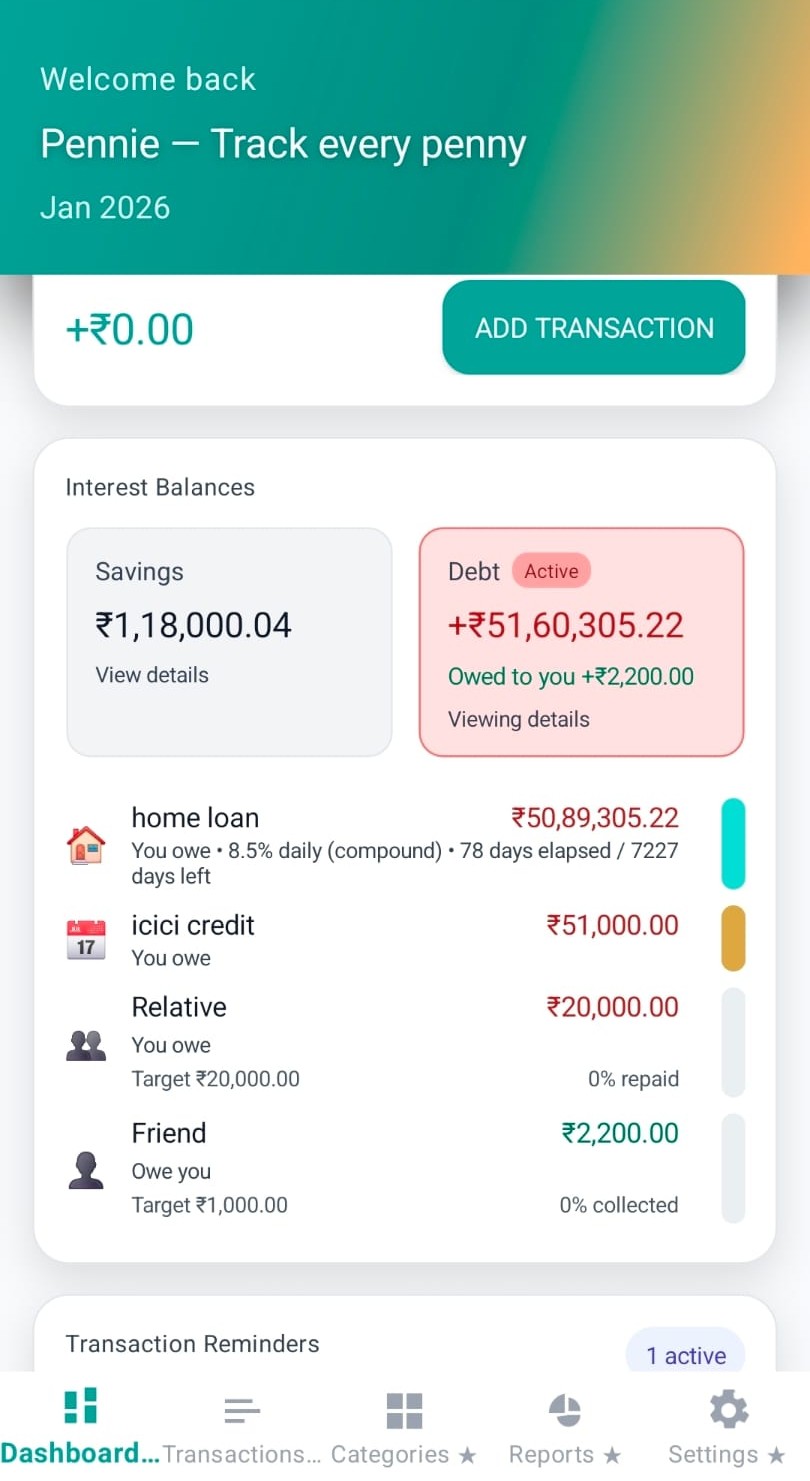
Premium users can track interest-bearing balances with two primary views:
Each chip can expand into a detailed list with category-level rows and progress indicators.
The reminders section is designed to keep financial habits consistent. The dashboard shows:
Insight: reminders are sorted to show what needs attention first (overdue, then soonest).
Subscriptions highlight recurring costs. The dashboard shows:
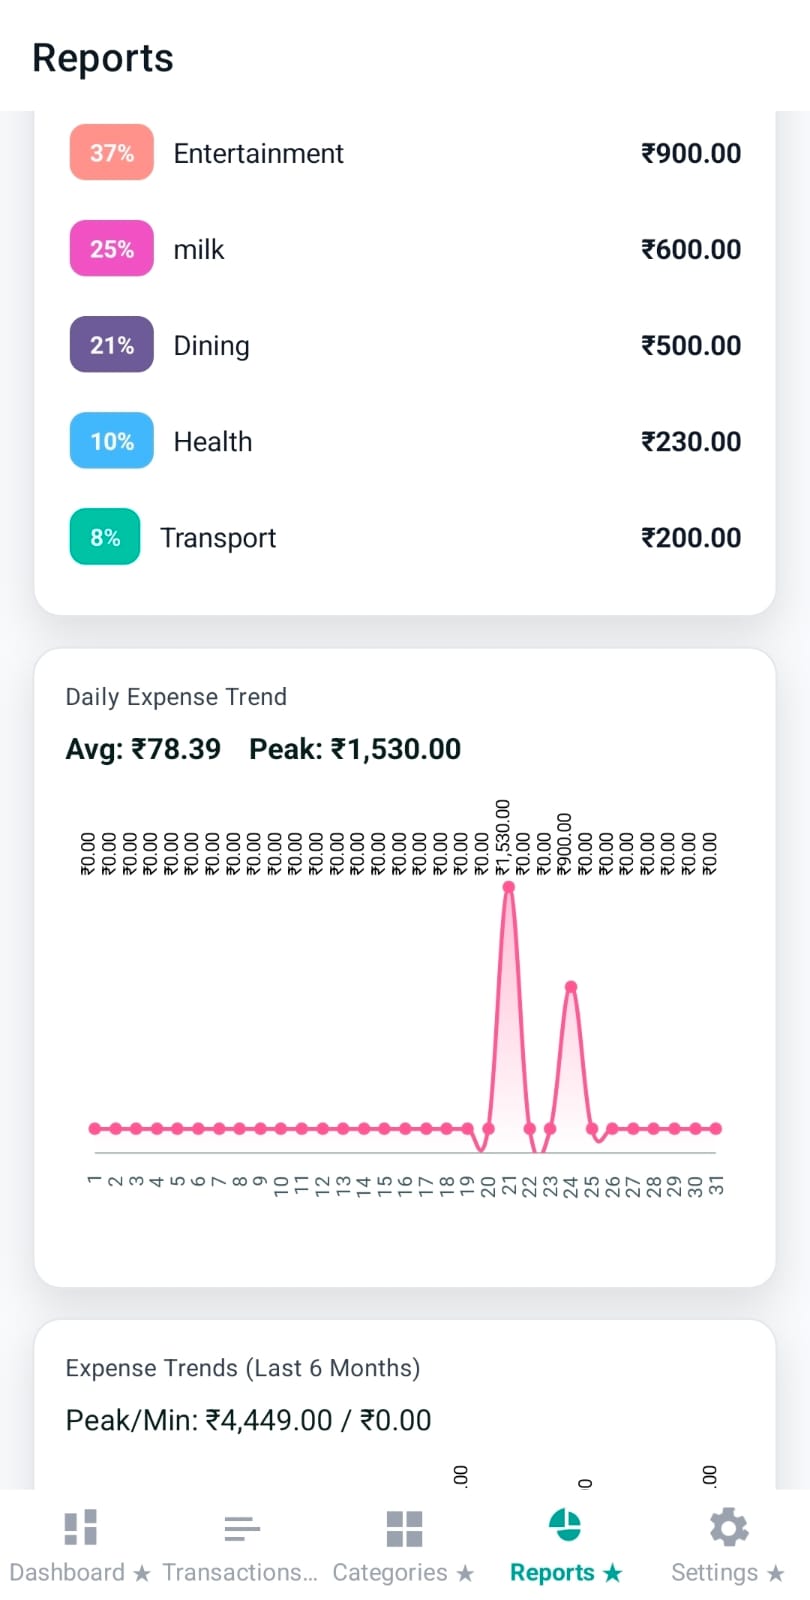
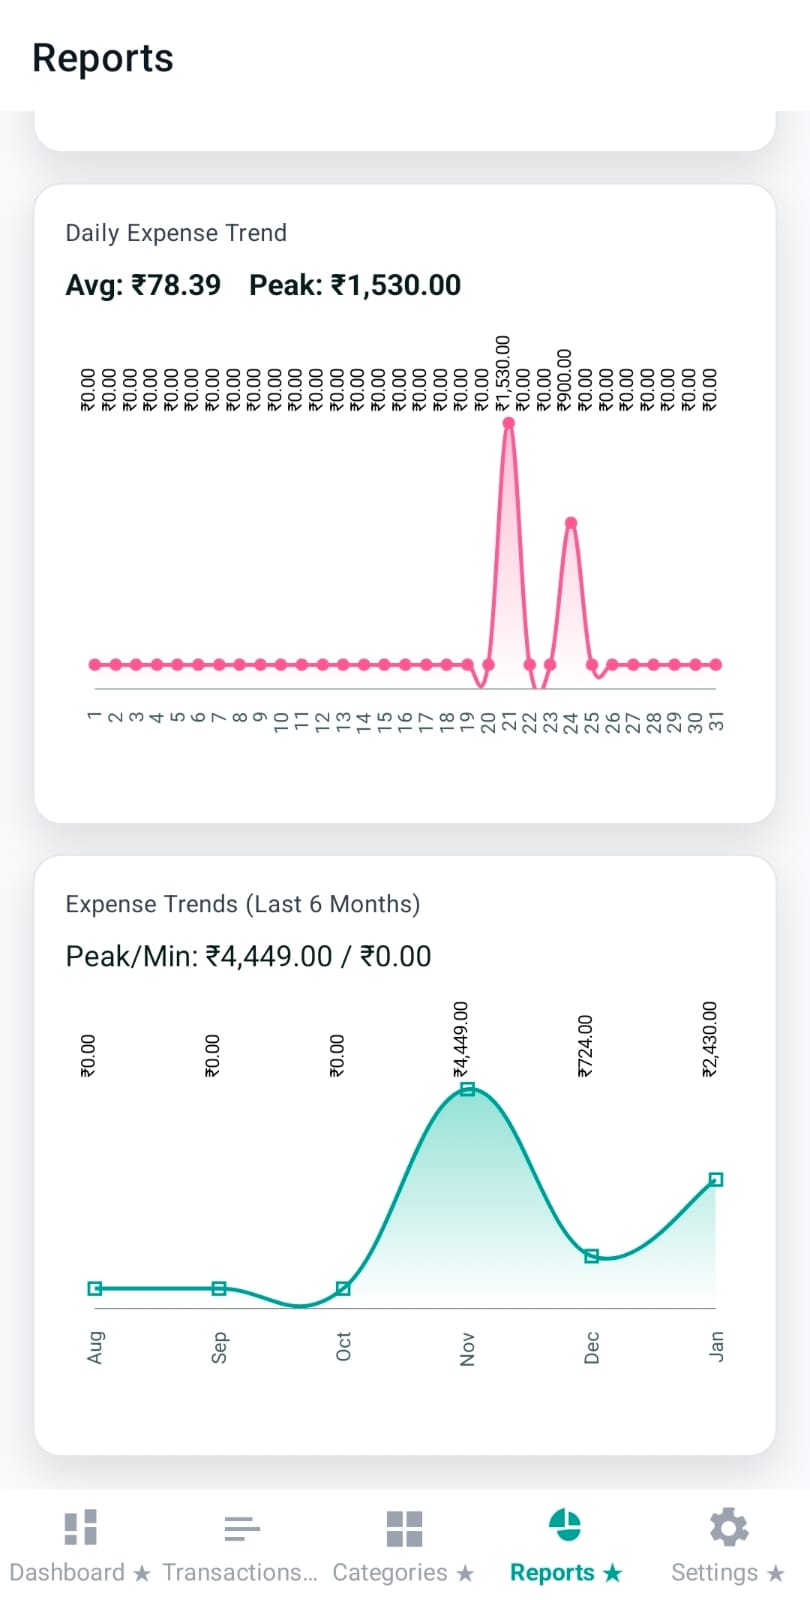
The expense breakdown chart answers: “Where did my money go this month?”
This chart shows net movement over time (budget − expense) so users can see momentum, seasonality, and whether spending is drifting upward.
Insight: points are colorized by sign (positive vs negative) so dips are visually obvious.
The bottom of the dashboard provides shortcuts to core next steps:
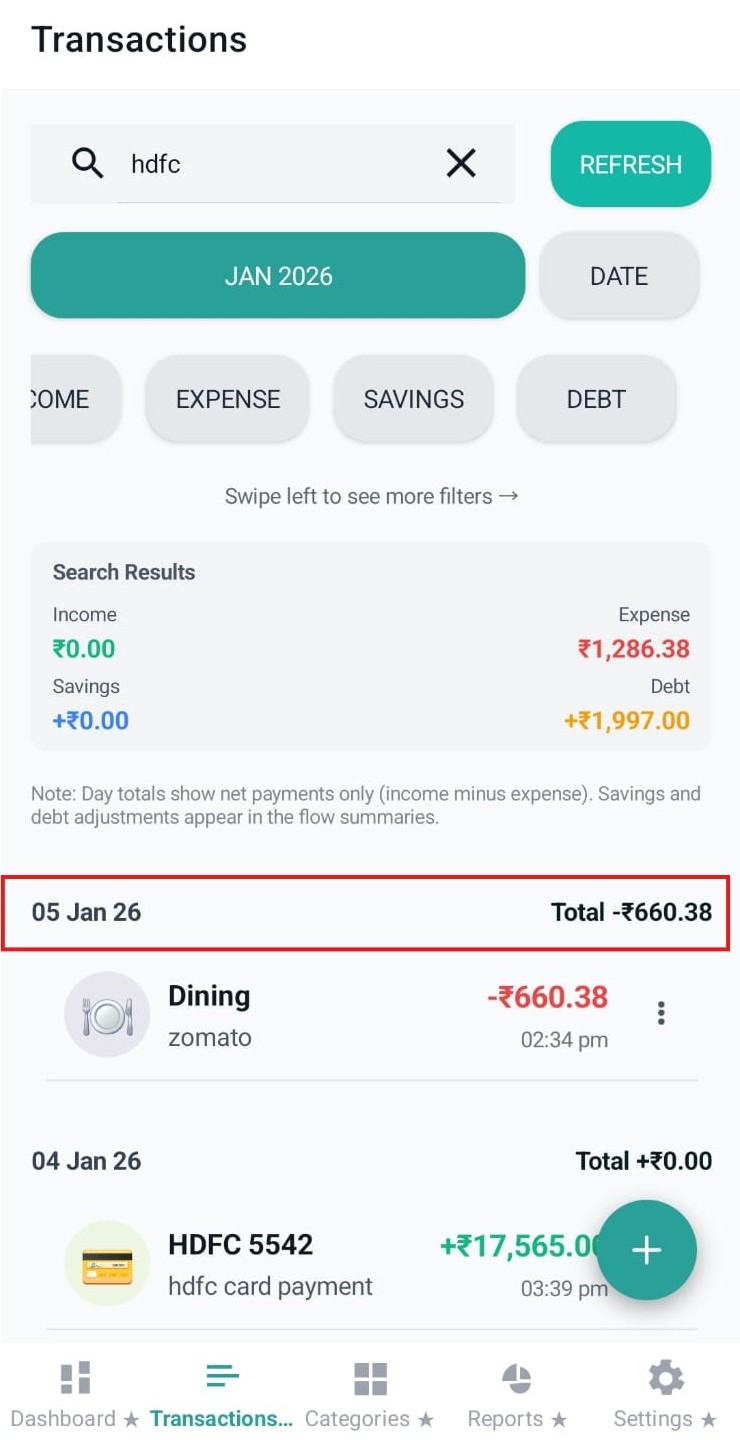
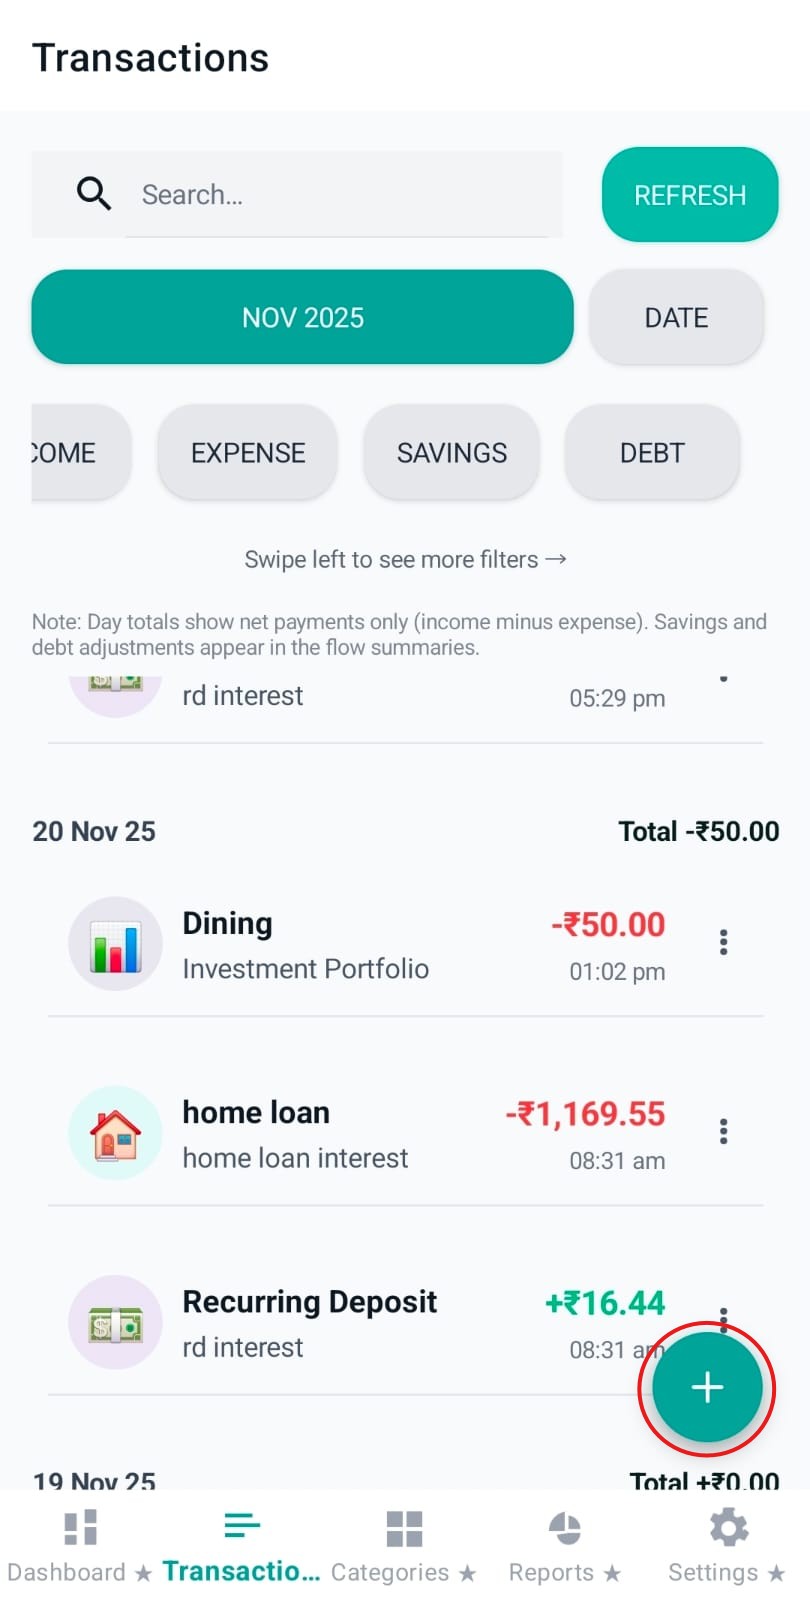
The Transactions tab is Pennie’s primary “timeline” view. It’s optimised for fast review (search + filters), safe edits (bottom sheet actions), and bulk cleanup (multi-select + undo).
The first row provides a search bar and a dedicated Refresh button. Search is debounced so typing doesn’t reload on every keystroke.
Insight: Refresh also scrolls the list back to the top so the user immediately sees the newest items for that month.
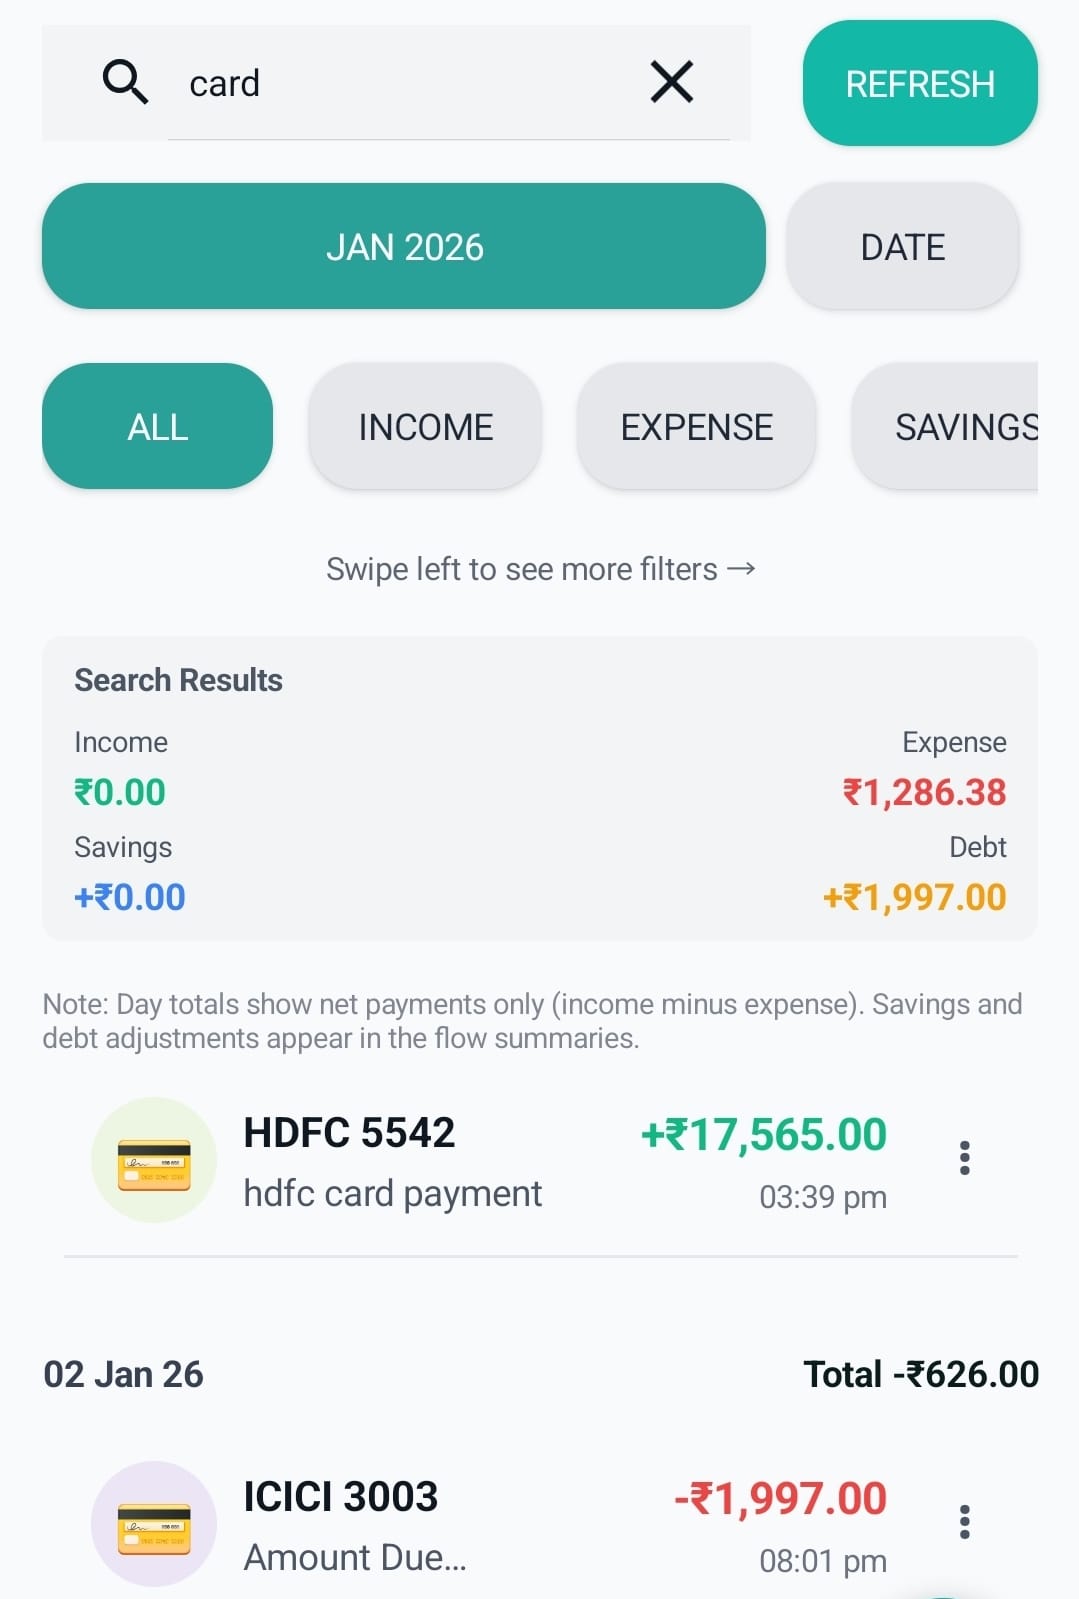
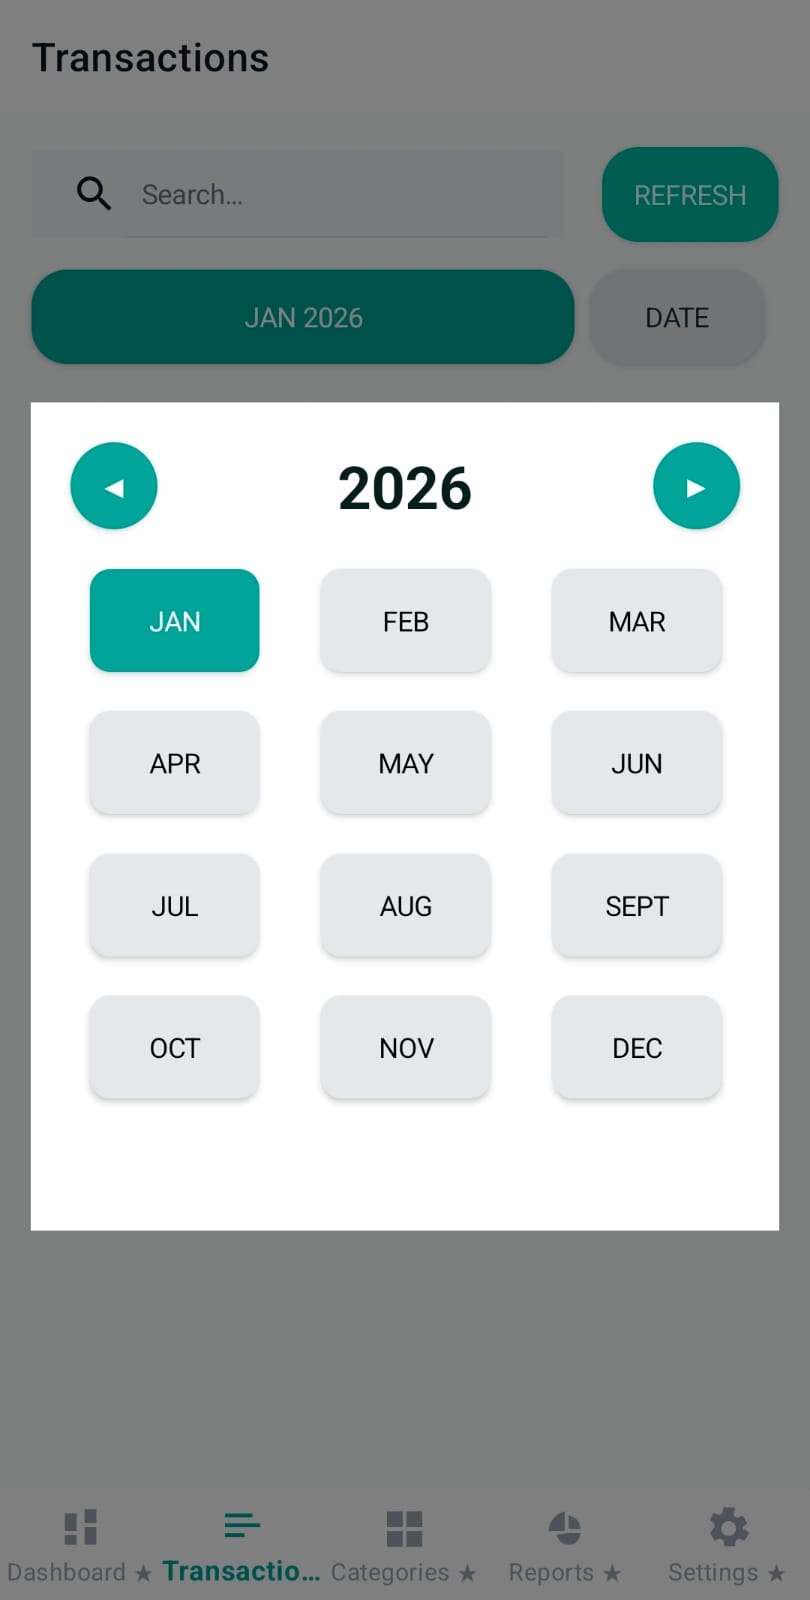
Pennie keeps the timeline strictly scoped to a single month (no infinite cross-month feed). Users can switch months with a chip-style month/year selector.
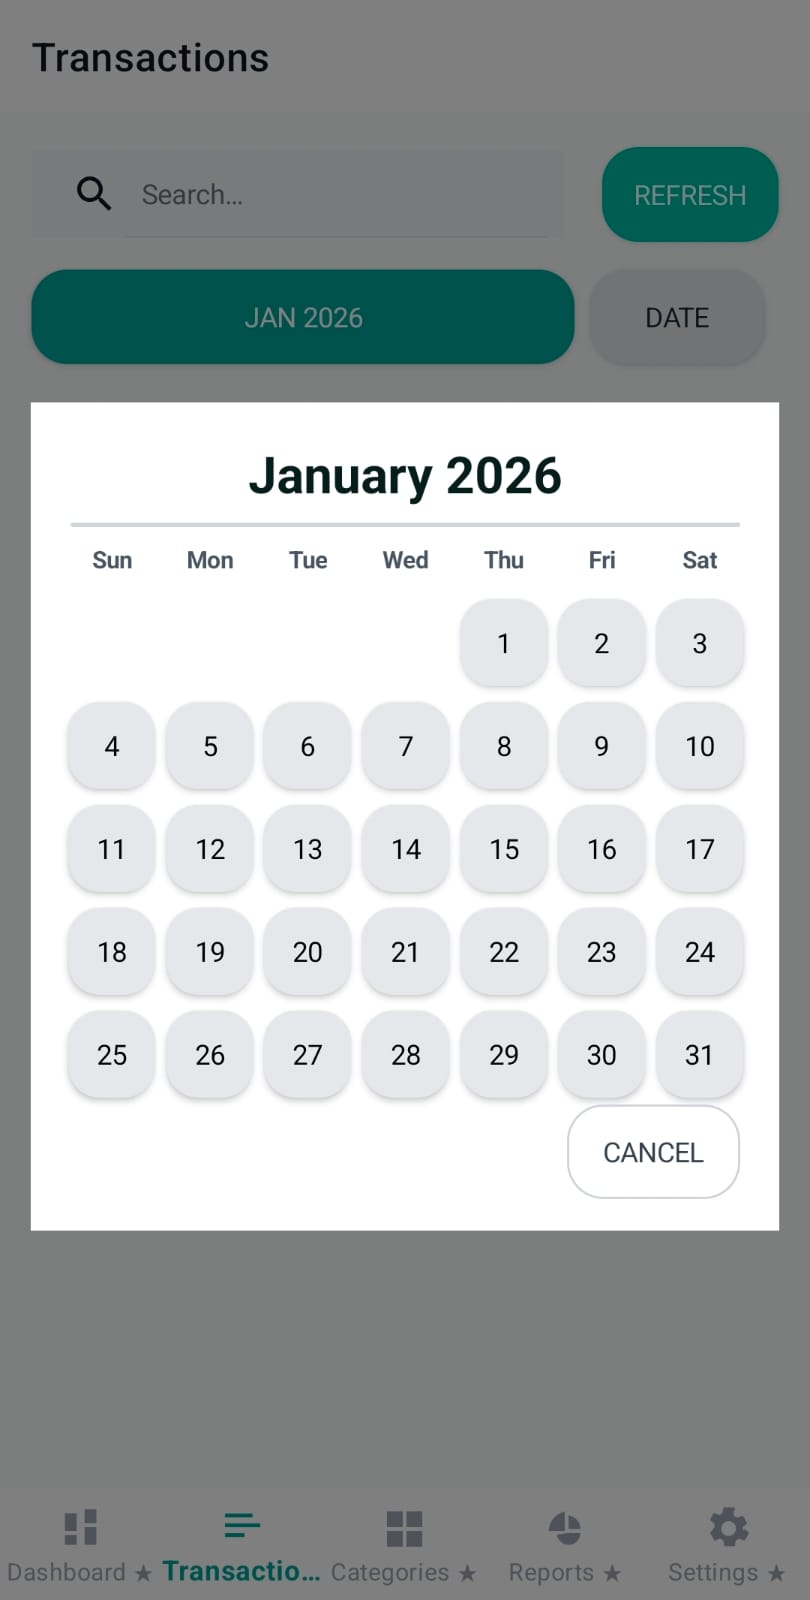
The Date chip enables a day filter inside the selected month. When a day is active, the chip shows the chosen date plus a small “✕” clear button.
Under the date controls, Pennie exposes quick filters as horizontally scrollable chips:
Insight: Selecting a chip updates the active filter state and reloads the month list from page 1 (paging resets).
When search or filters are active, Pennie shows a compact summary card with totals for the full matching set (not just the visible page). This helps users understand “how much” without scrolling the entire month.
Note: Day totals shown in headers focus on net payments (budget minus expense). Savings/debt adjustments are surfaced in the summary totals.
The transaction list is grouped by day. Each day starts with a header (Today/Yesterday or date) and a daily total computed as:
Daily Total = (sum of allocation payments) − (sum of expense payments)
Insight: interest accrual entries are ignored for daily totals so the “what I paid/received” number stays trustworthy.
Each transaction row is designed to scan quickly:
Gestures: long-press starts multi-select, single-tap toggles selection (when multi-select is active), and double-tap jumps to edit.
Tapping the “⋮” menu opens a bottom sheet with the two most common actions:
editId set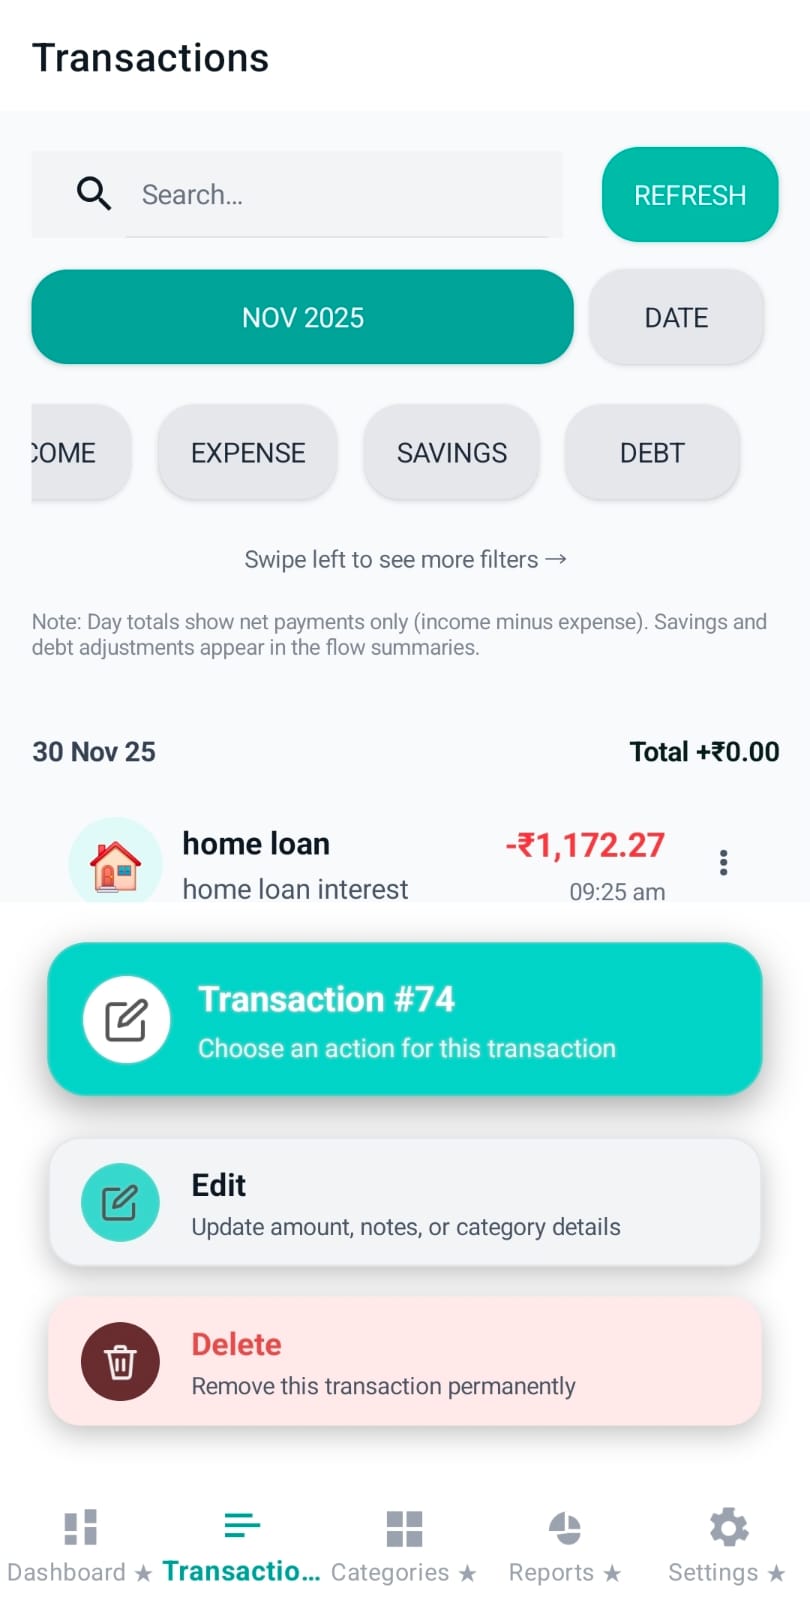
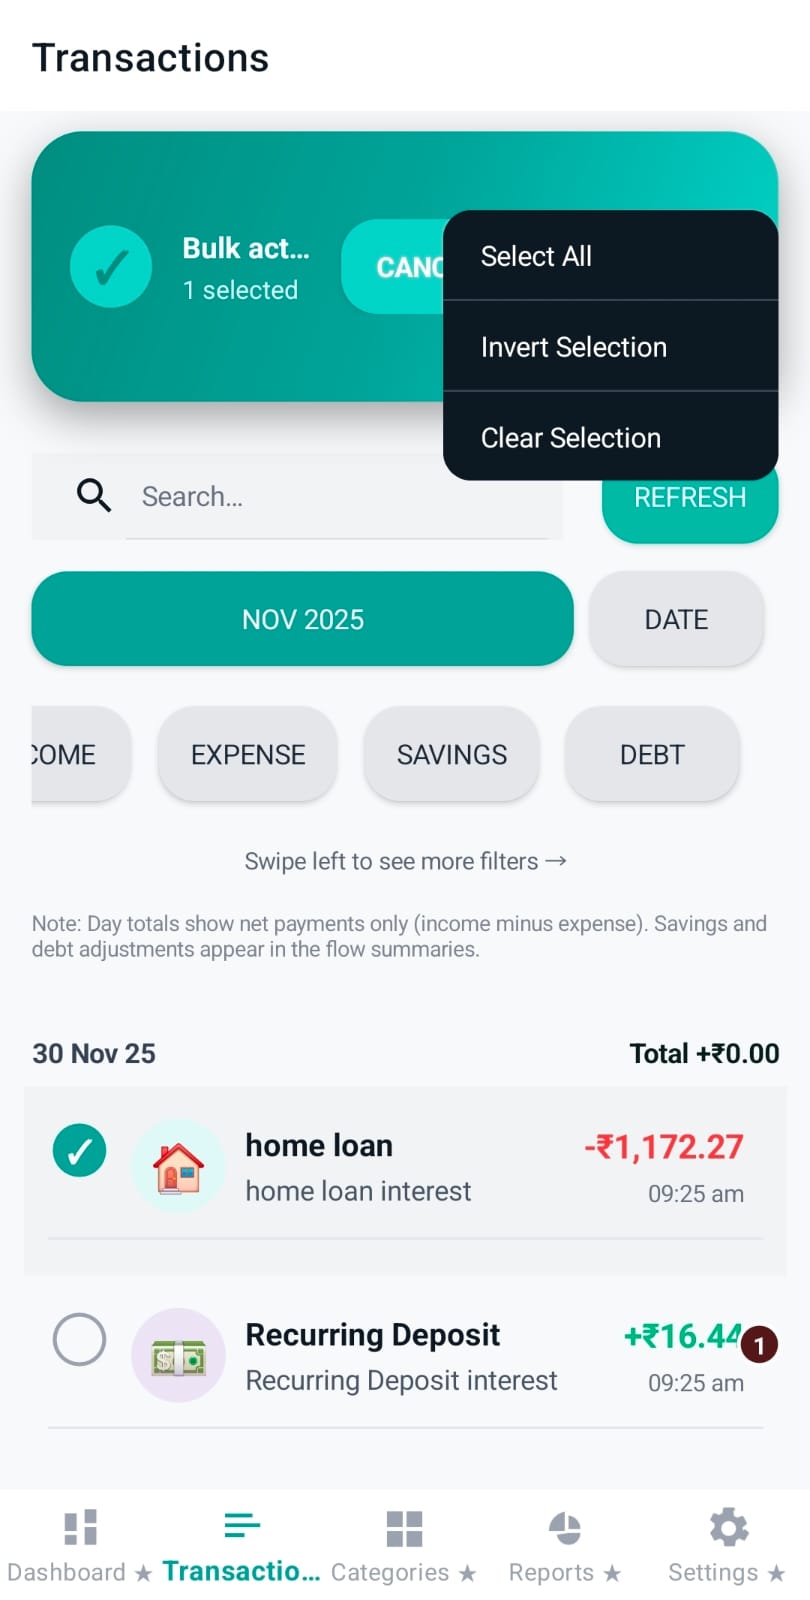
For cleanup tasks (e.g., deleting multiple staged notifications), Pennie supports multi-select with a dedicated top bar:
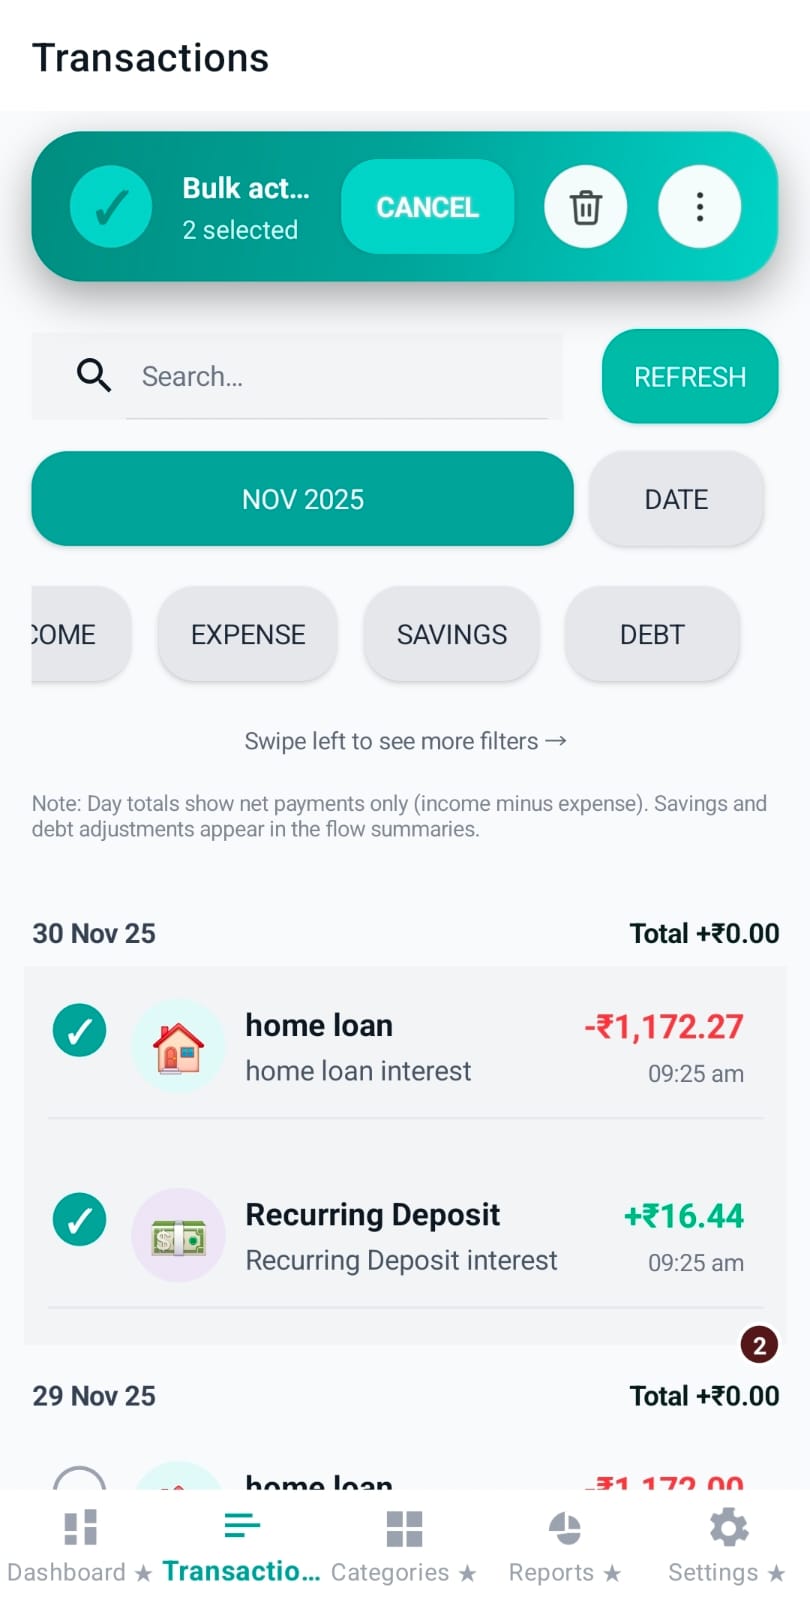
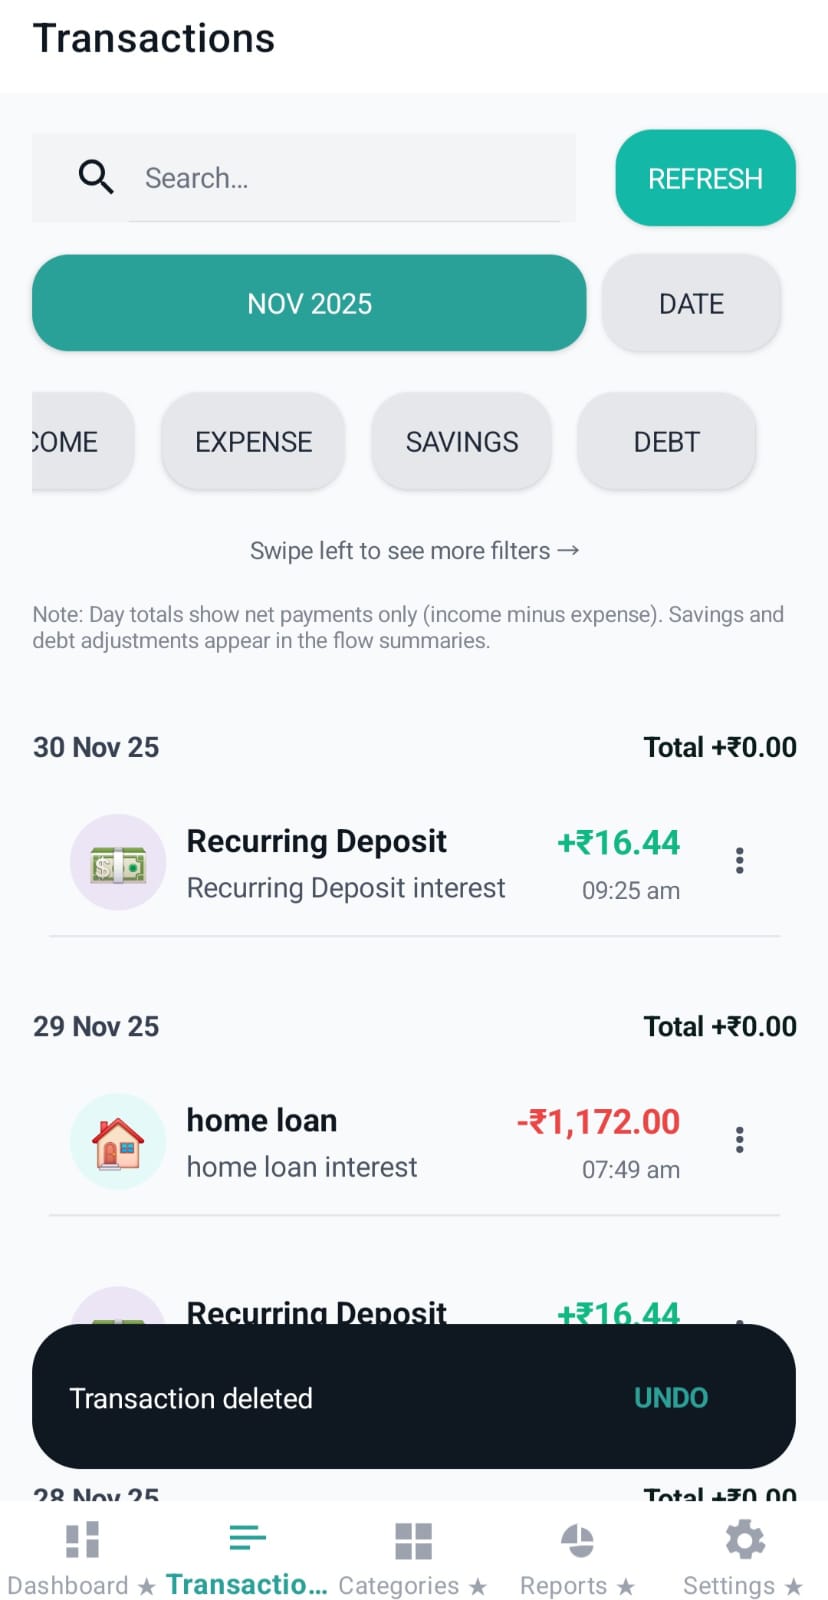
After deletions (single or bulk), Pennie shows a snackbar for a few seconds with an UNDO action. Undo restores the deleted batch, making cleanup safer.
The floating Add button stays available while browsing. It intelligently hides on scroll-down (to reduce visual noise) and reappears when the user scrolls up.
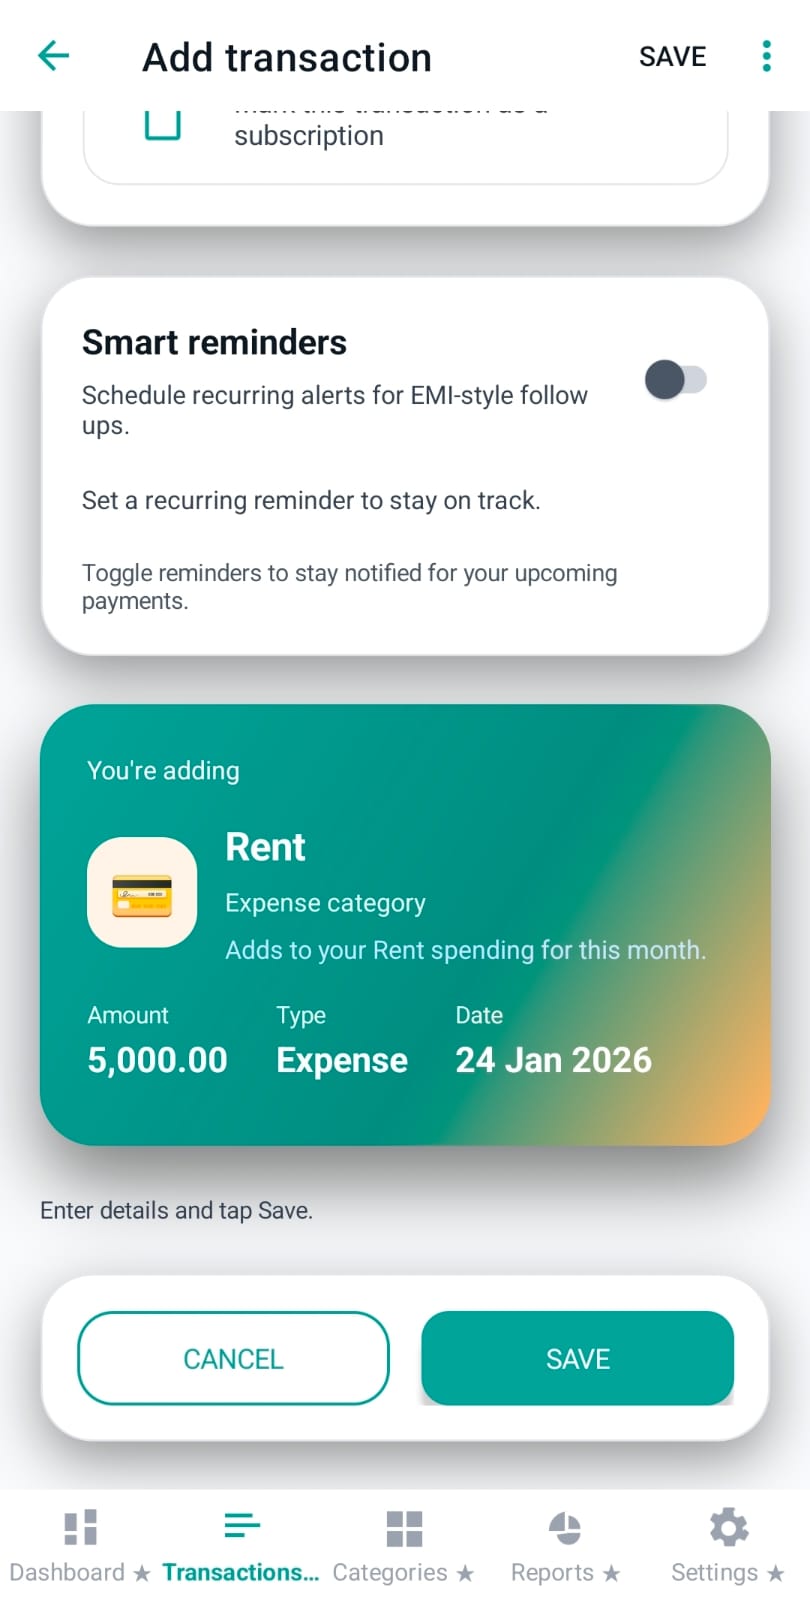
Add Transaction is where Pennie converts a “money event” into a structured entry. It supports normal allocation/expense entries, Savings and Debt balance updates (Premium), Transfers (Premium), optional reminders (Premium), and lightweight enrichment via sub-category + notes.
Users typically open this page from:
The page provides two consistent actions:
UX detail: Pennie shows Save/Cancel both in the top toolbar and again at the bottom so users don’t need to scroll back up after filling fields.
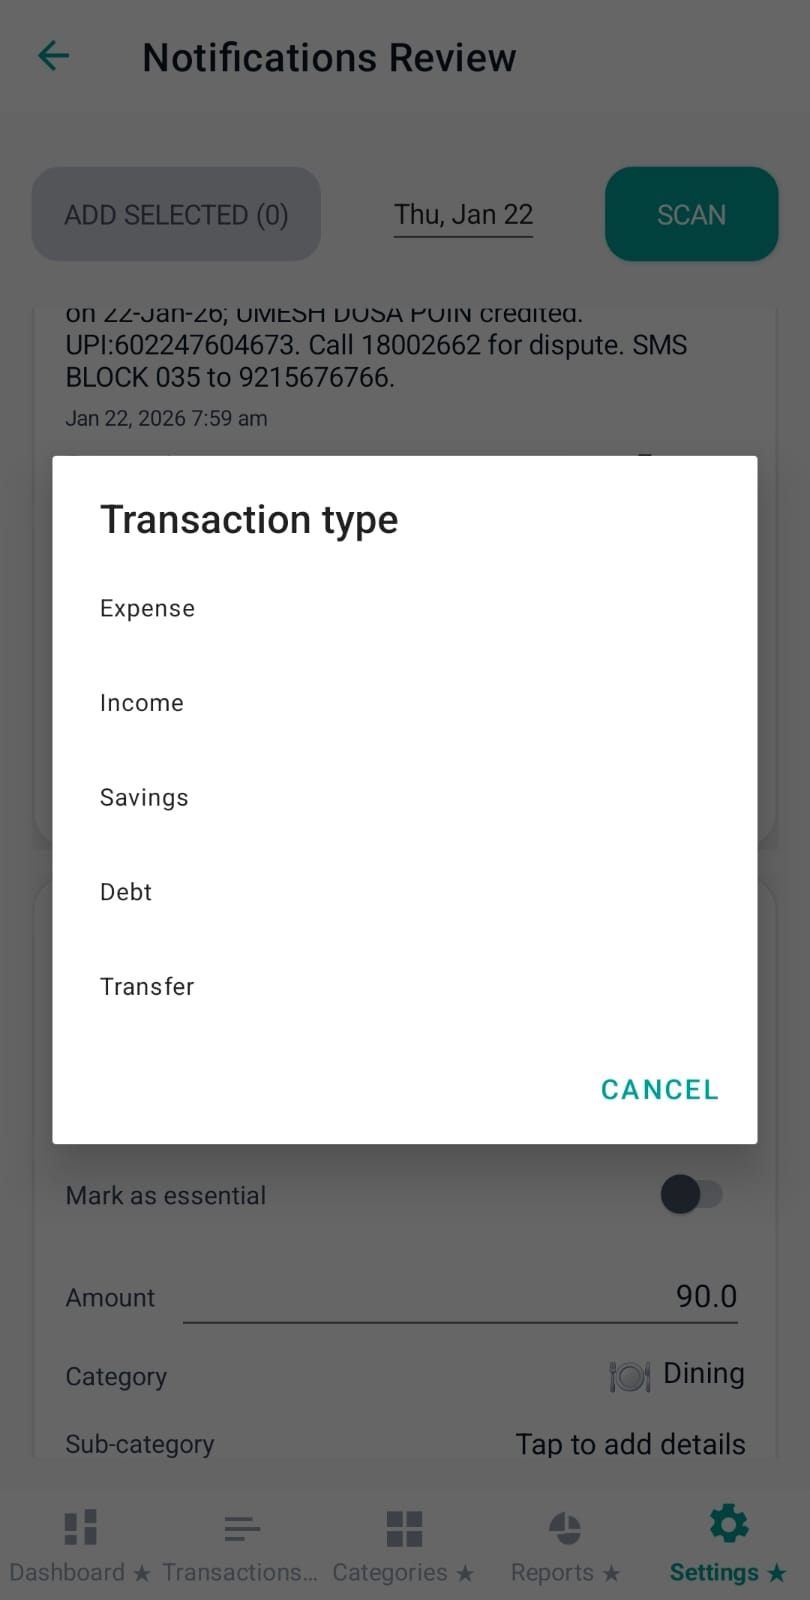
At the top of the form, a horizontal chip row selects the entry type:
Validation: Pennie blocks saving for Premium-only types when Premium is not active.
The category field is the core classifier. It shows:
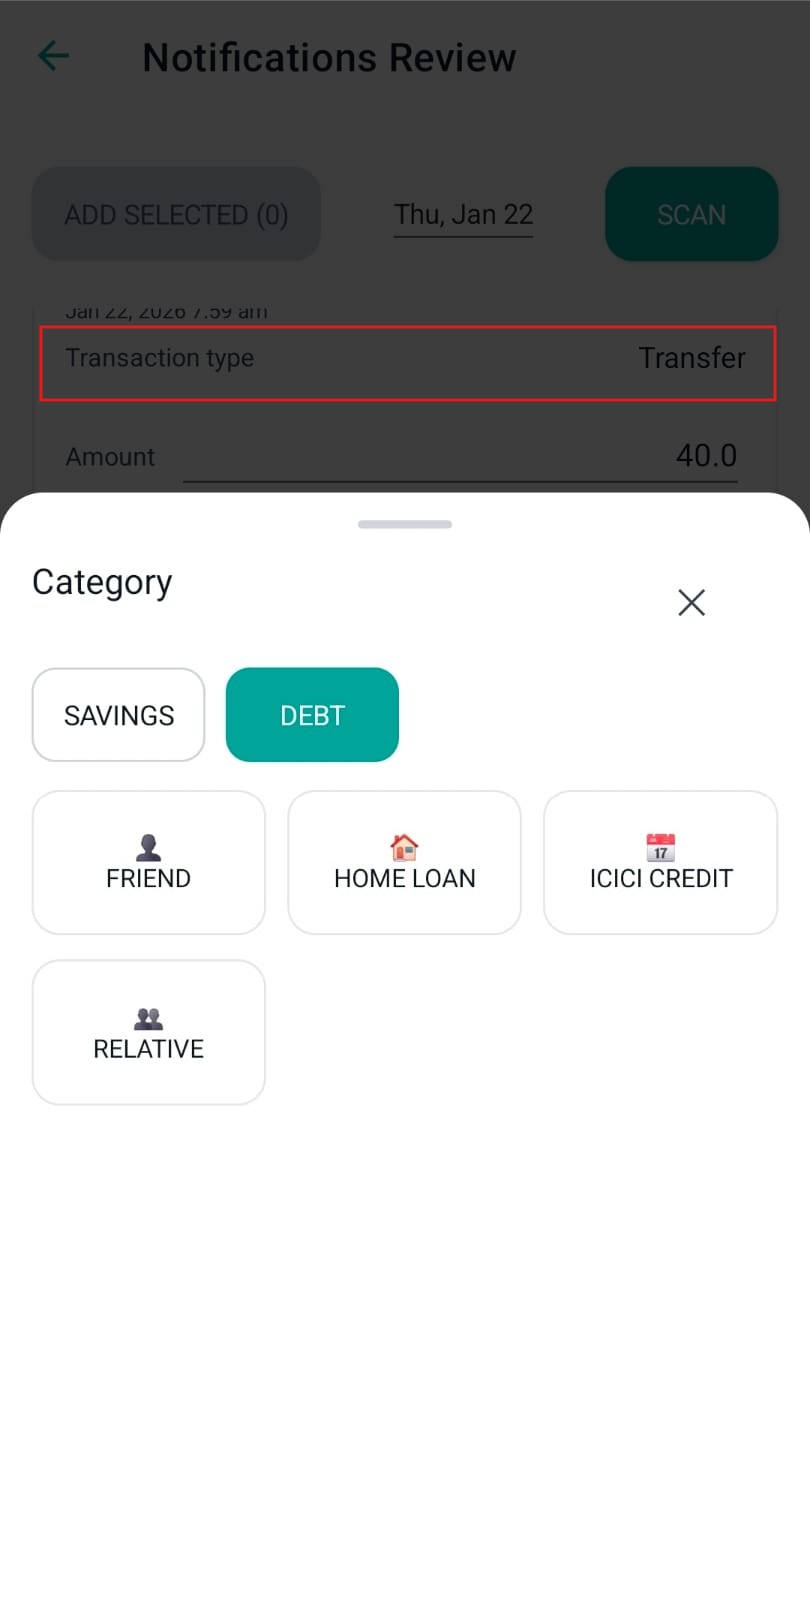
When the type is Transfer, the same UI expands to a two-part selection:
Rule: Transfer destinations are constrained (Savings or Debt categories), and “From” and “To” cannot be the same category.
When the selected category doesn’t match the current transaction type, Pennie surfaces a contextual info message to prevent wrong classification (for example, choosing an Allocation category while Expense is selected).
The amount field is numeric with a visible currency symbol. Pennie displays a limit hint (for example “Up to 100,000”) and validates:
When the type is Savings, Pennie adds a “Savings balance” toggle:
When the type is Debt, Pennie adds a “Debt balance” toggle:
The date field controls which month/day the transaction appears under in the Transactions timeline and in month totals. It defaults to “today” but can be backdated for missed entries.
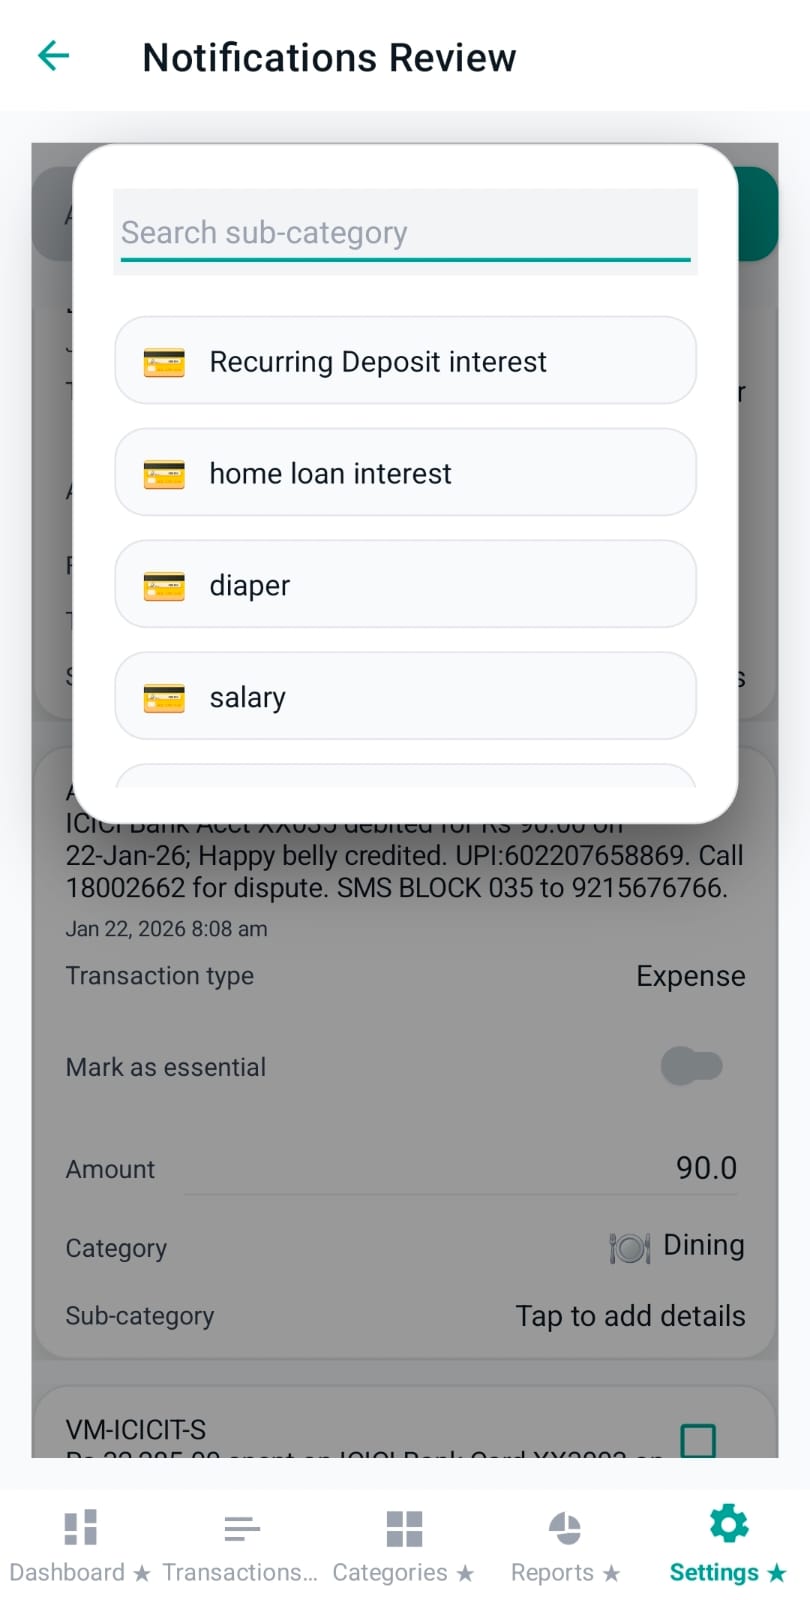
Sub-category is a lightweight enrichment field (e.g., store name, restaurant name, route). When tapped, Pennie opens an overlay dropdown with:
The note field is free-text and supports multi-line input. It’s useful for reminders context (e.g., “rent for Jan”, “split with friend”, “paid via UPI”).
When applicable, Pennie shows an “Essential / Non-essential” toggle. This classification is used for reporting and analysis, and can be constrained by the selected category (some categories may force a specific mode).
Pennie can mark a transaction as a Subscription. This helps the Dashboard subscription panel understand recurring commitments and keep them visible.
Premium users can enable Smart reminders for EMI-style follow-ups. The reminder card includes:
Validation: if the configuration is invalid, Pennie shows a warning message inside the card (for example, missing subject text).
Near the bottom, Pennie shows a colored summary card that mirrors what will be saved: category, amount, type, and date. This acts like a final confirmation before the user taps Save.
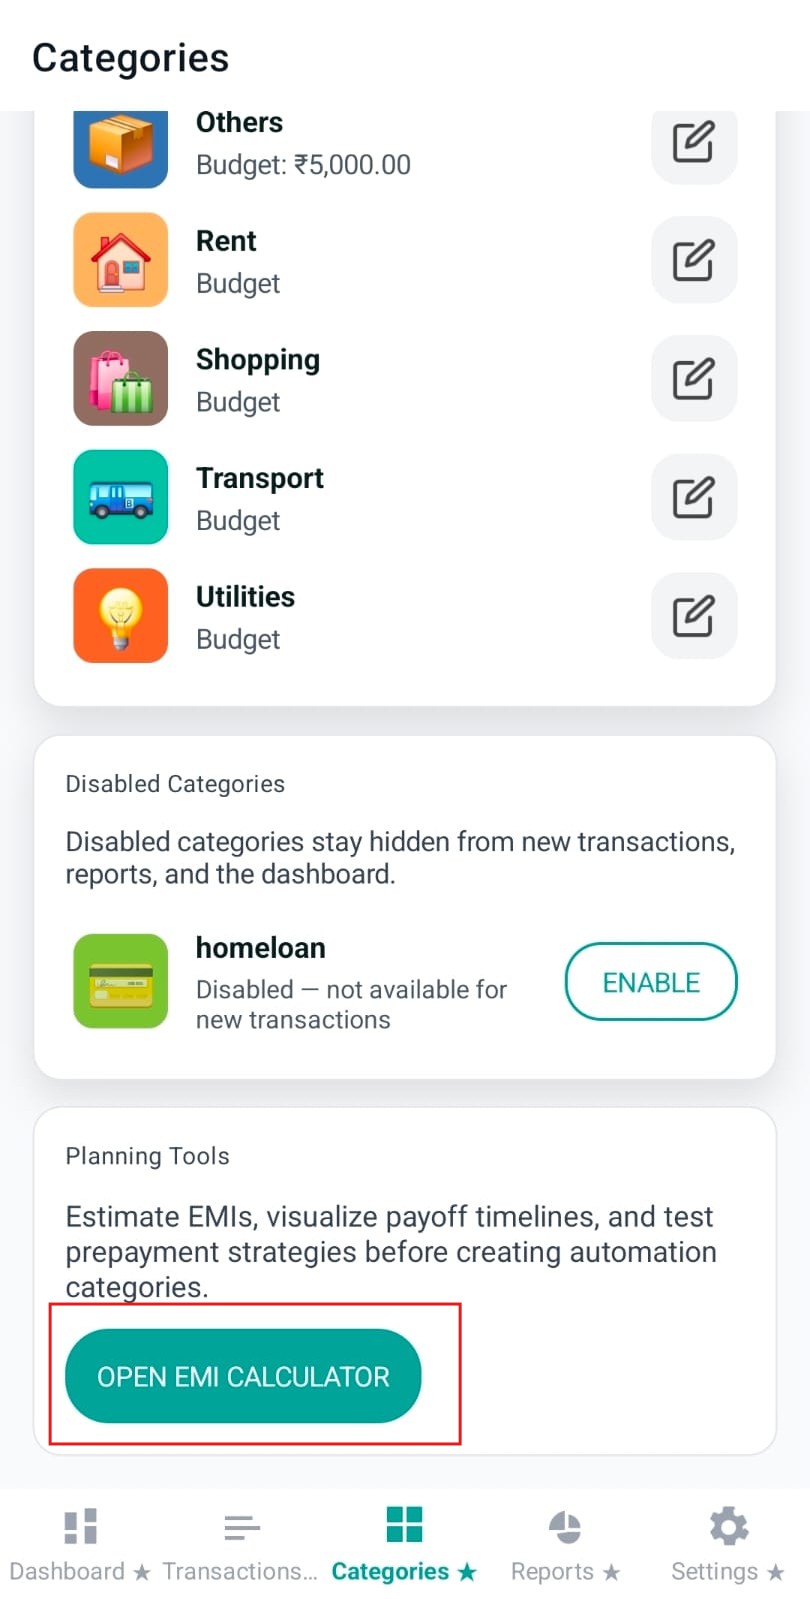
This tab is the control center for how Pennie interprets money. Budgets (expense planning), Savings goals, and Debt tracking are all configured here, and the rest of the app (Transactions, Dashboard, Reports) reads these settings.
Categories is intentionally split into two layers:
Workflow: You always start by selecting a category. That activates the editor, scrolls the page to the top, and focuses the most relevant field.
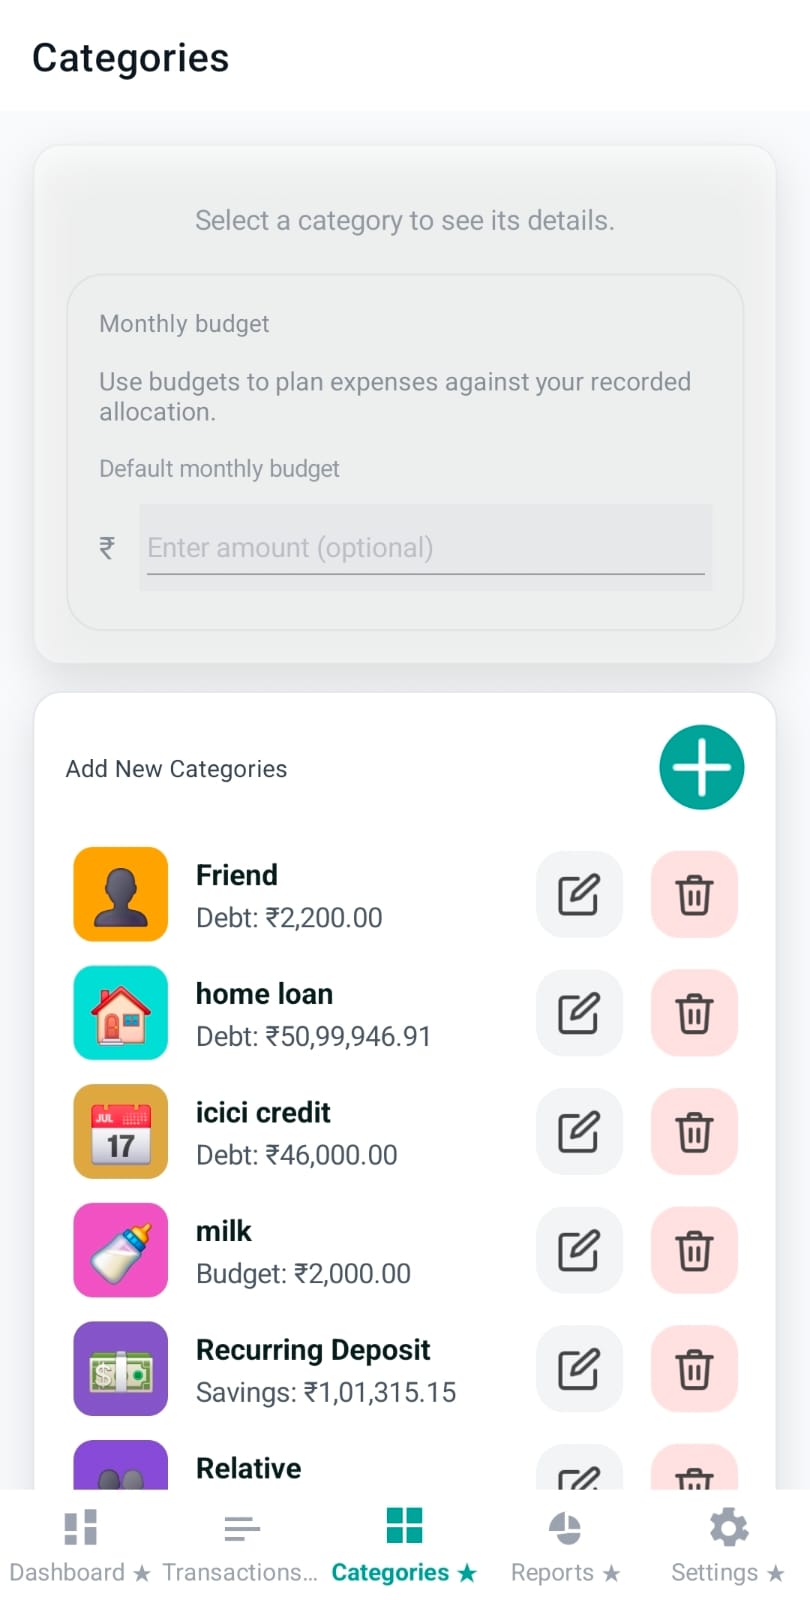
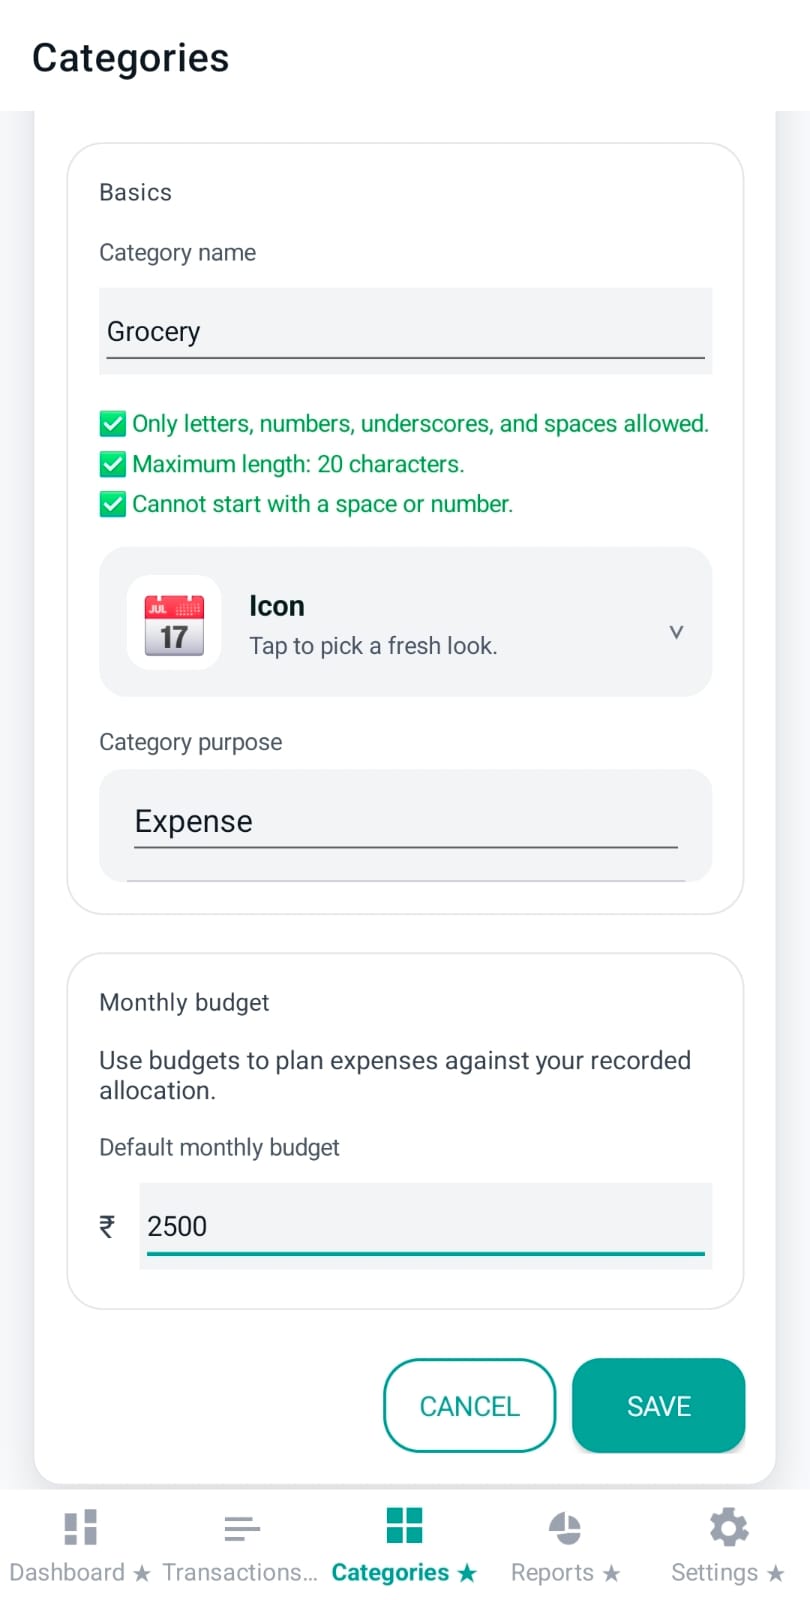
Pennie includes default categories out of the box. You can edit limited fields on them (for example, budgeting), but name and icon are fixed.
Creating and managing your own categories is a Premium feature. The “Add New Categories” section shows a “Get Premium” CTA until Premium is active.
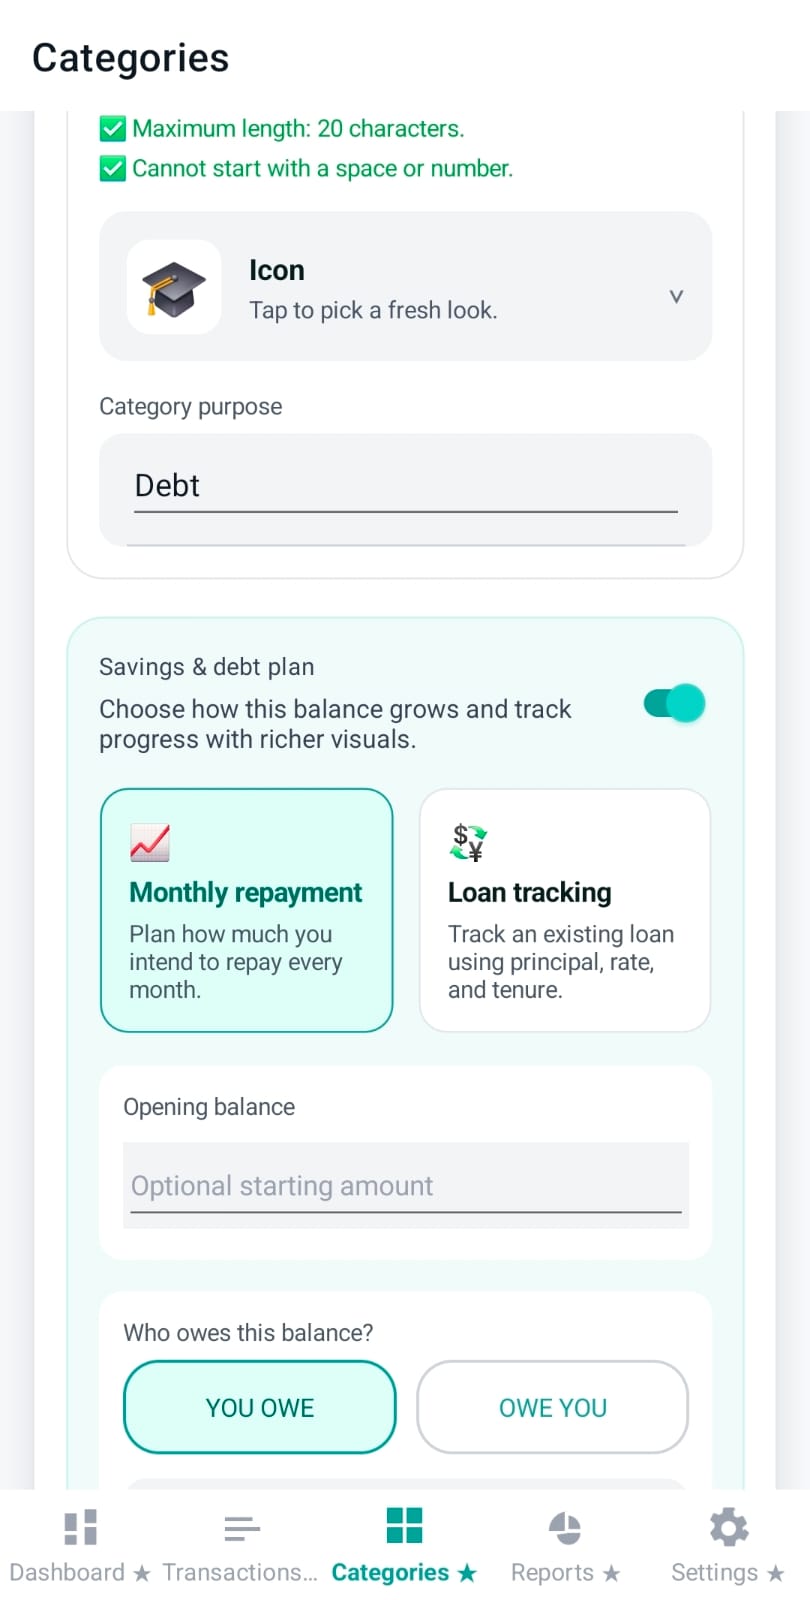
When editing a custom category, Pennie enforces simple, “safe” naming rules (so category labels remain clean everywhere):
Custom categories can also pick an emoji/icon via the icon picker.
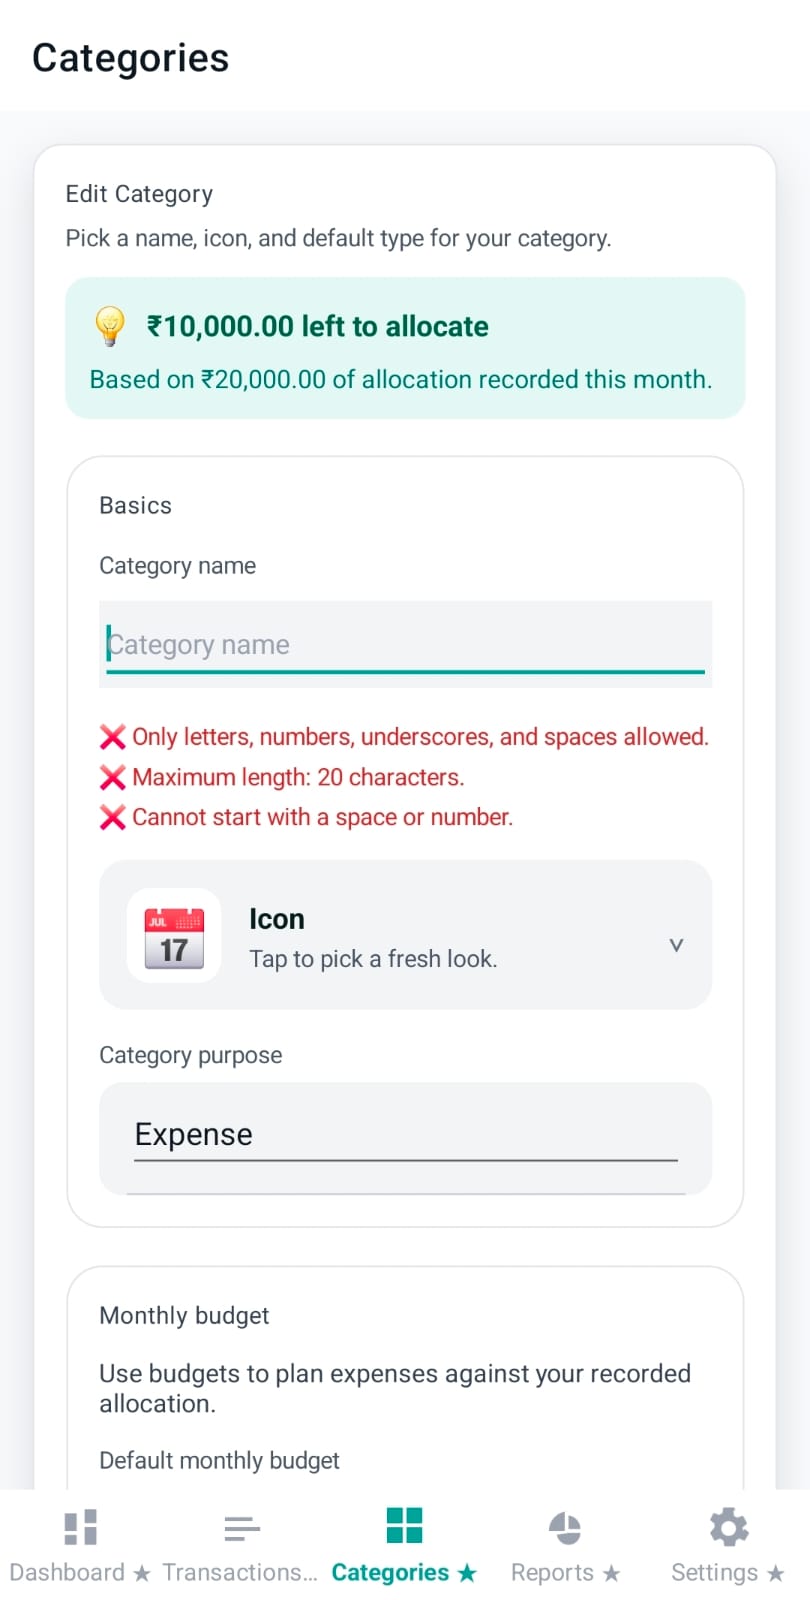
Every category has a “purpose” that changes how Pennie treats totals and planning:
Important: Switching the purpose resets or hides fields that don’t apply (for example, Expense budgets are cleared when switching to Savings/Debt).
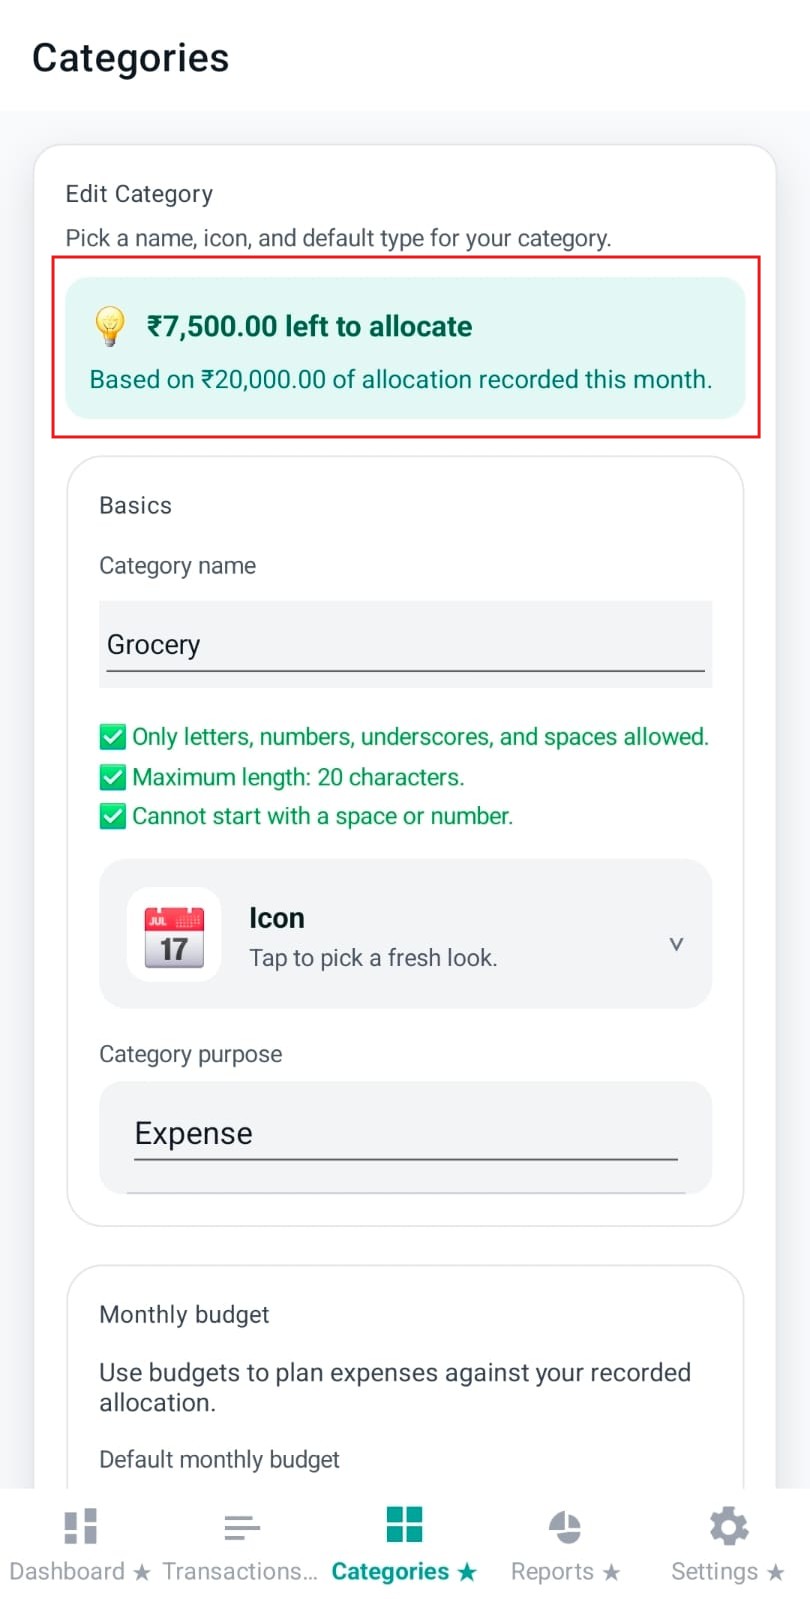
For Expense categories, Pennie supports an optional default monthly budget. This is used to plan spending against the allocation you’ve actually recorded for the current month.
While editing an expense budget, a status banner explains the situation in real time:
Insight: The banner evaluates the total budget across all categories, not only the one you’re editing, so you always know whether your overall plan is feasible.
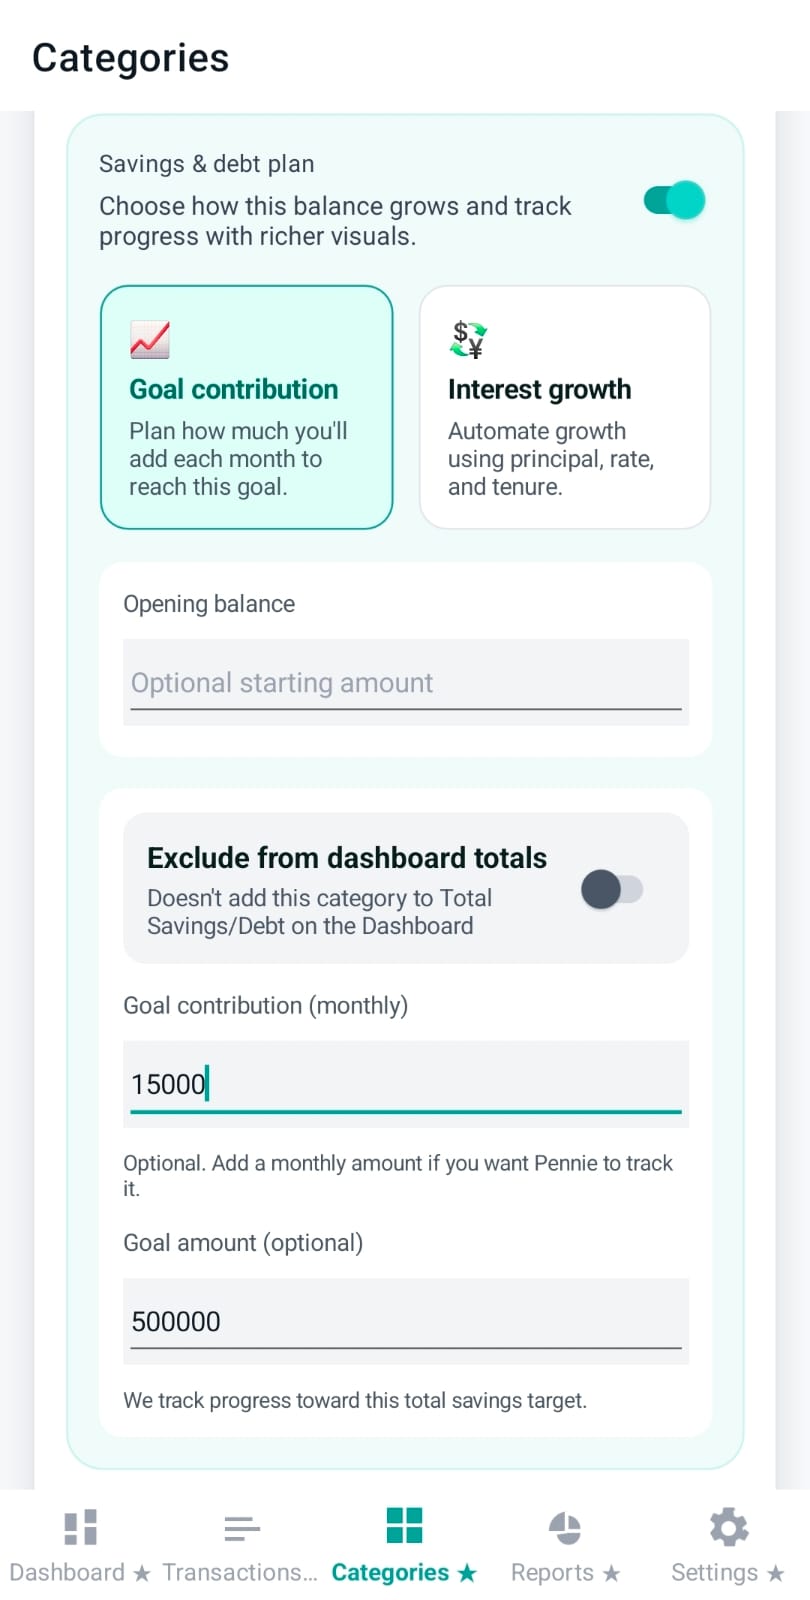
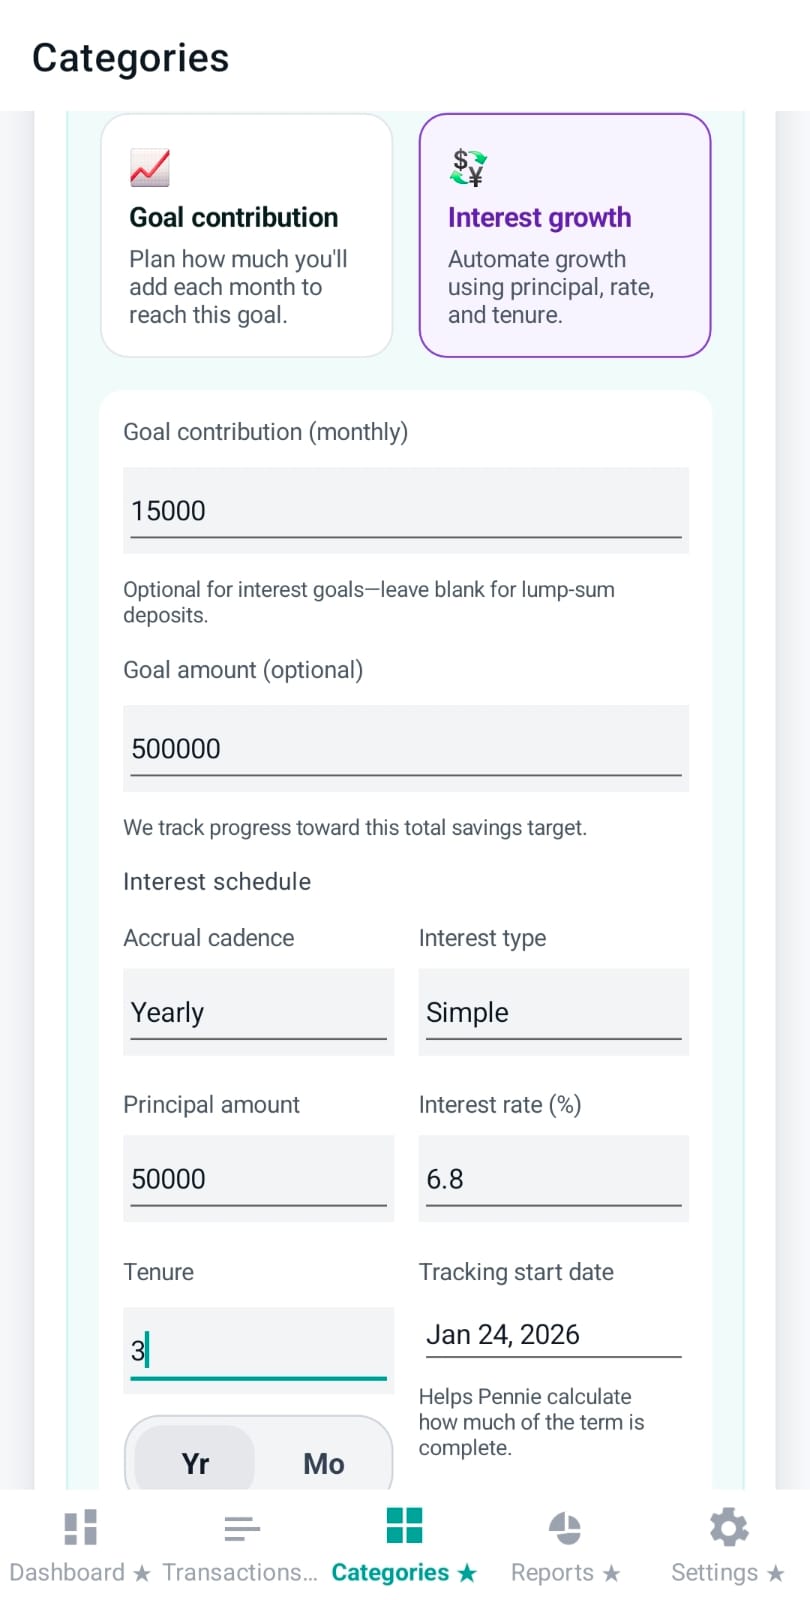
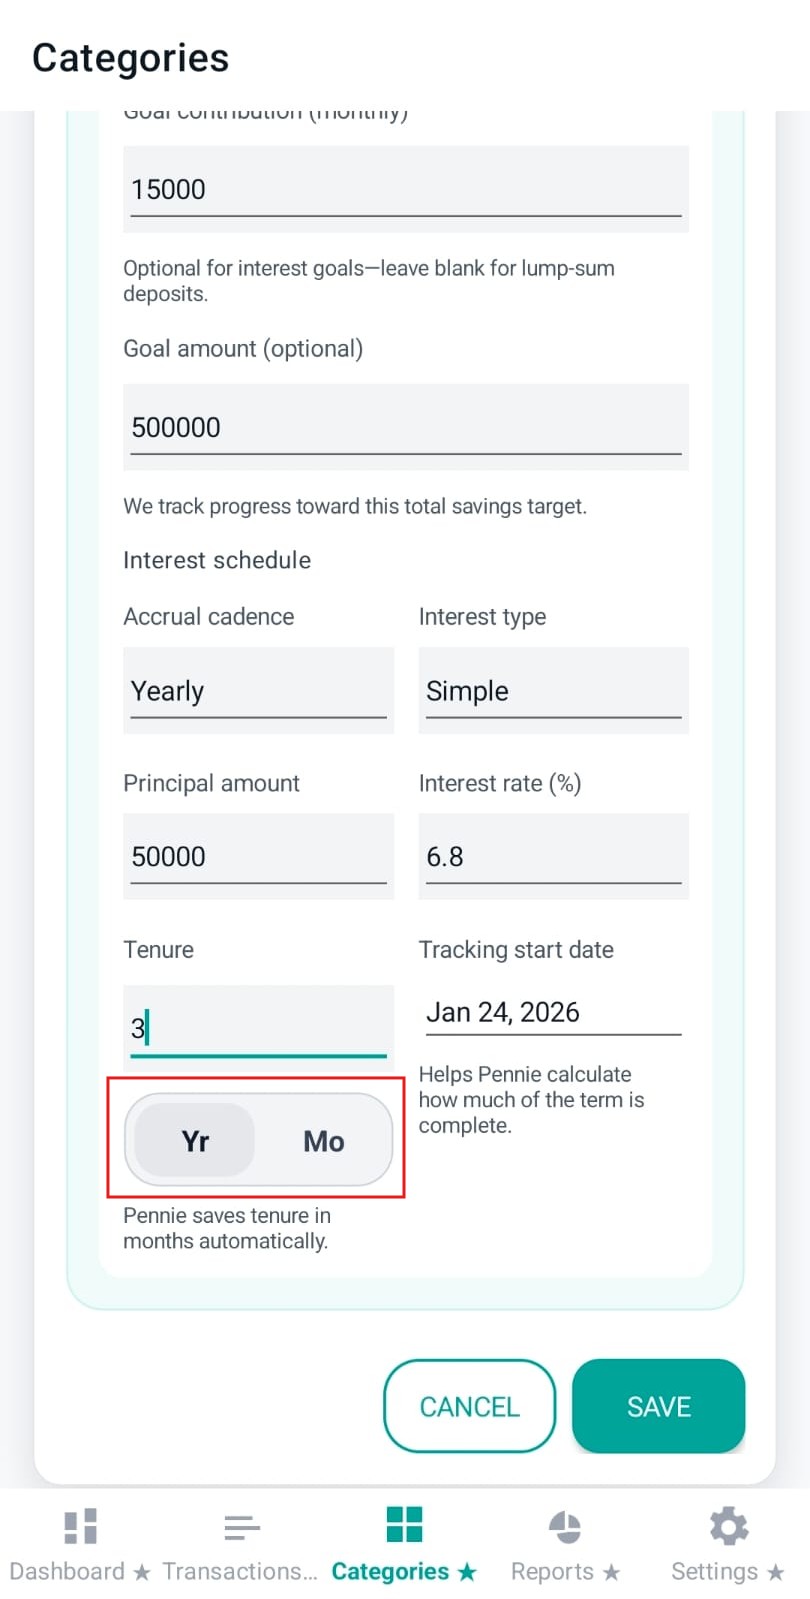
When a category is set to Savings, the editor switches into a “plan” configuration. These fields drive balance tracking and Dashboard visuals.
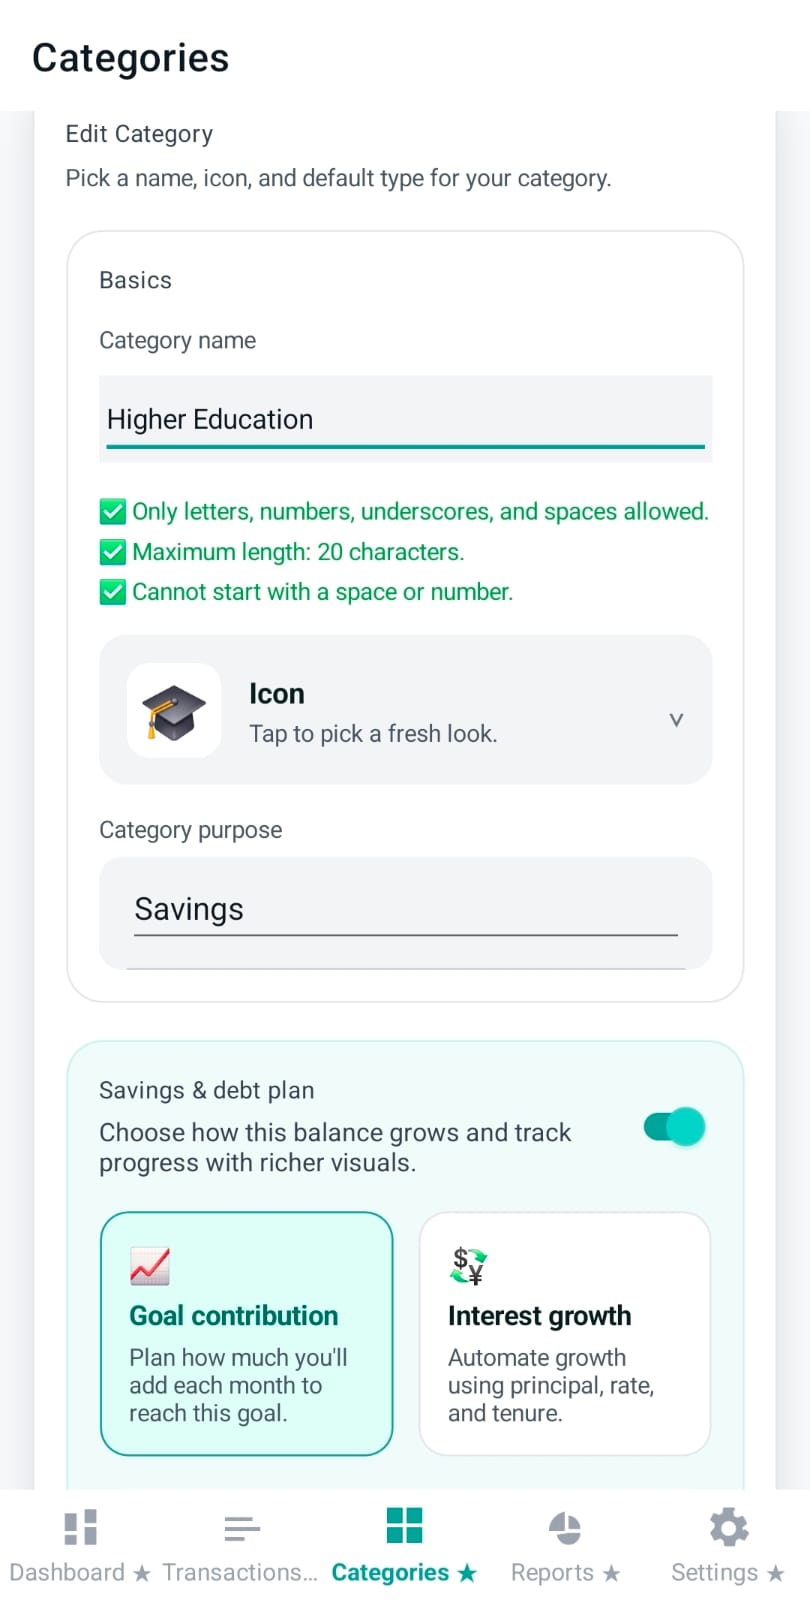
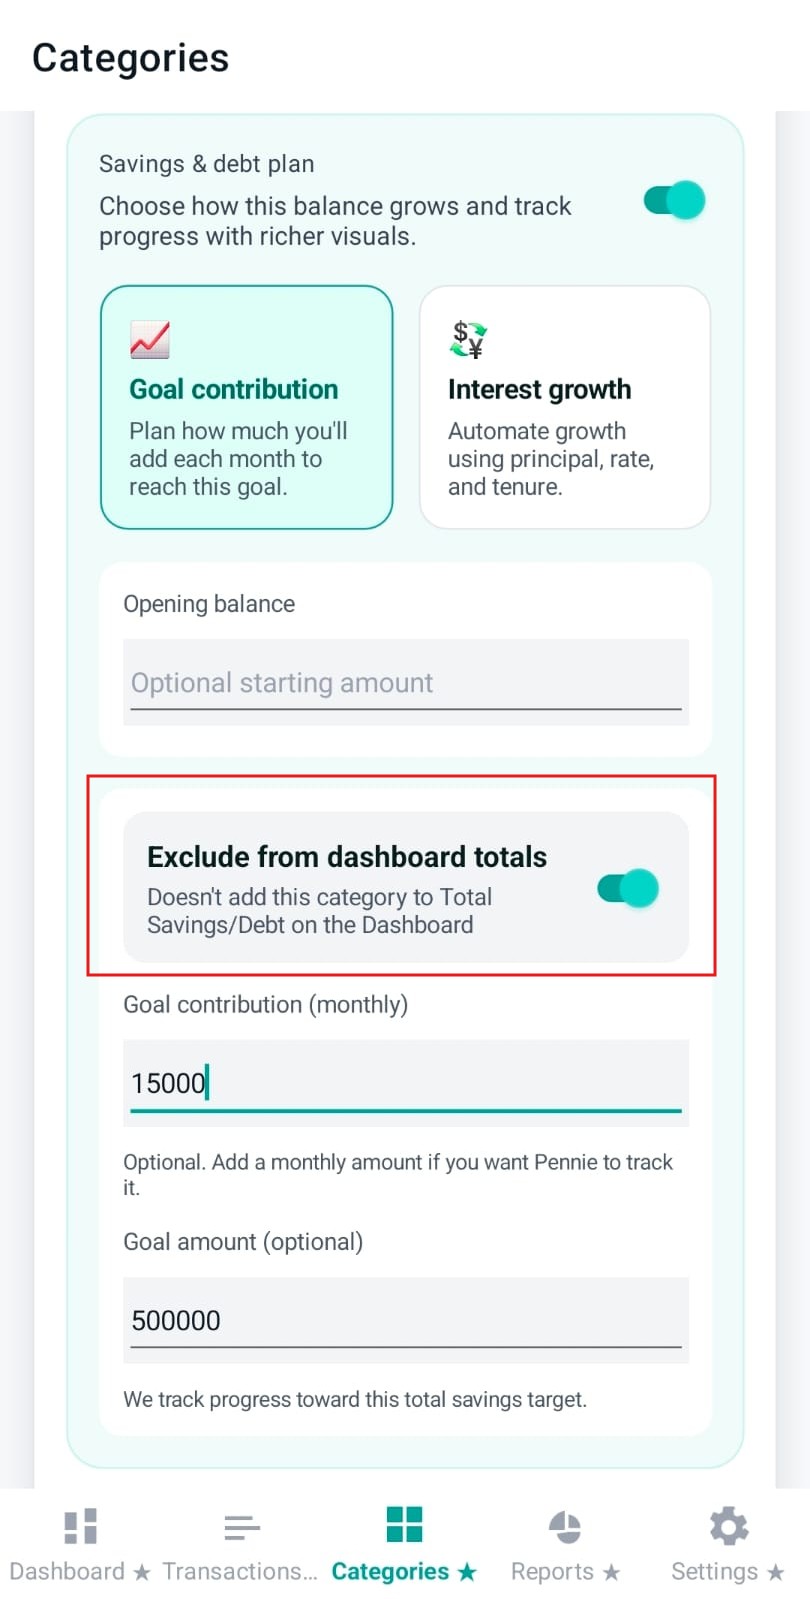
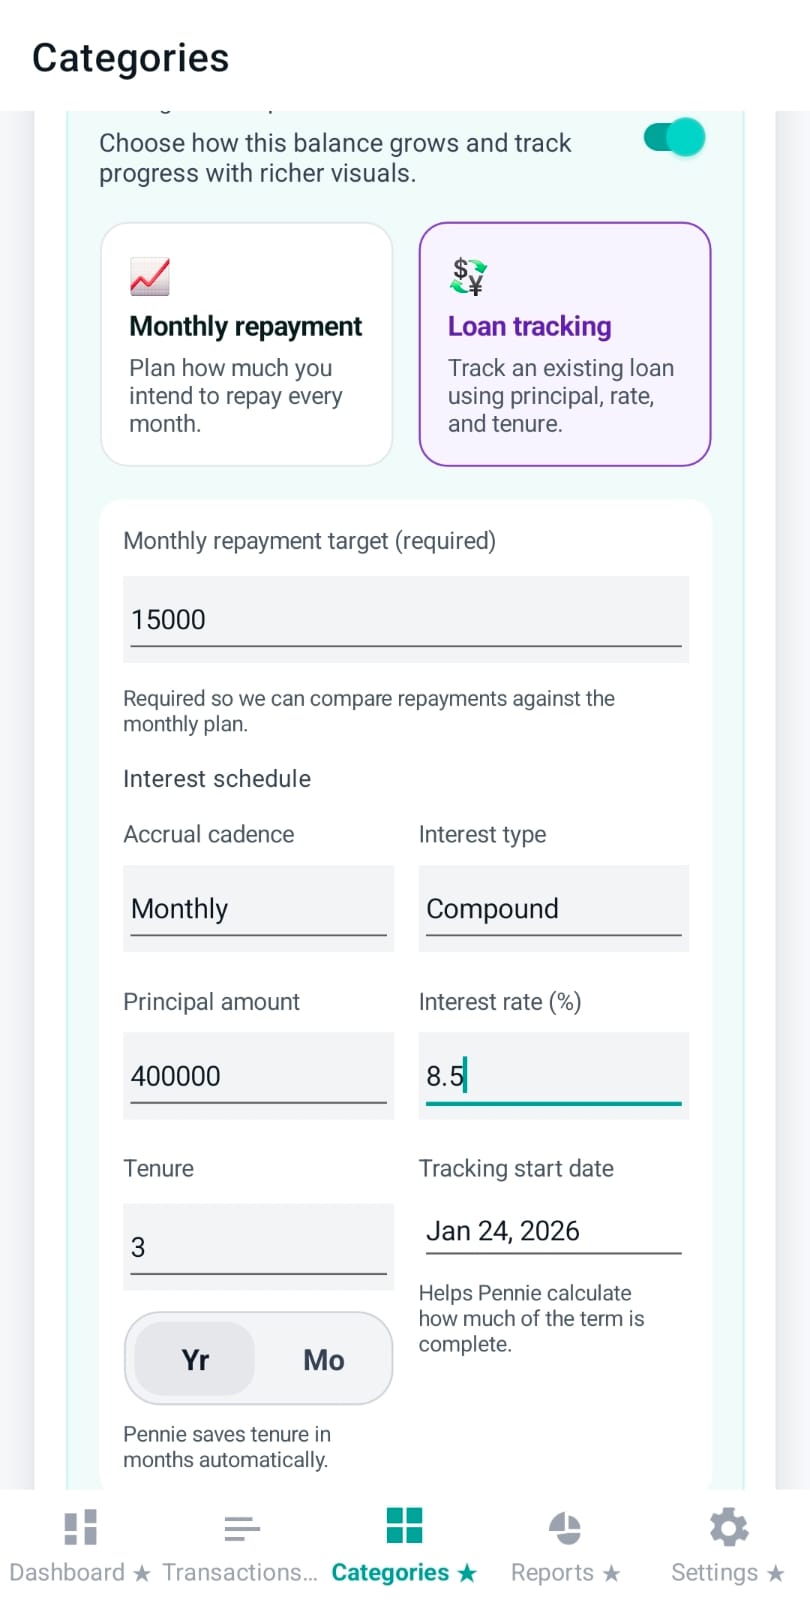
If you choose Interest deposit for a Savings category, Pennie exposes a loan/savings-style interest configuration so growth can be tracked more accurately over time.
Key fields:
Convenience: When interest is enabled and the monthly target is empty, Pennie may suggest a monthly target (based on principal + rate) to help you plan contributions.
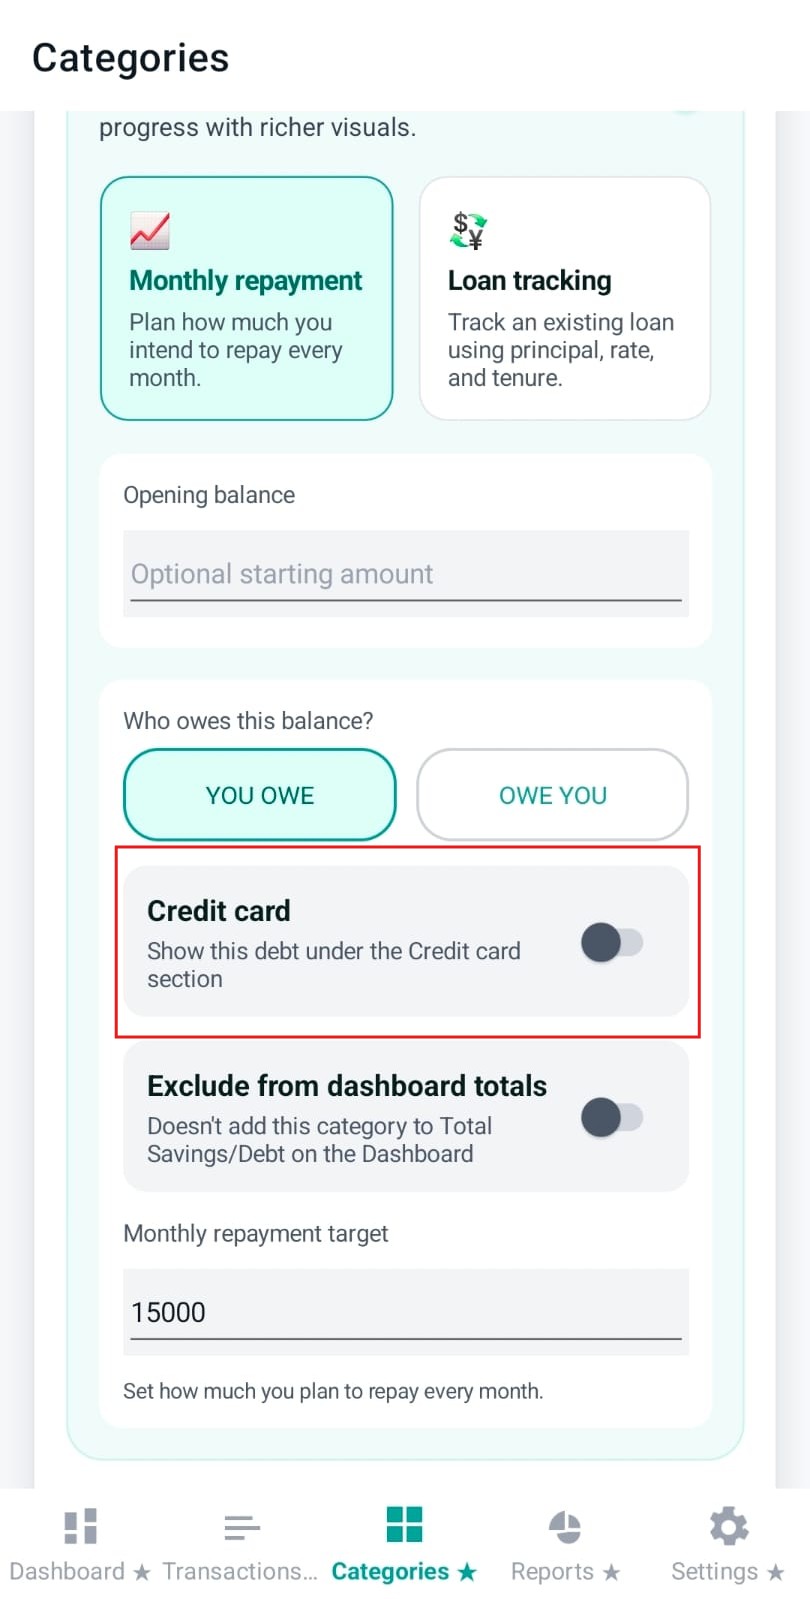
Debt categories model “relationship direction” explicitly so the UI can label targets correctly and interpret payments consistently:
Core fields for Debt categories:
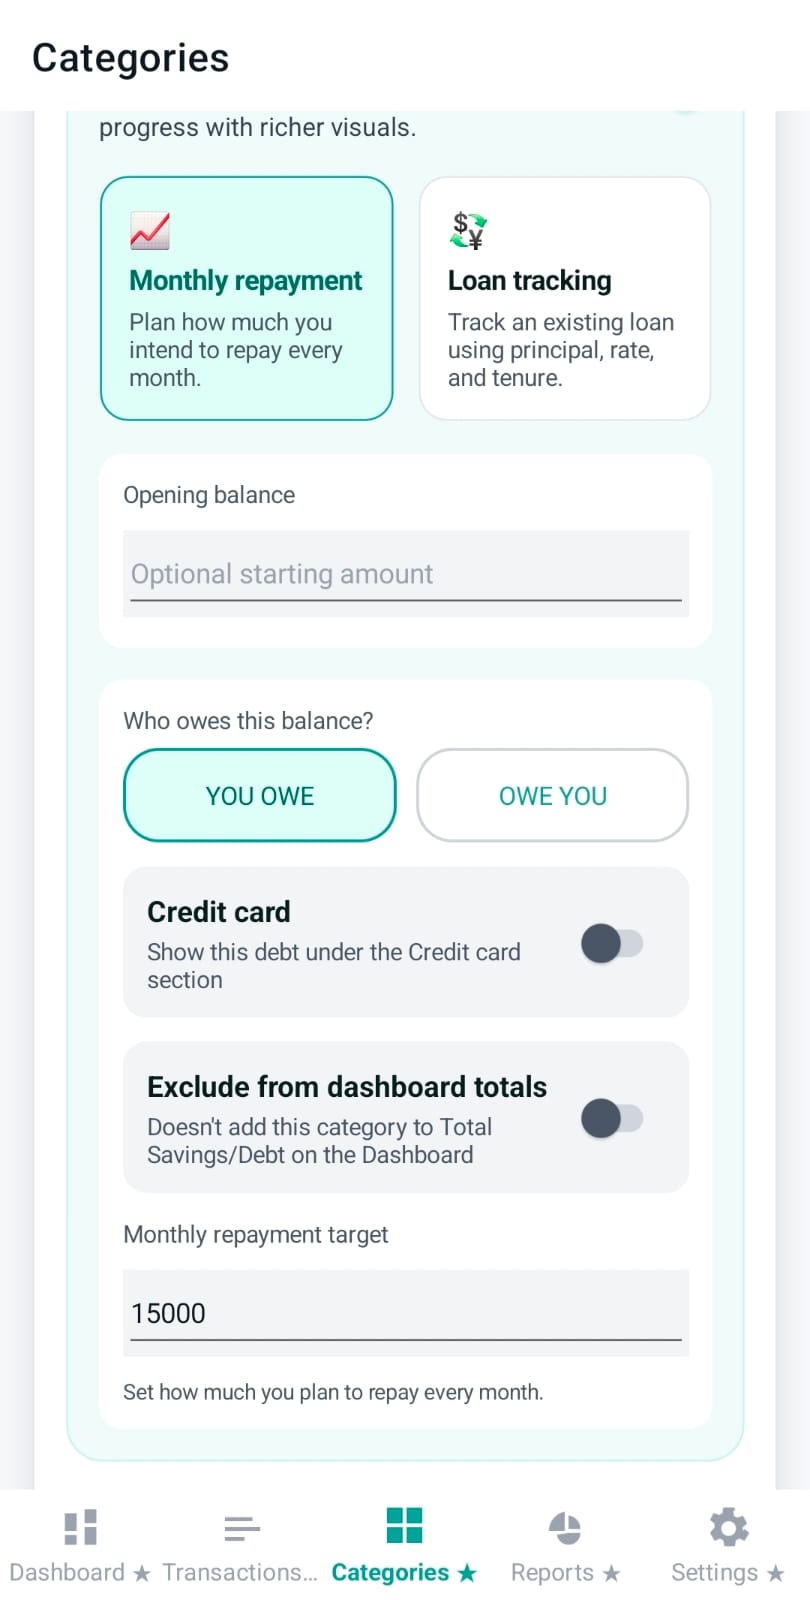
When interest tracking is enabled for a Debt category, Pennie treats it like a loan plan:
Design detail: in interest mode, Pennie locks the debt direction to “You owe” to keep the math and labels consistent.
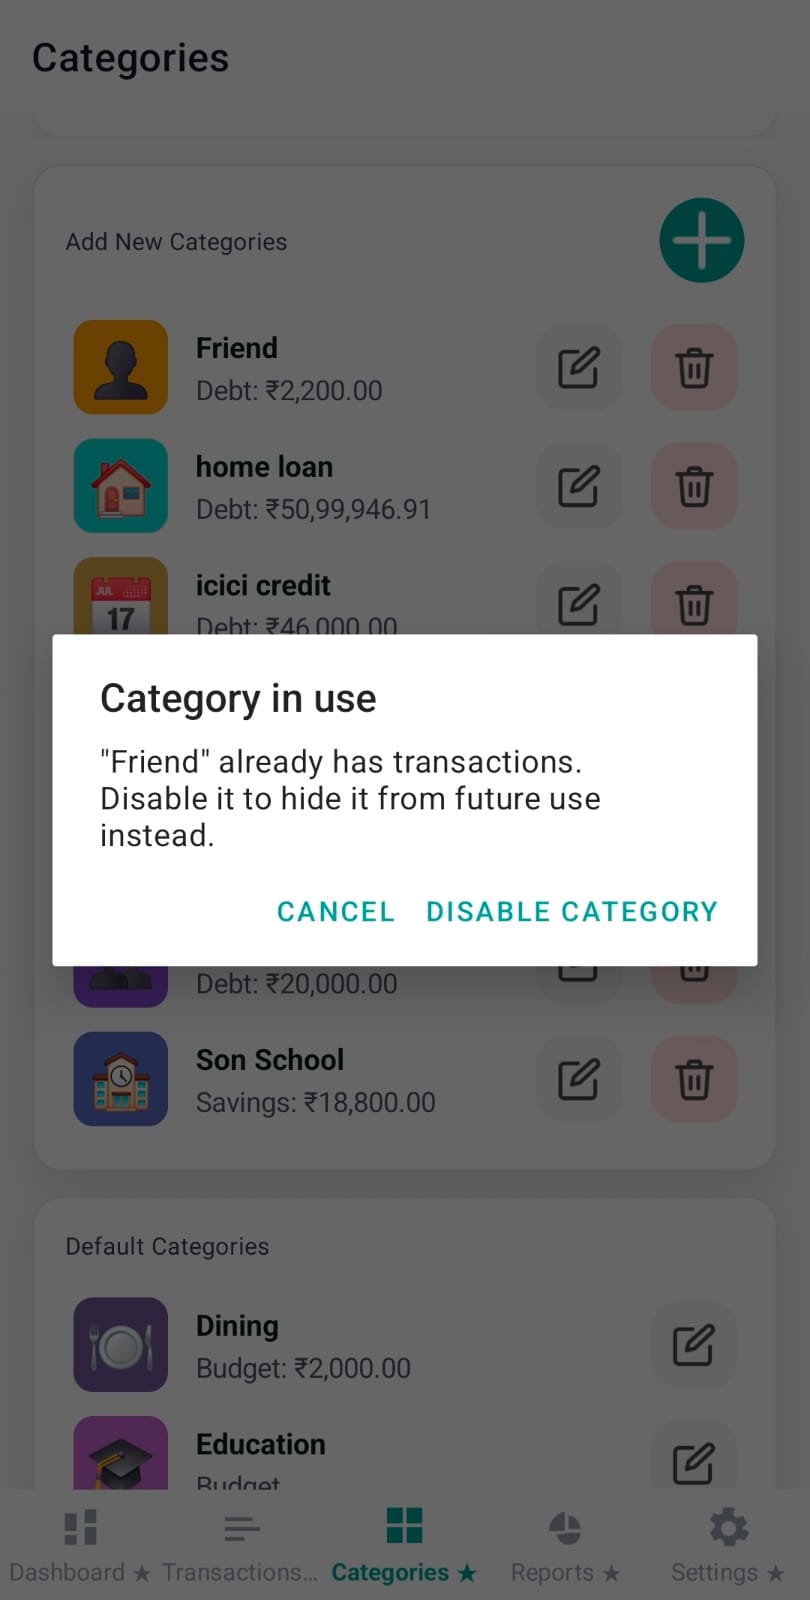
If a custom category already has transactions, Pennie encourages disabling it instead of deleting. Disabled categories:
The Categories tab also hosts a small “Planning Tools” section. Premium users can open the EMI planner to estimate loan payments and explore payoff strategies before setting up debt automation.
Read the full EMI Planner walkthrough →
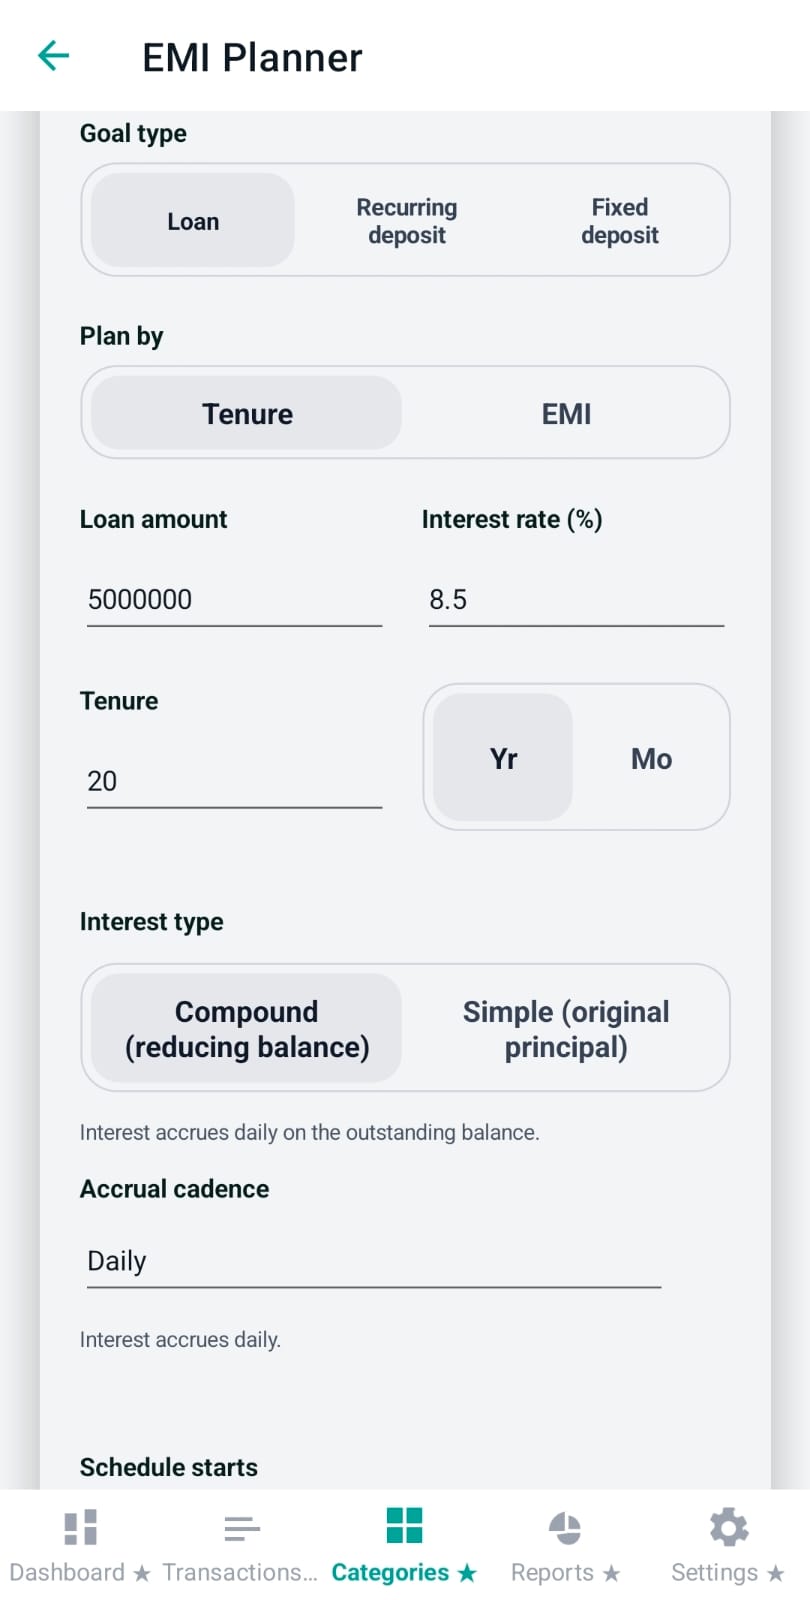
Pennie’s EMI Planner helps users model three goal types: Loan payoff, Recurring deposit (save monthly toward a goal), and Fixed deposit (park a lump sum and see maturity). The planner is interactive: you adjust fields, tap Calculate, and compare outcomes before you commit to a budget or a debt plan.
Most users will use the EMI Planner after they’ve set up categories (especially a Debt category). It’s a “what-if” tool that helps answer questions like:
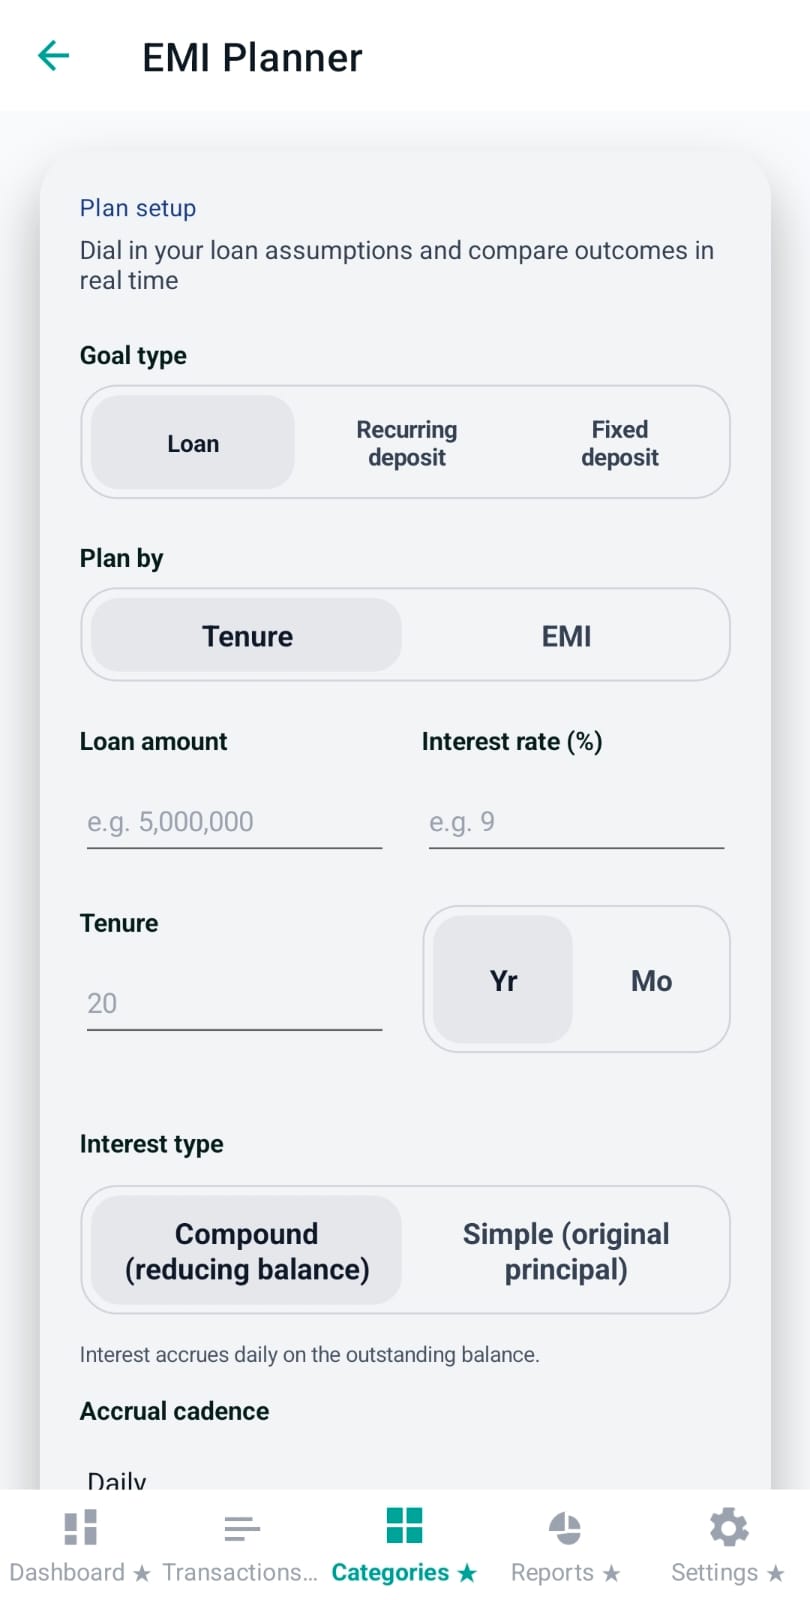
This segmented control changes the meaning of the entire form. It is the first decision because it changes both the input labels and the interpretation of results.
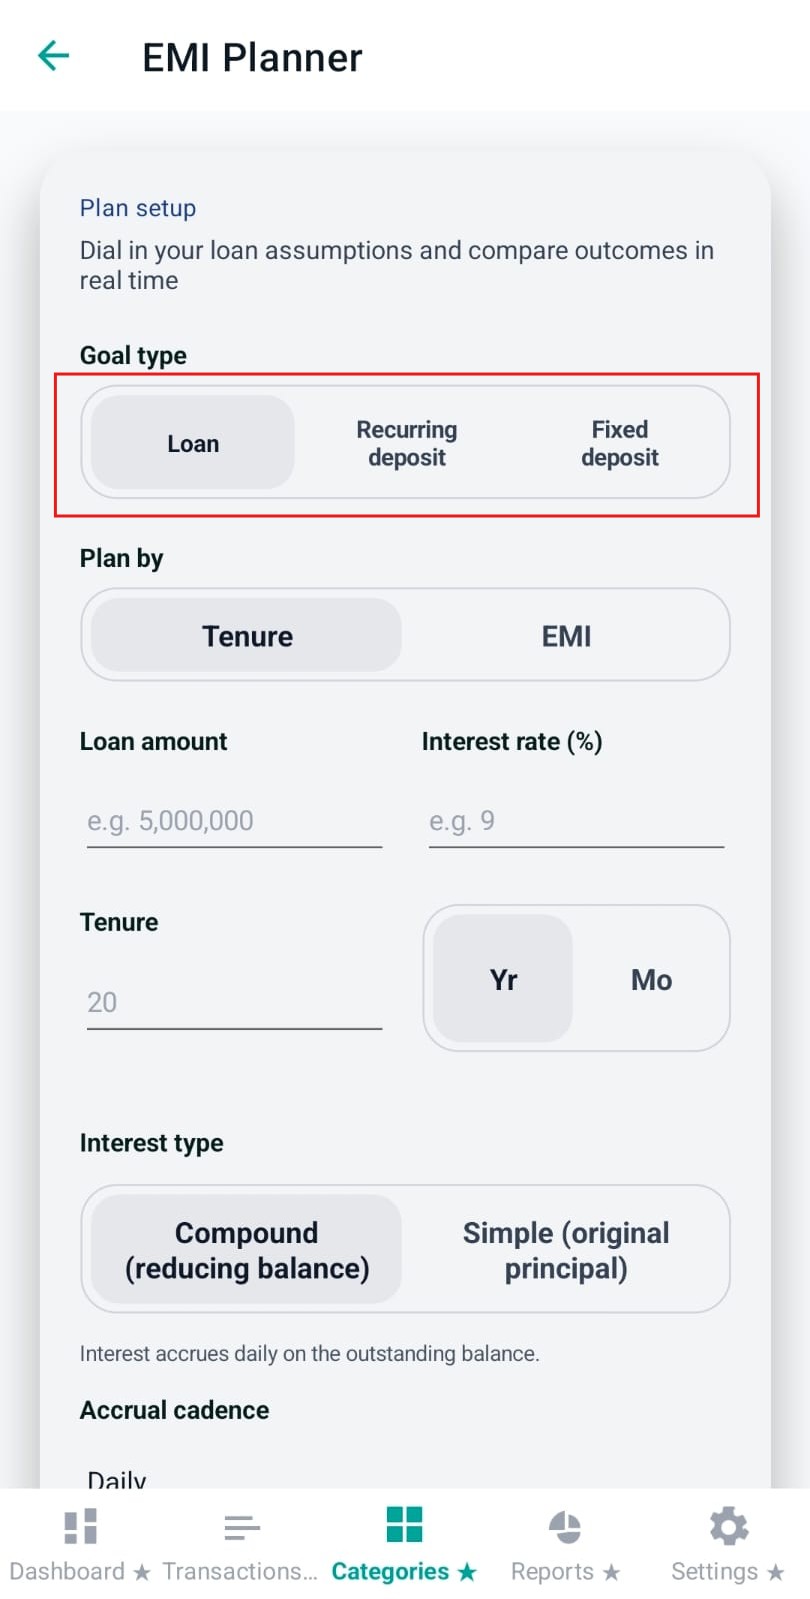
Planning tip: For “goal to buy something”, Recurring deposit is the simplest way to translate your goal into a monthly habit (what you need to put away each month).
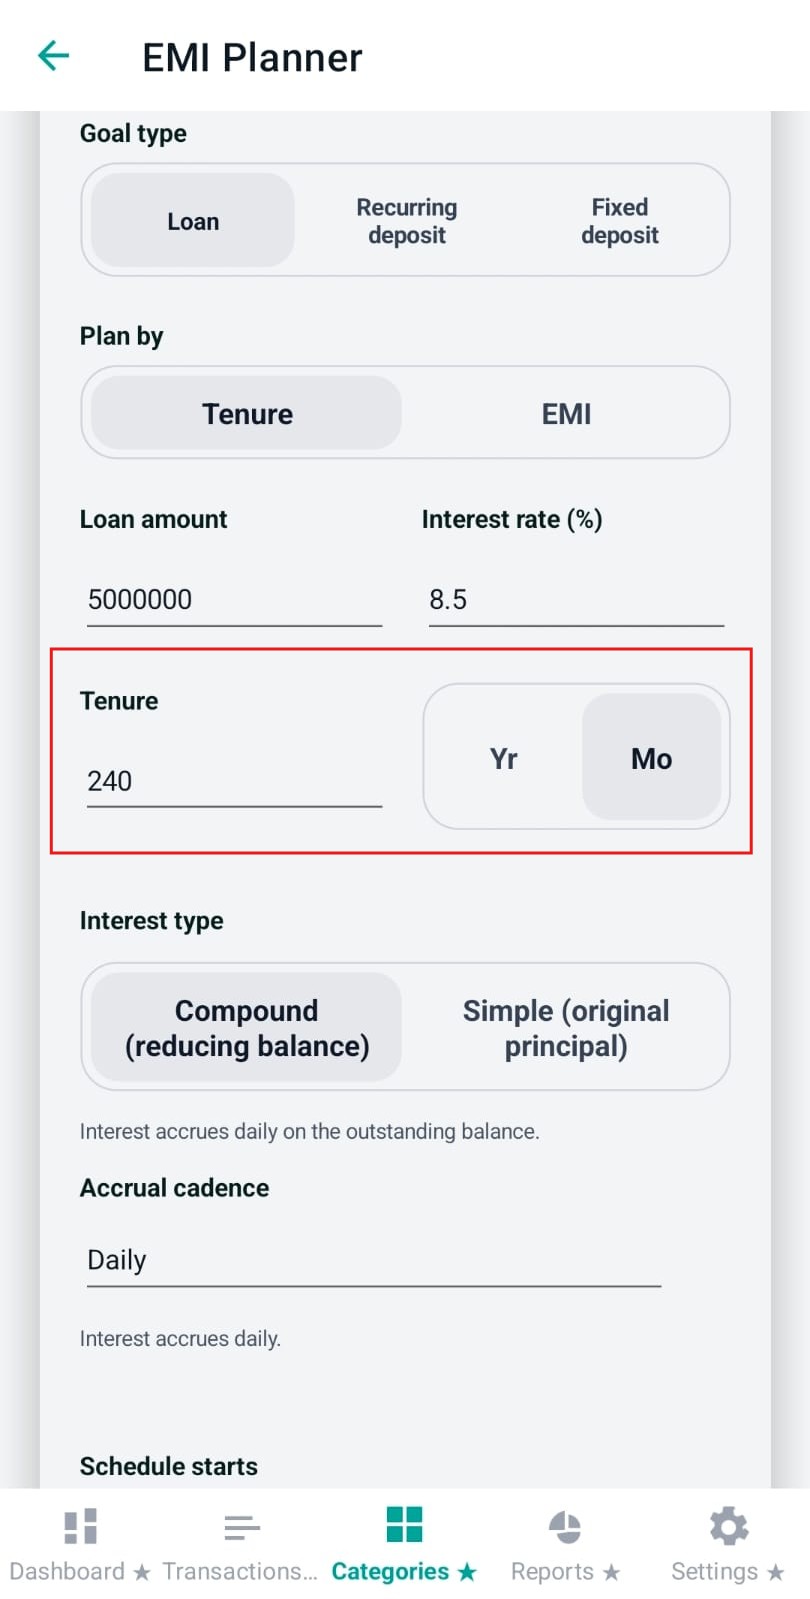
When Goal type is Loan, Pennie lets you choose the calculation basis:
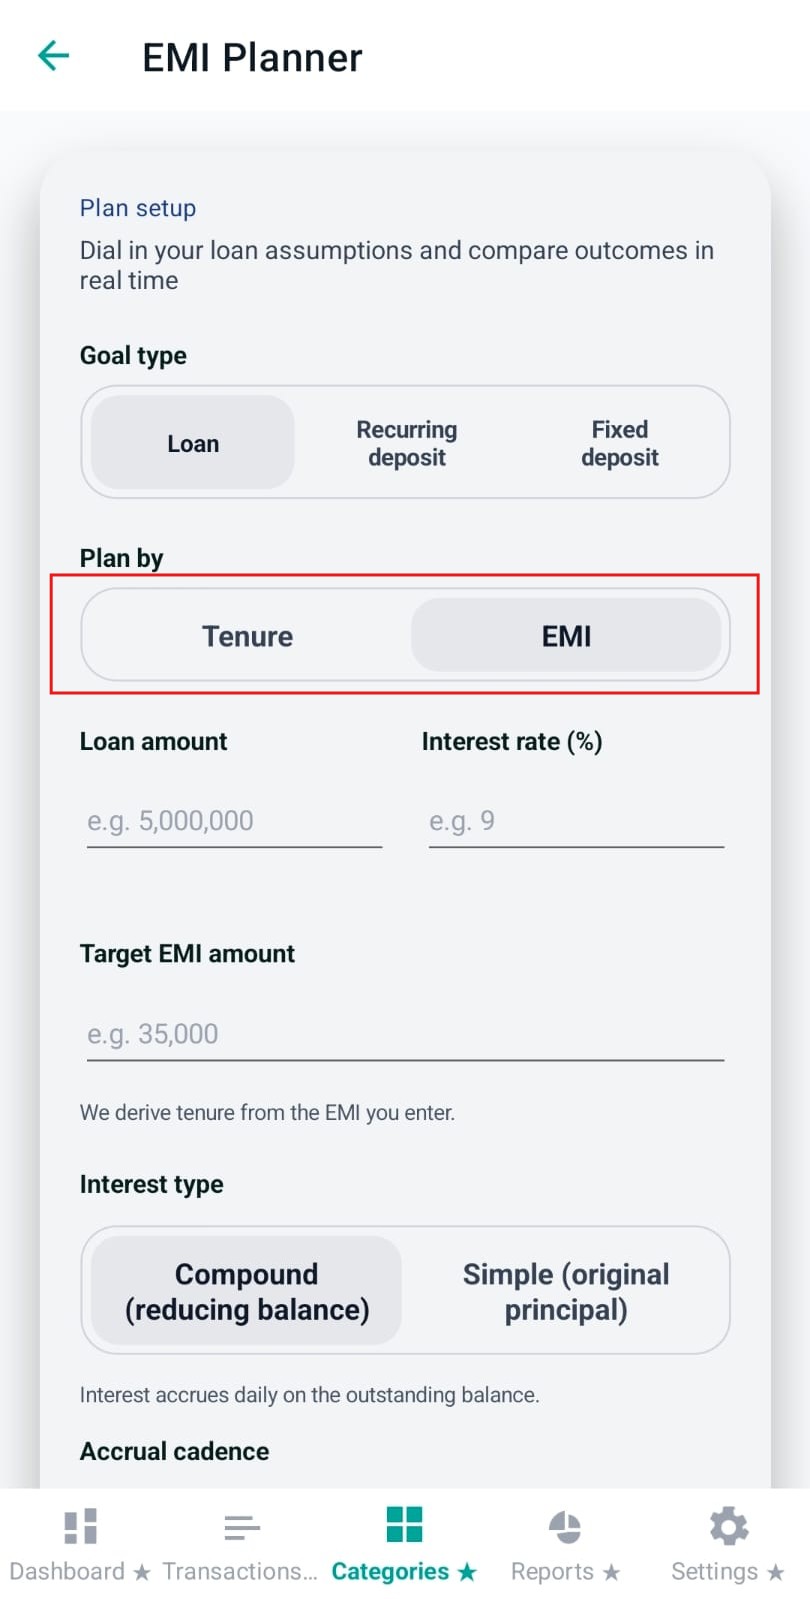
Planning tip: Use EMI mode if your monthly cashflow is fixed. Use Tenure mode if you have a hard deadline (e.g., close before child’s school fee cycle starts).
The top grid is always the “core math” of your plan:
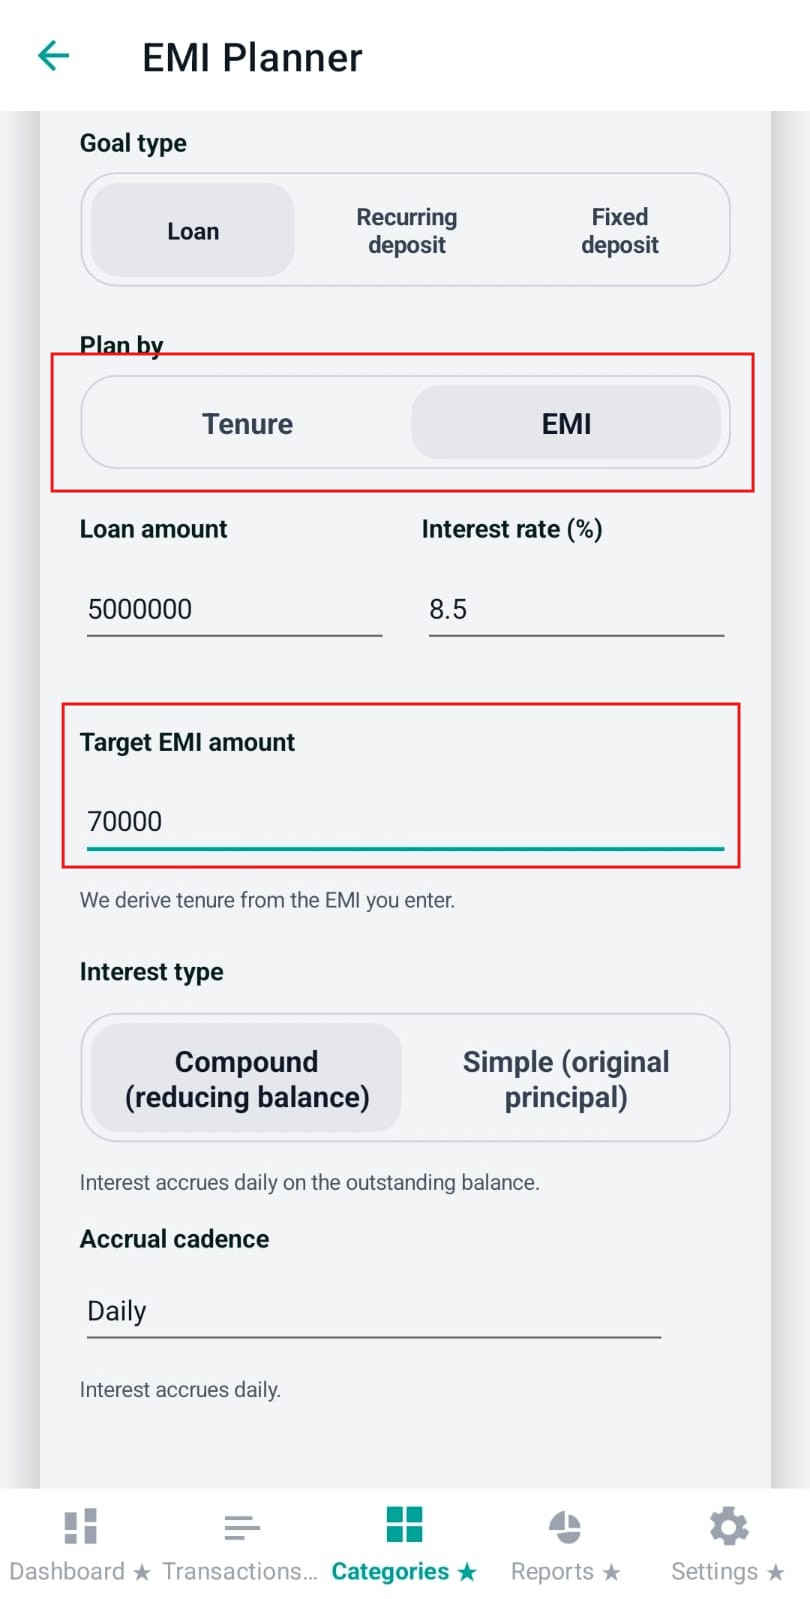
Validation detail: In EMI mode for loans, Pennie requires EMI to exceed the upcoming interest amount; otherwise, the balance would never reduce.
This toggle decides how Pennie models interest:
Planning tip: Choose the interest type that matches your lender/product sheet. Many loans behave like compounding on reducing balance; some “flat rate” products behave closer to simple interest.
The planner can simulate how often interest accrues:
These are important because they change the effective growth/interest pattern even at the same annual rate.
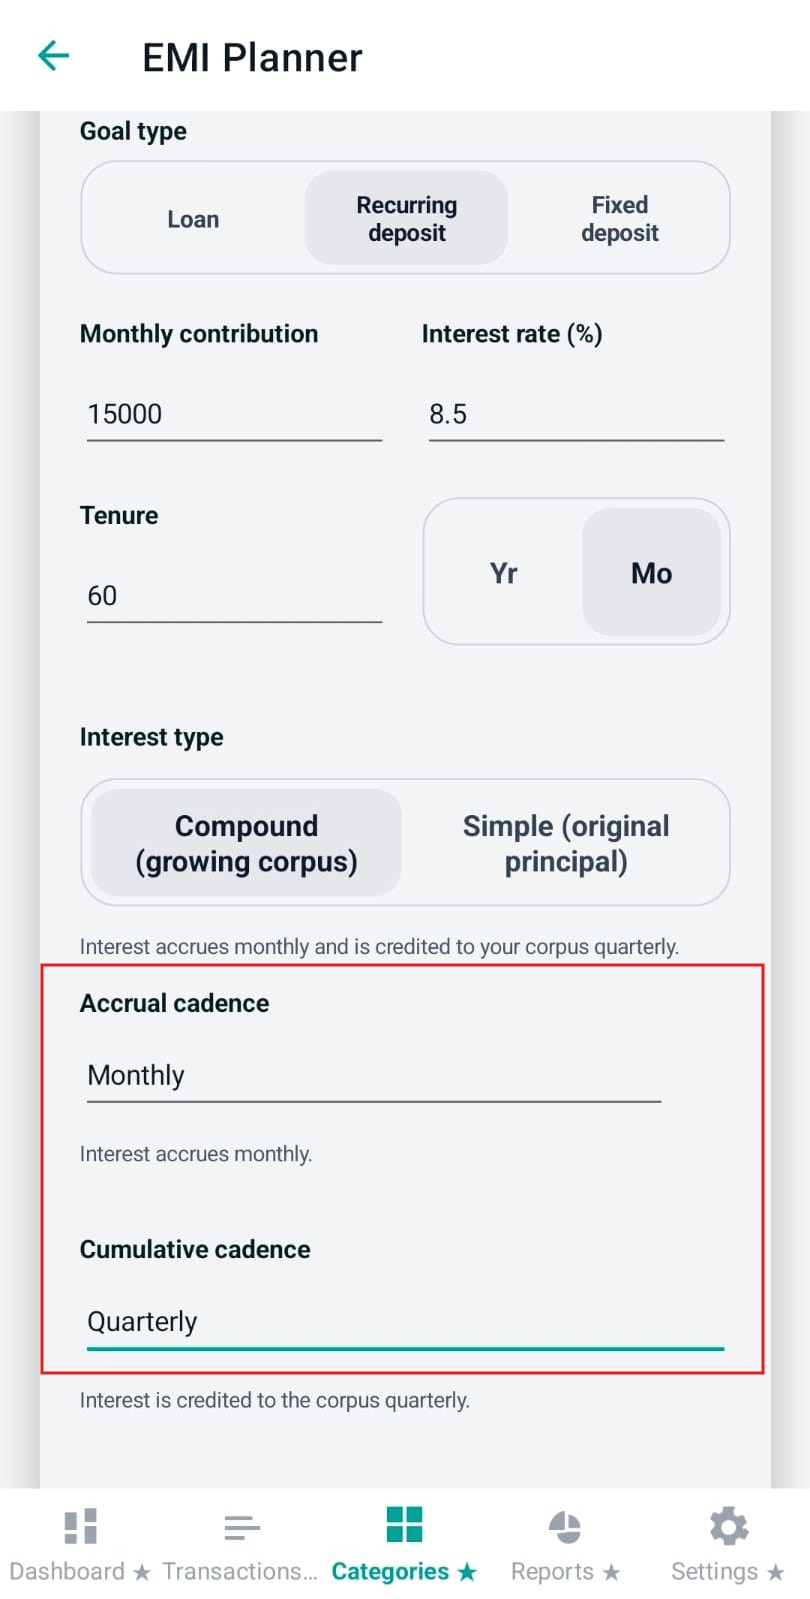
When you pick quarterly or yearly cycles, Pennie can align those cycles with a specific fiscal year start month (useful for India-style FY planning or when products accrue quarterly from a fixed FY boundary).
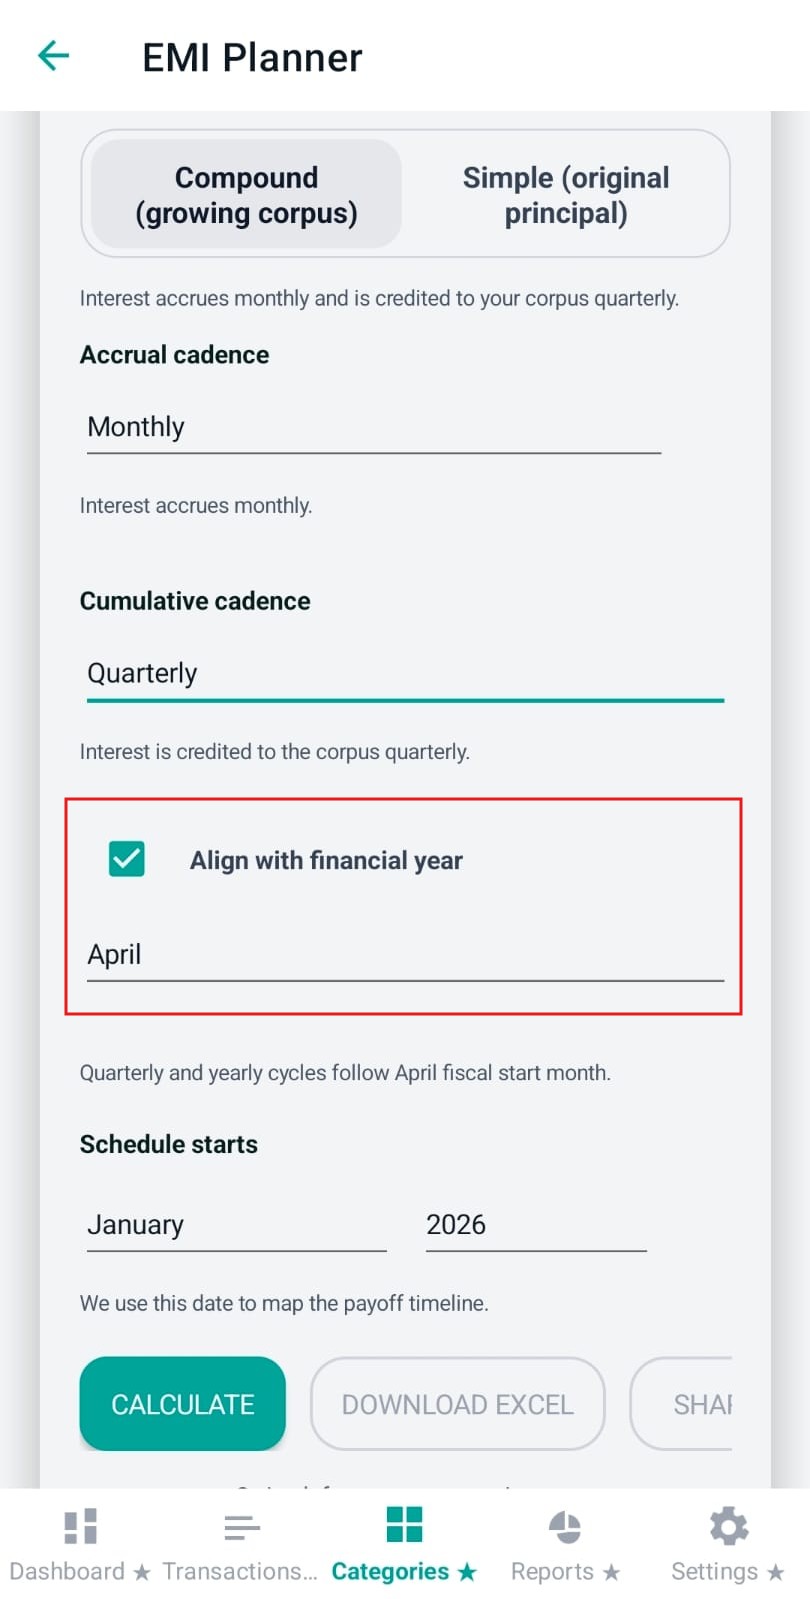
Planning tip: If you budget around yearly bonuses/appraisals, fiscal alignment makes the timeline “feel” like your real life.
This is the calendar anchor for the entire schedule. Pennie uses this to label each month/year in the payoff table and charts.
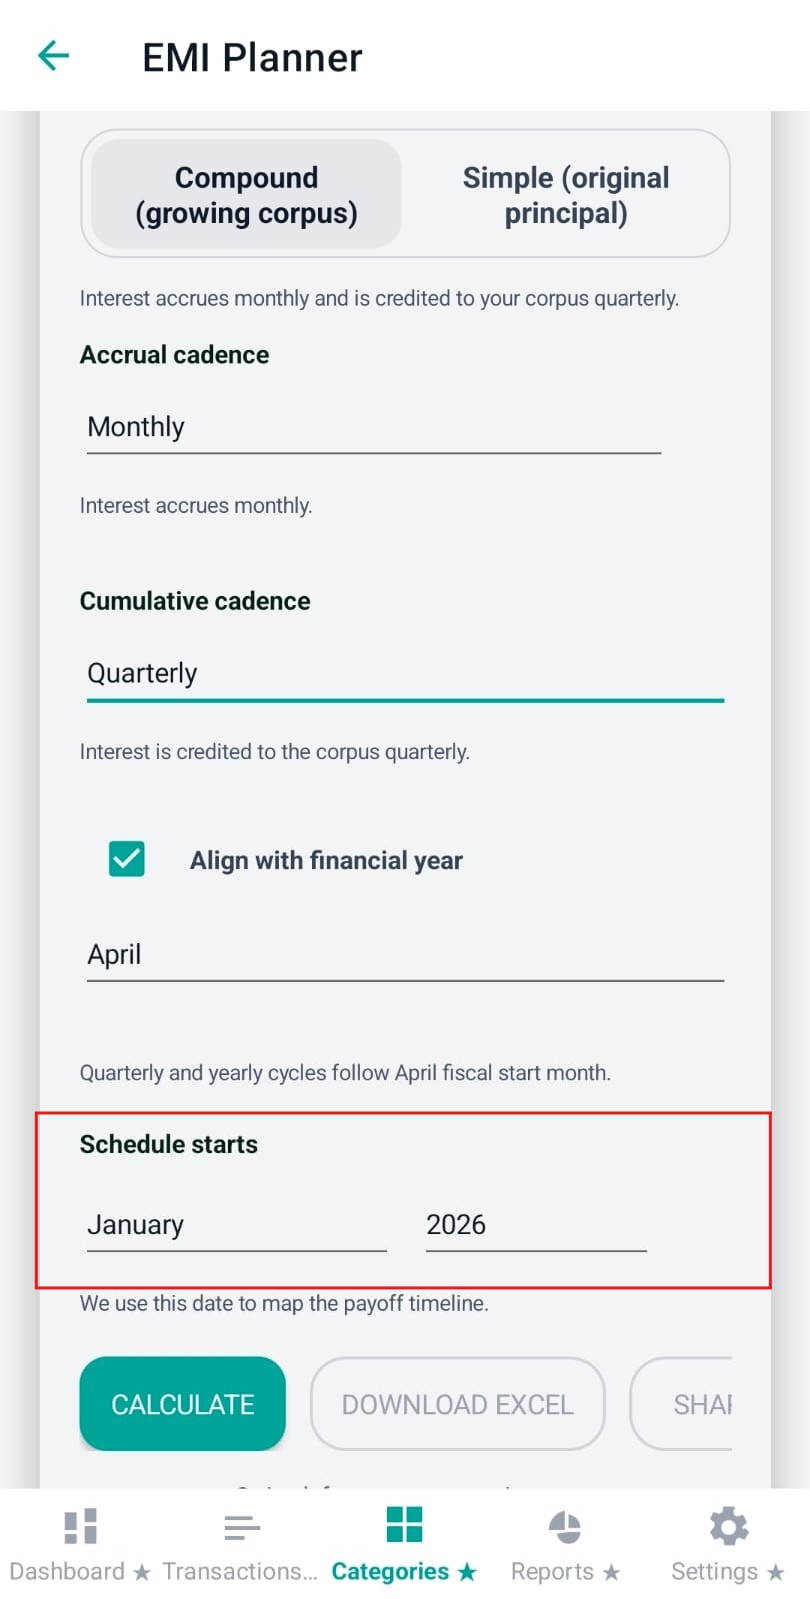
Planning tip: Set this to your next EMI date month so the timeline matches your actual lender schedule.
These fields help users simulate “closing early” strategies. They appear only when:
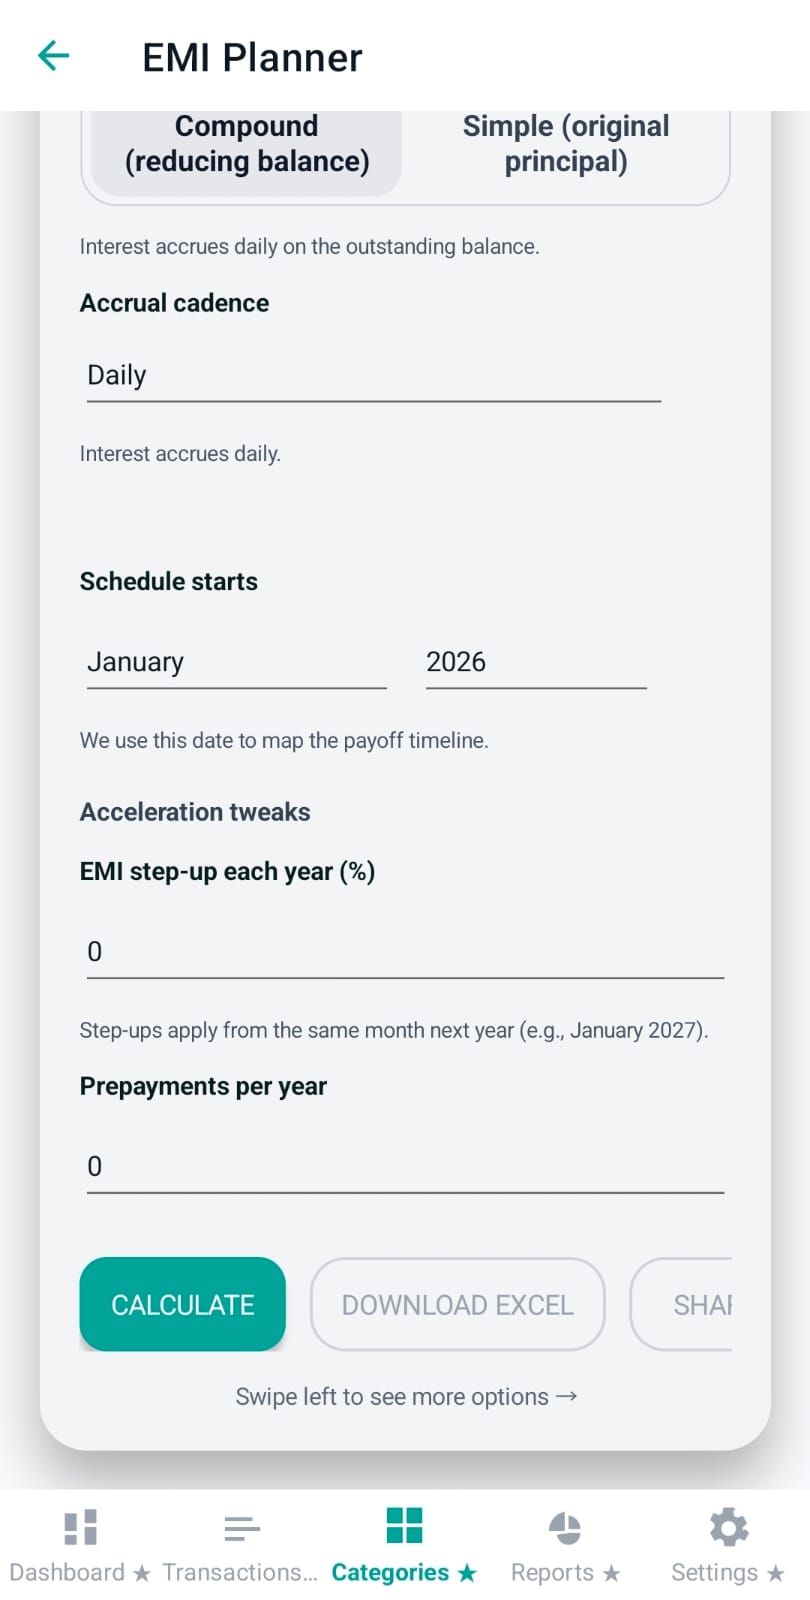
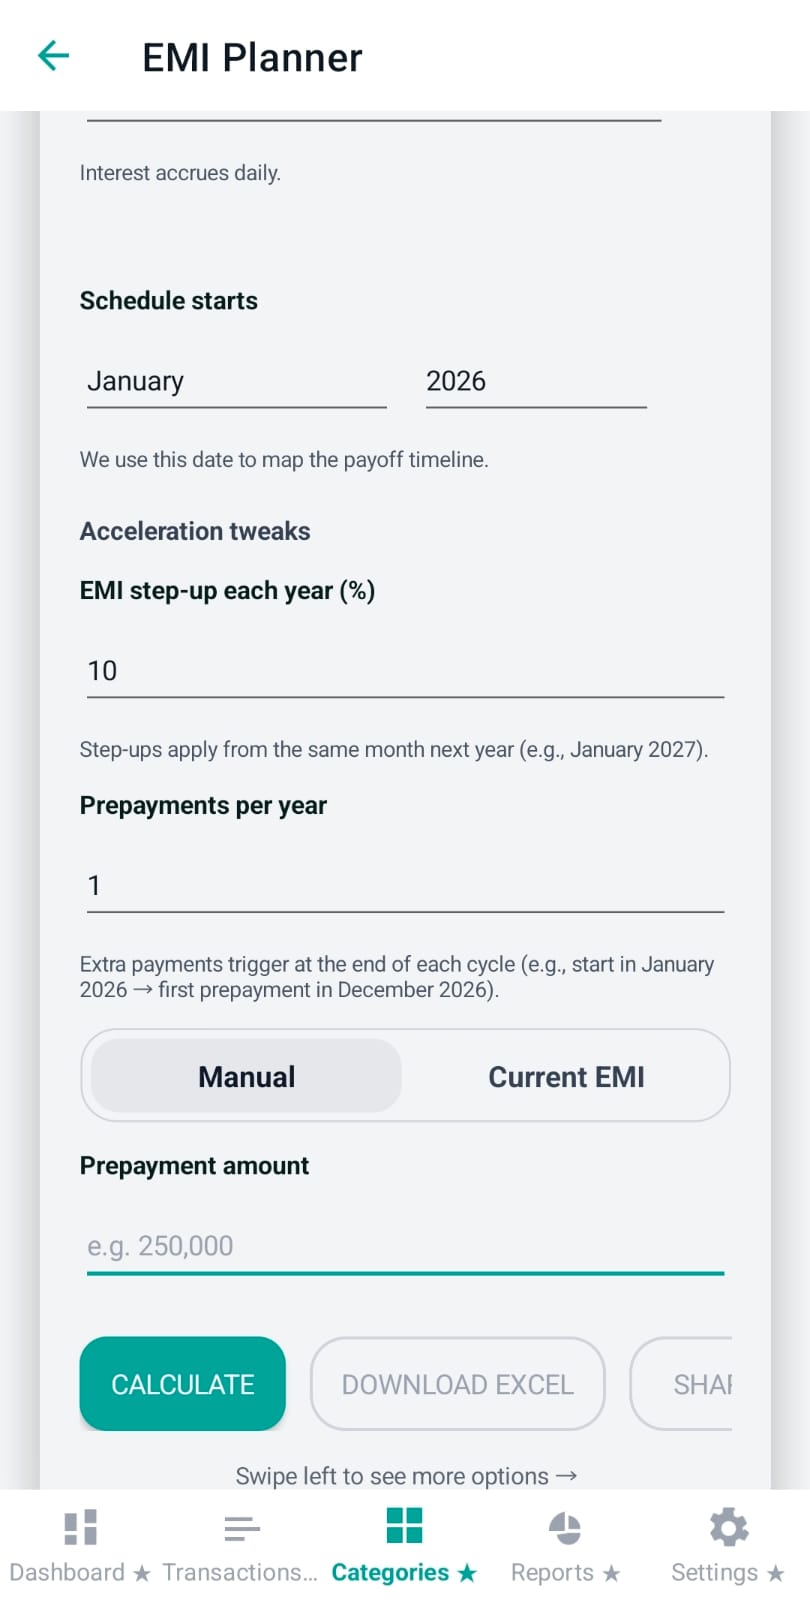
Planning tip: If you get an annual bonus, set “Prepayments per year” to 1 and use Manual mode to model a single annual lumpsum.
After you enter inputs, use:
pennie_emi_schedule_YYYYMMDD_HHMMSS.csv ).If inputs are missing or inconsistent, Pennie shows an inline banner instead of producing a misleading schedule.
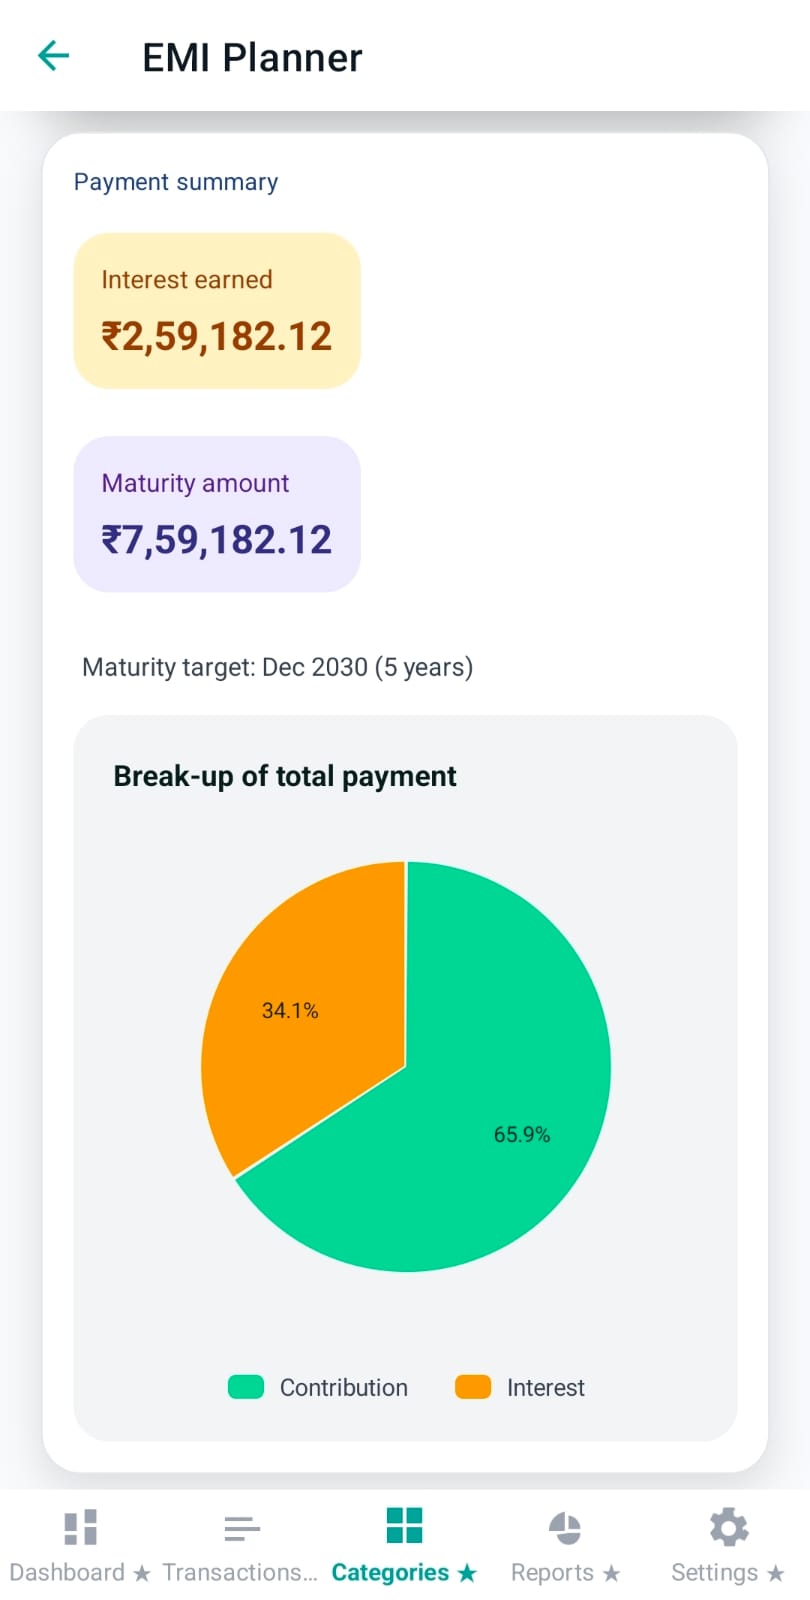
Once calculated, Pennie shows a payment summary with:
For loans, Pennie also compares your “base plan” (no step-ups, no prepayments) against the plan with acceleration tweaks, and shows:
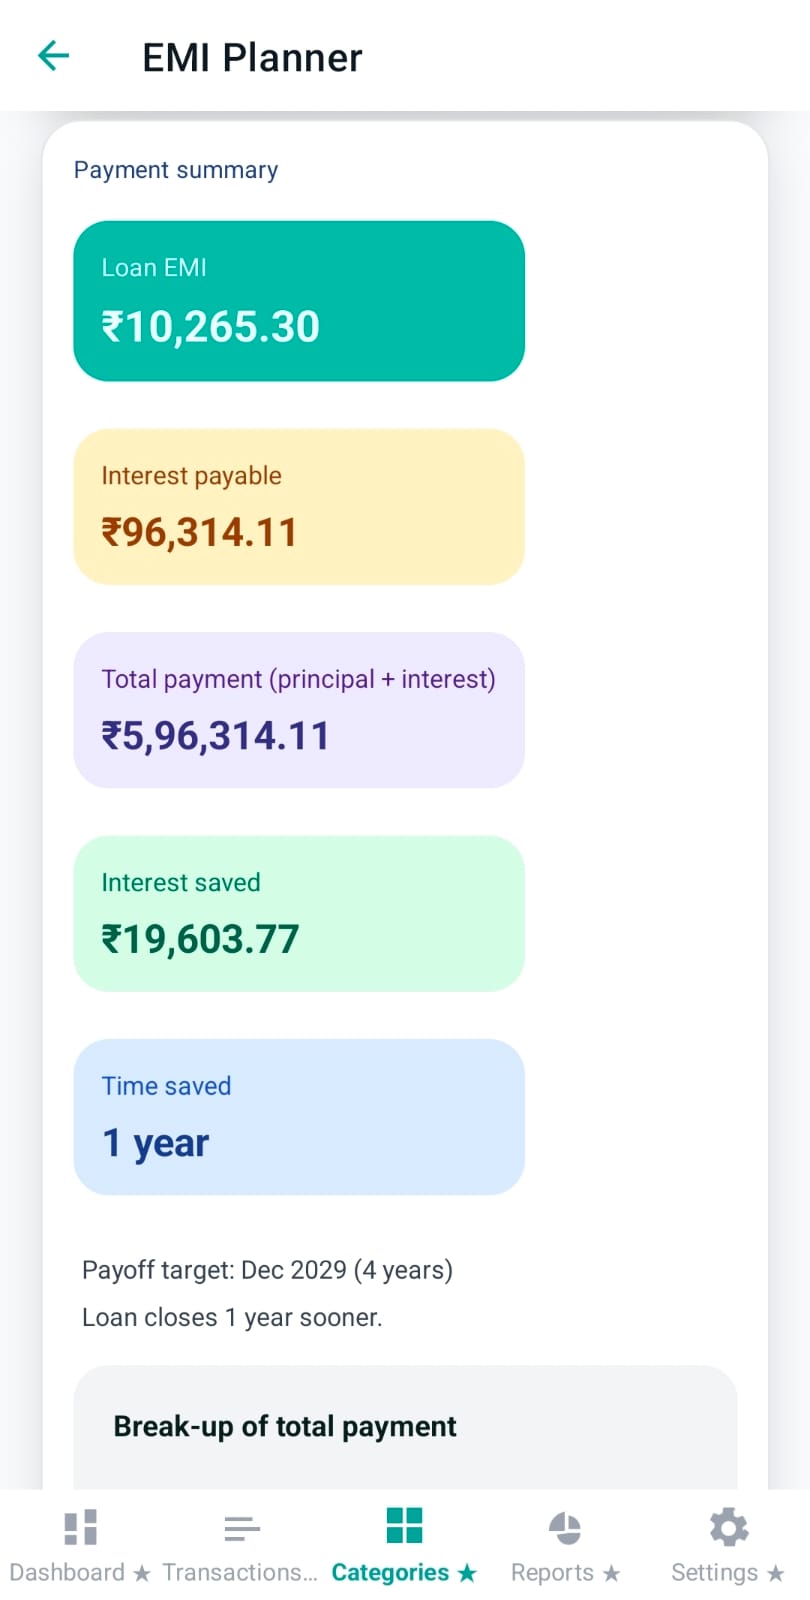
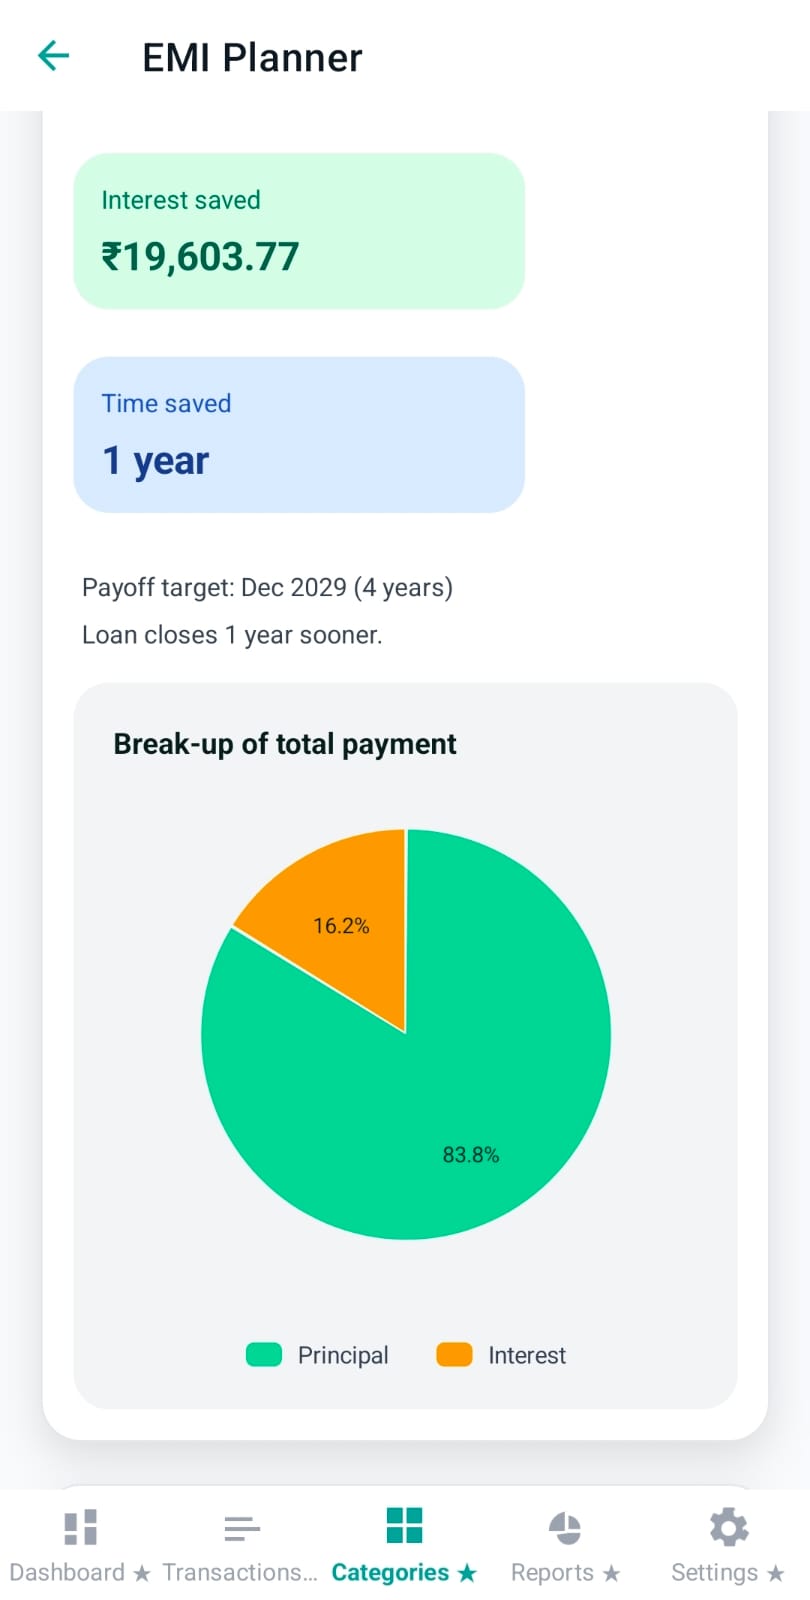
This chart answers “how much is principal vs interest?” For deposit goals, the labels adapt (principal becomes contribution/corpus).
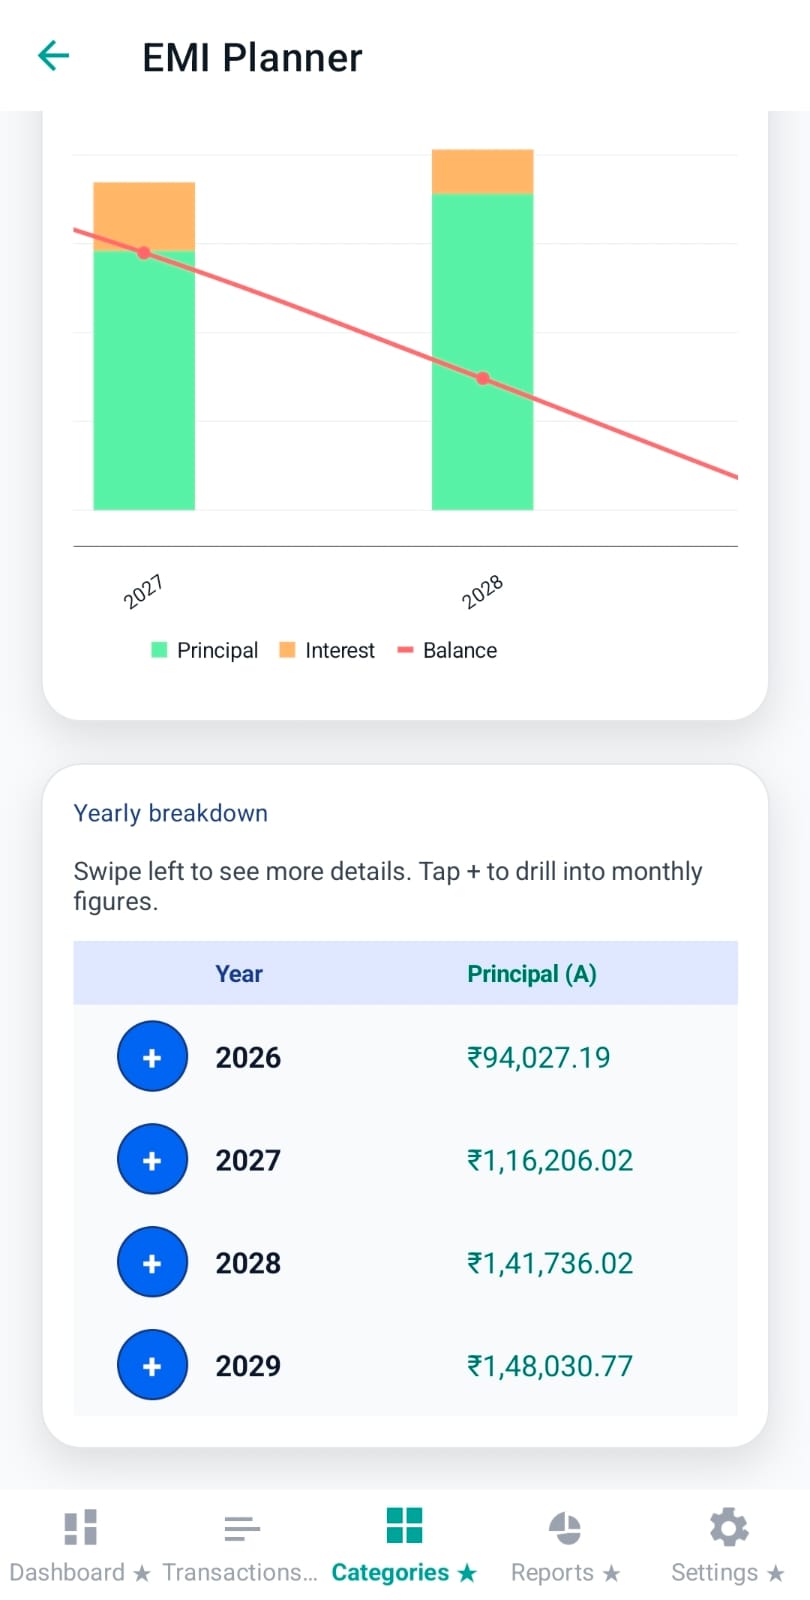
The “Loan payoff trajectory / Goal trajectory” view is designed for quick comparisons across years:
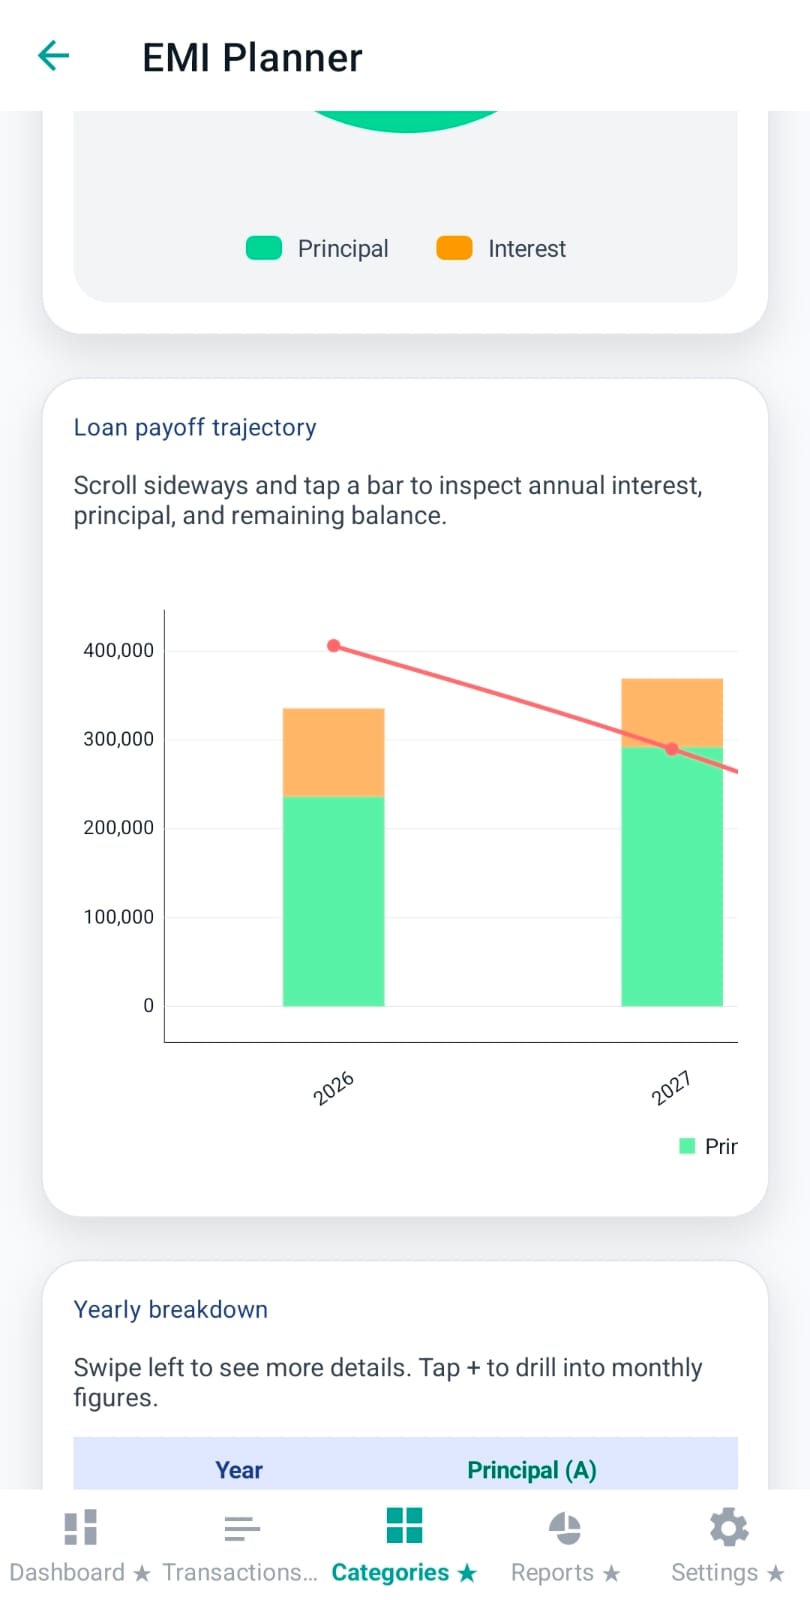
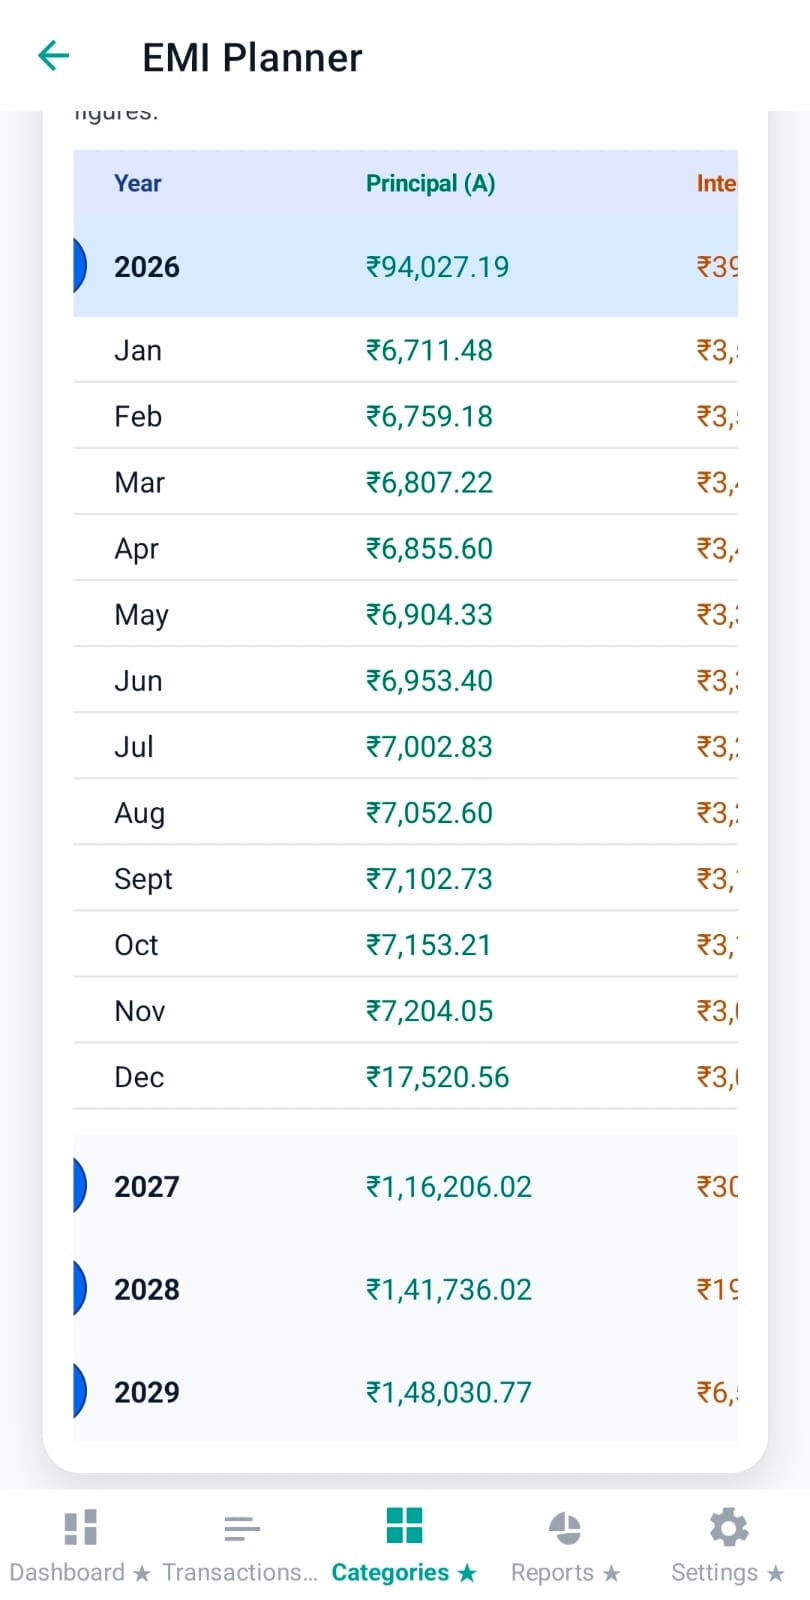
This table is the “audit view” for planning. It shows, year by year:
Tap “+” on a year to expand and inspect month-level figures.
If your goal is a purchase (phone, bike, emergency fund), Pennie’s deposit modes help translate that goal into a timeline:
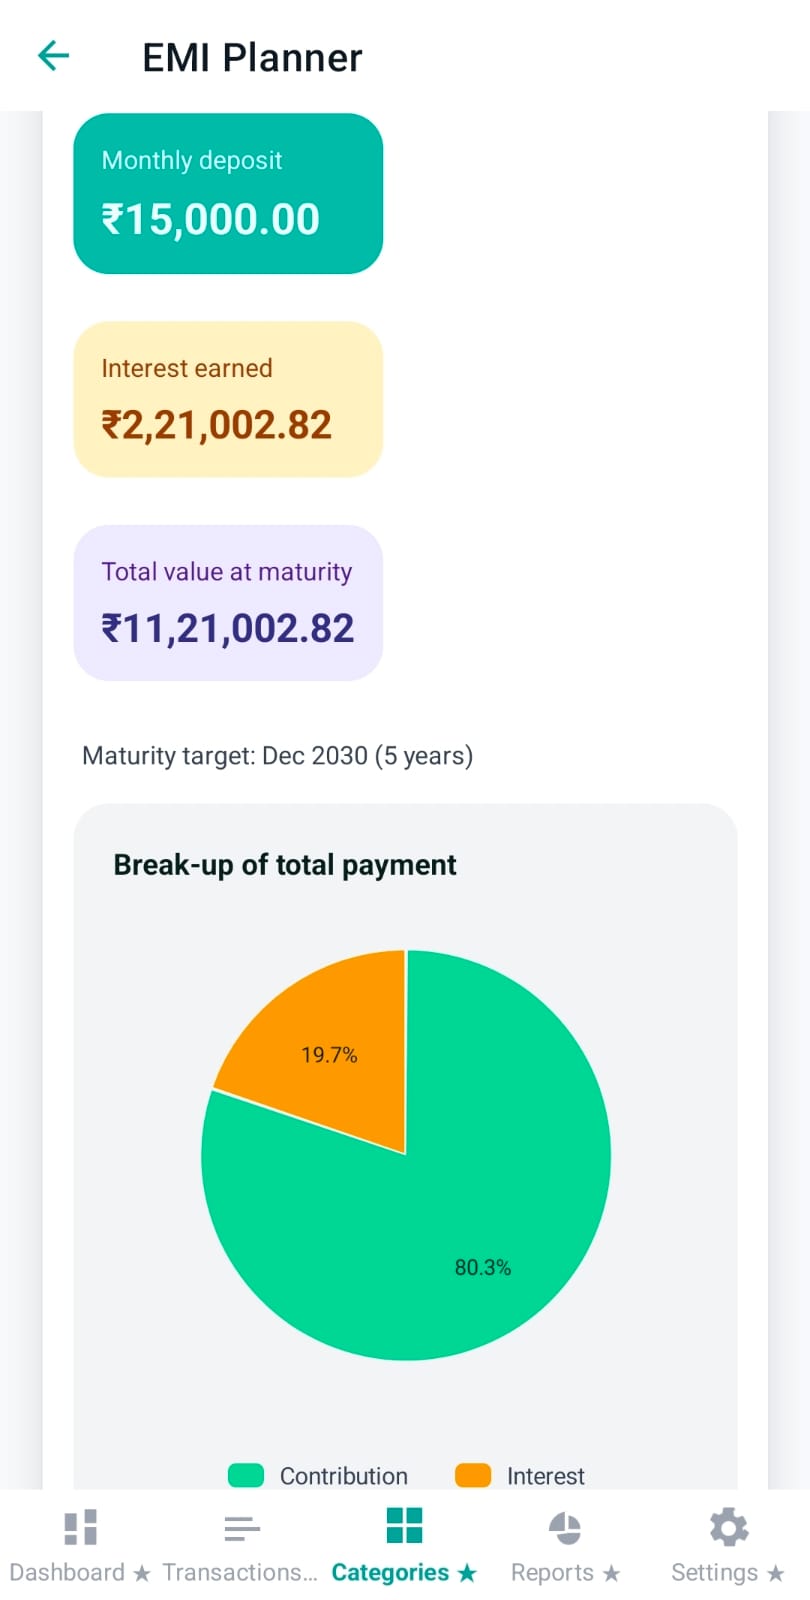
Next step: Once you pick a monthly contribution that works, you can mirror it in the Categories tab by creating a Savings category with a matching monthly target.
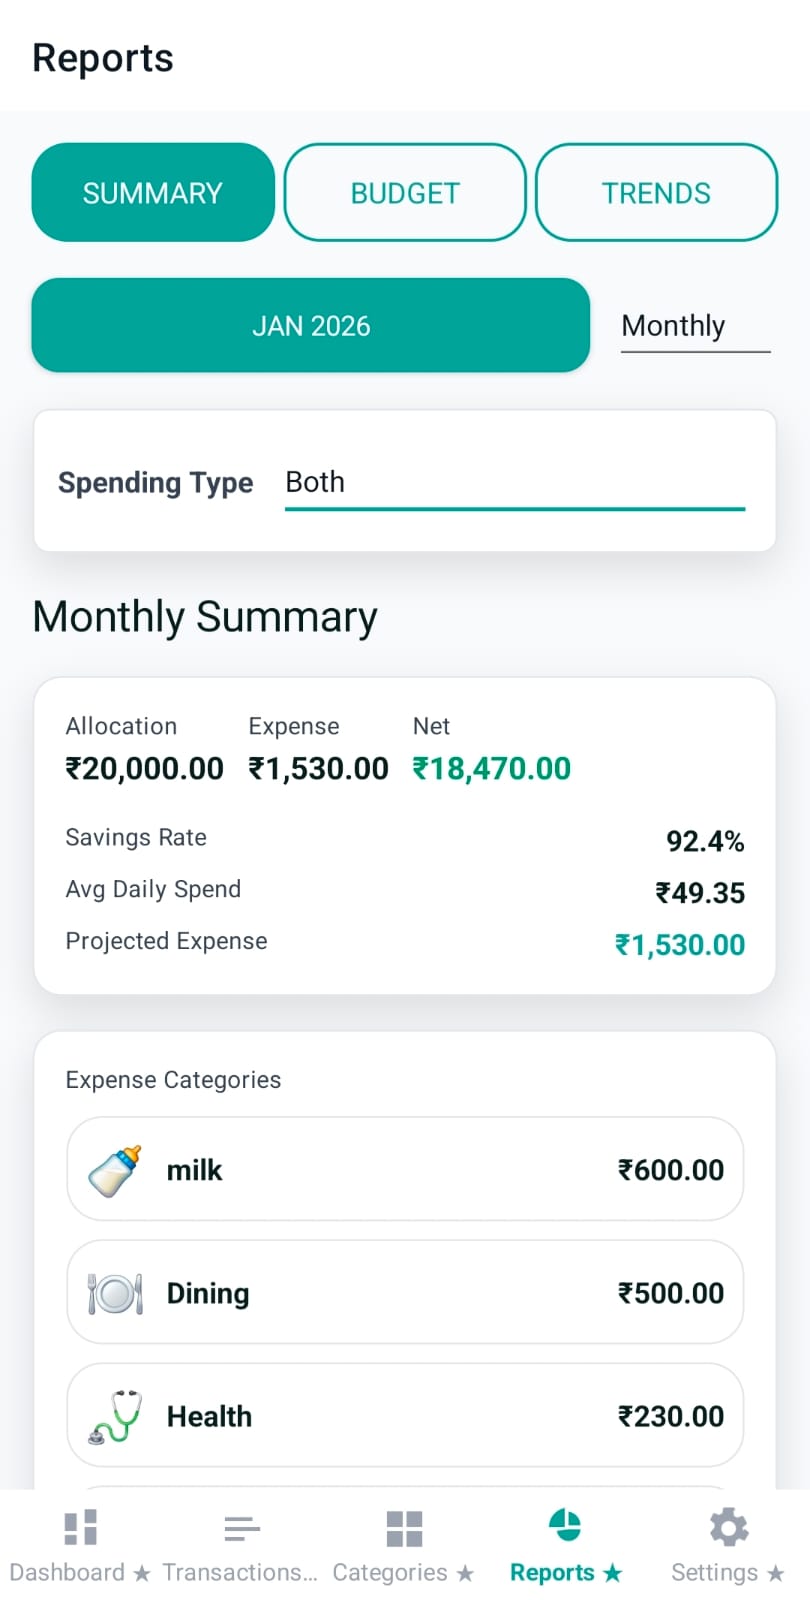
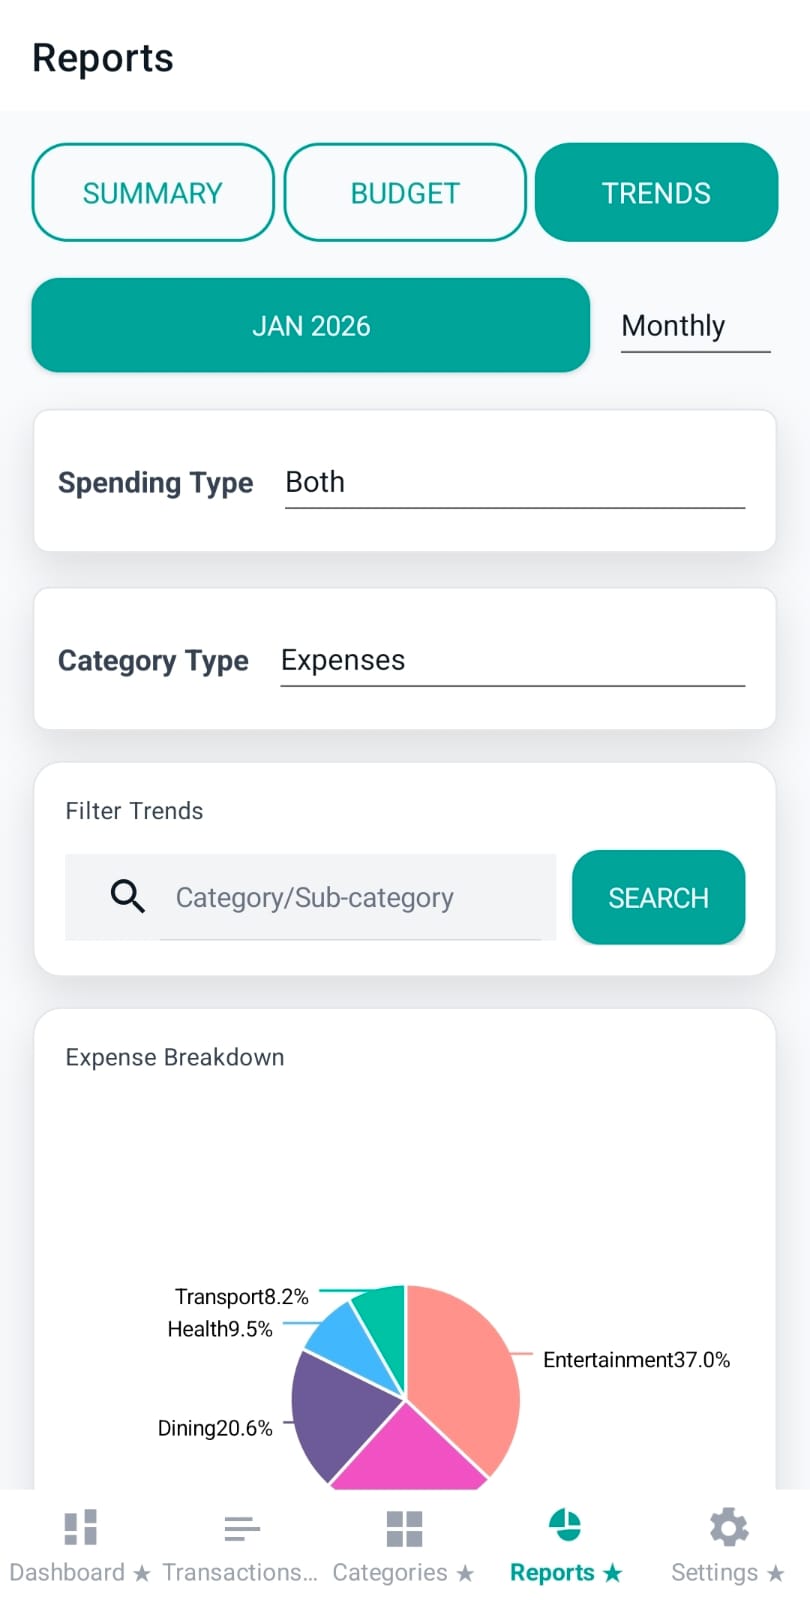
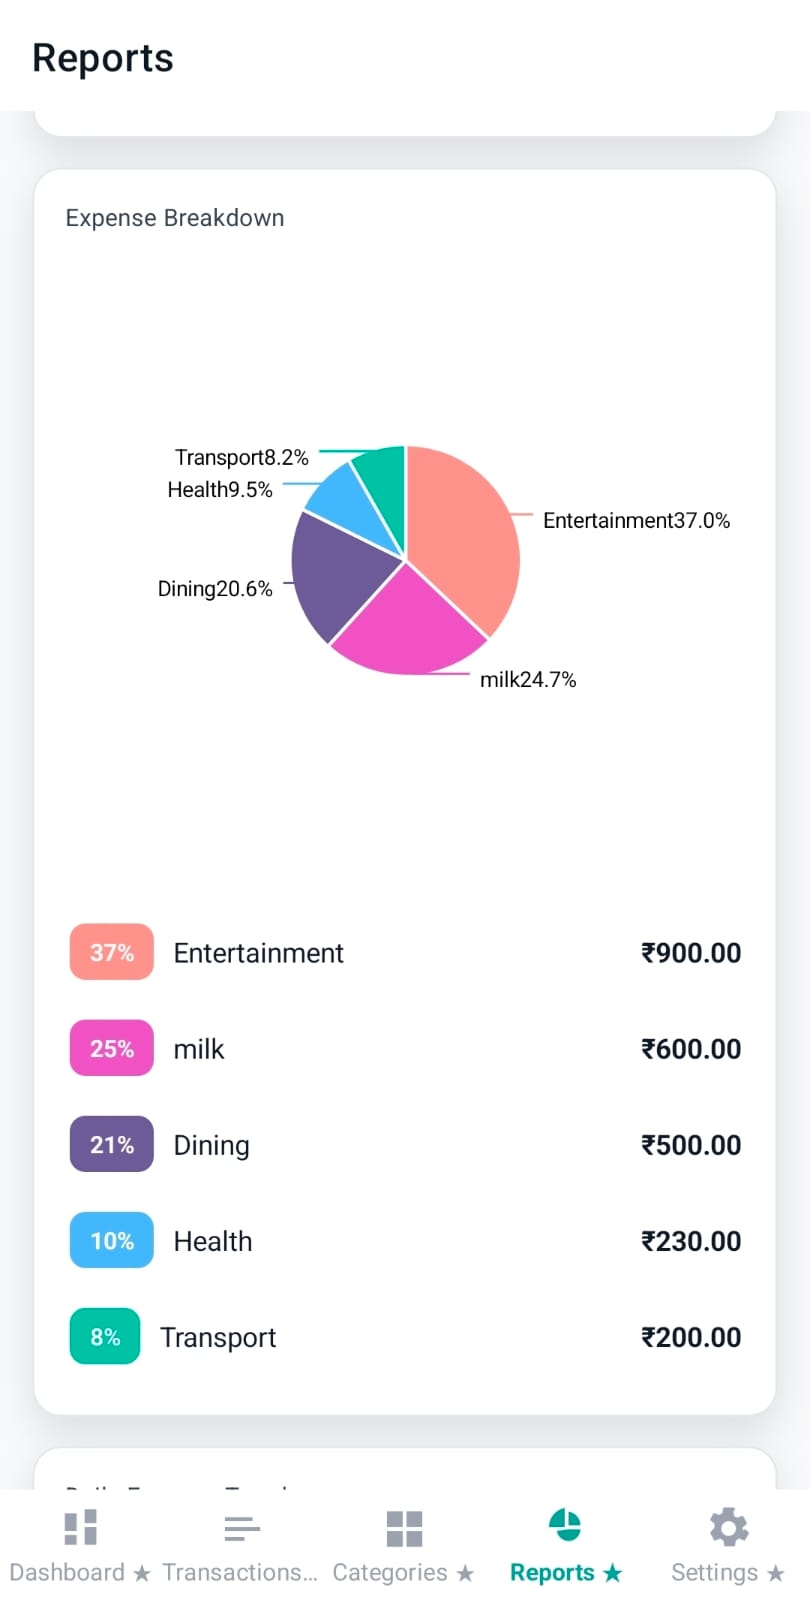
Reports is Pennie’s analytics workspace. It runs entirely on-device: Pennie queries your local SQLite database, applies the time range + essential filters, and then renders charts (donuts, trend lines, breakdown pies) for fast scanning.
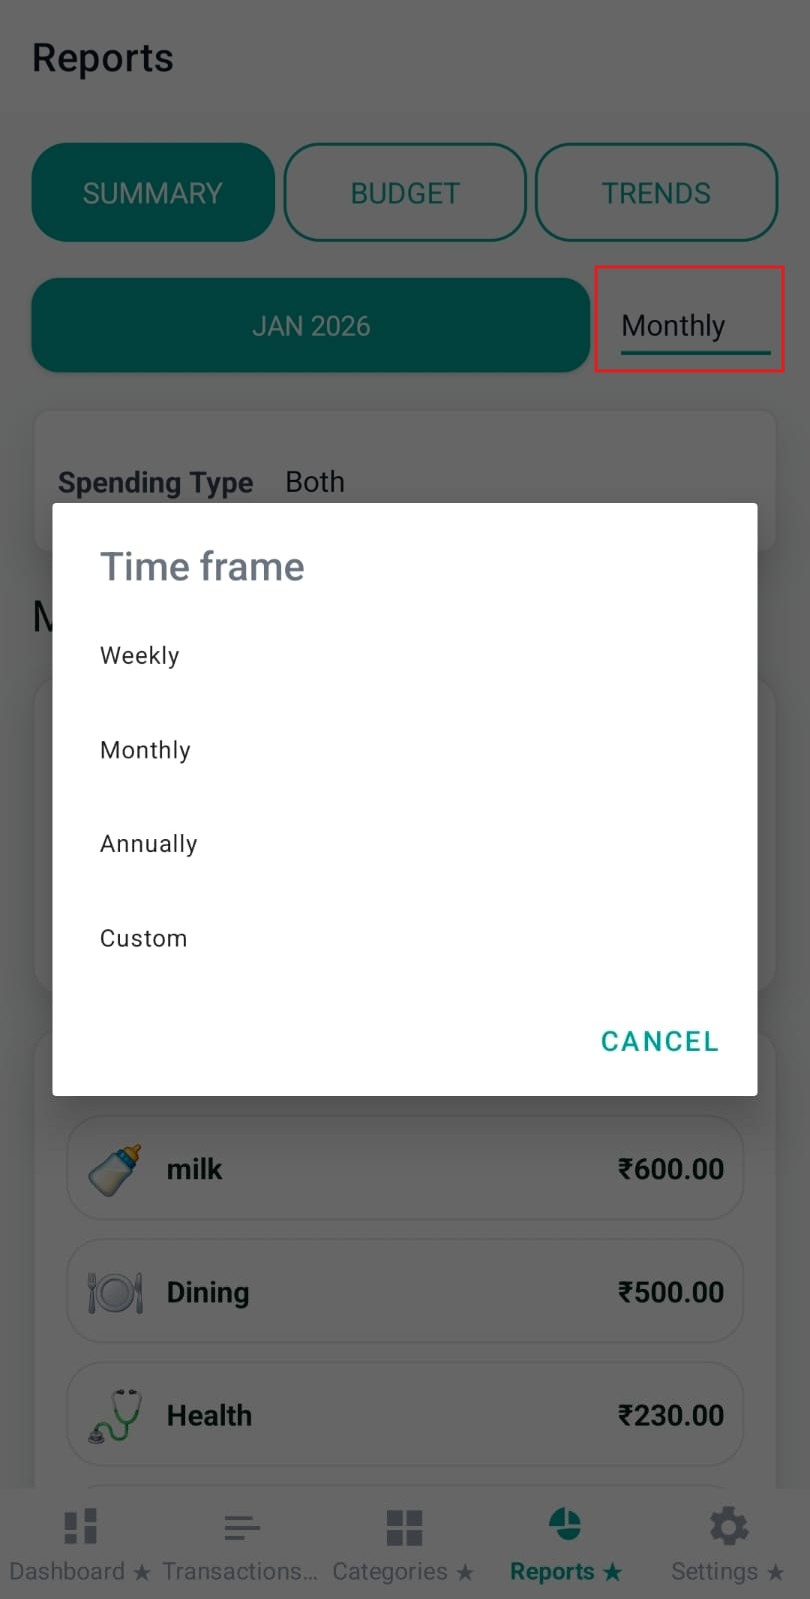
The Reports header uses a segmented selector. Each segment changes the section content below, but they share the same idea: pick a time range and focus the data.

The time frame changes the active date range used for every chart. Pennie supports:
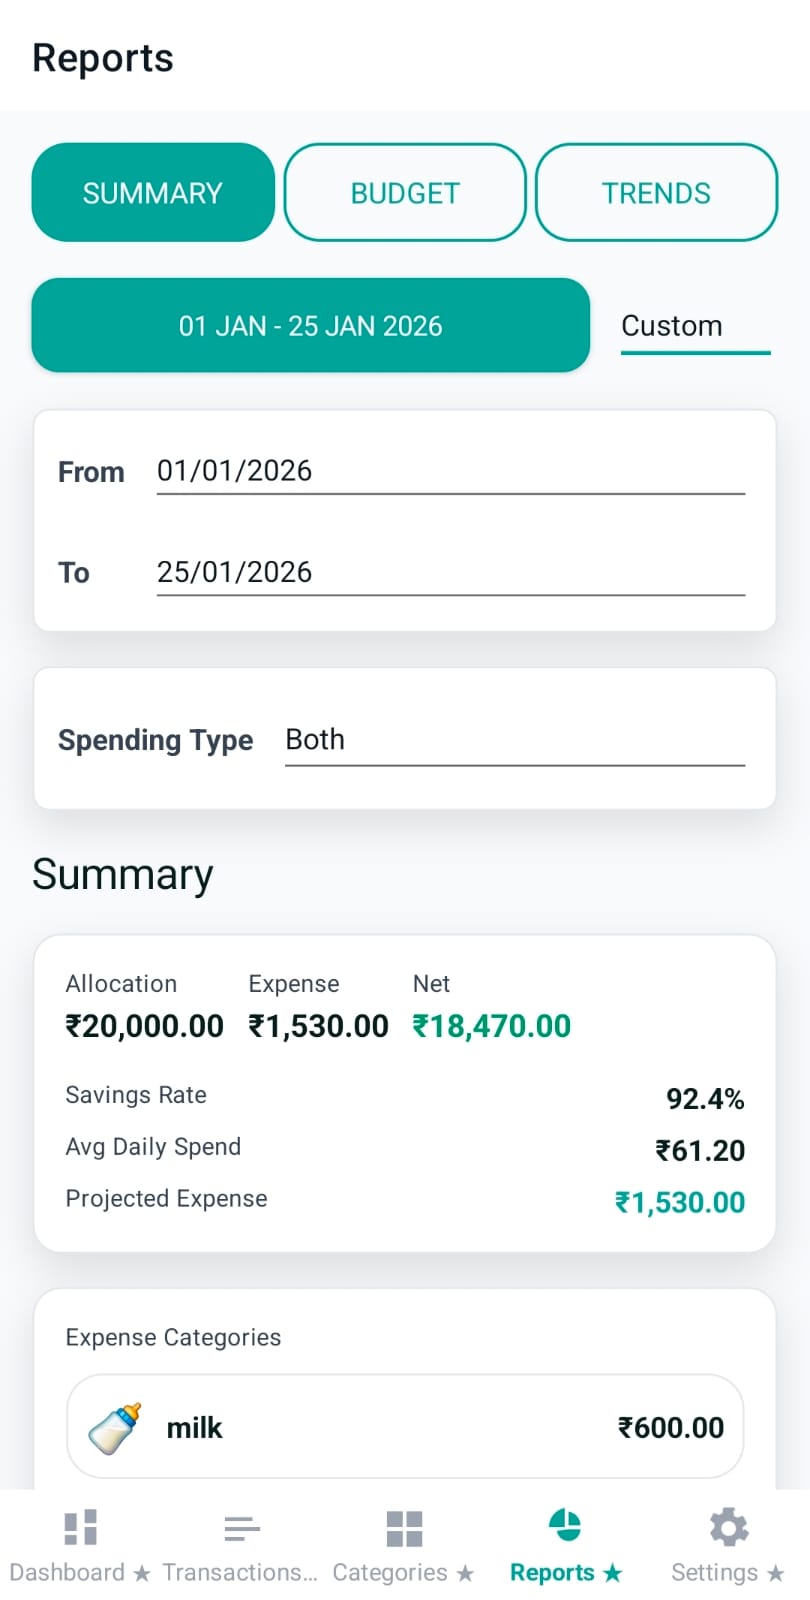
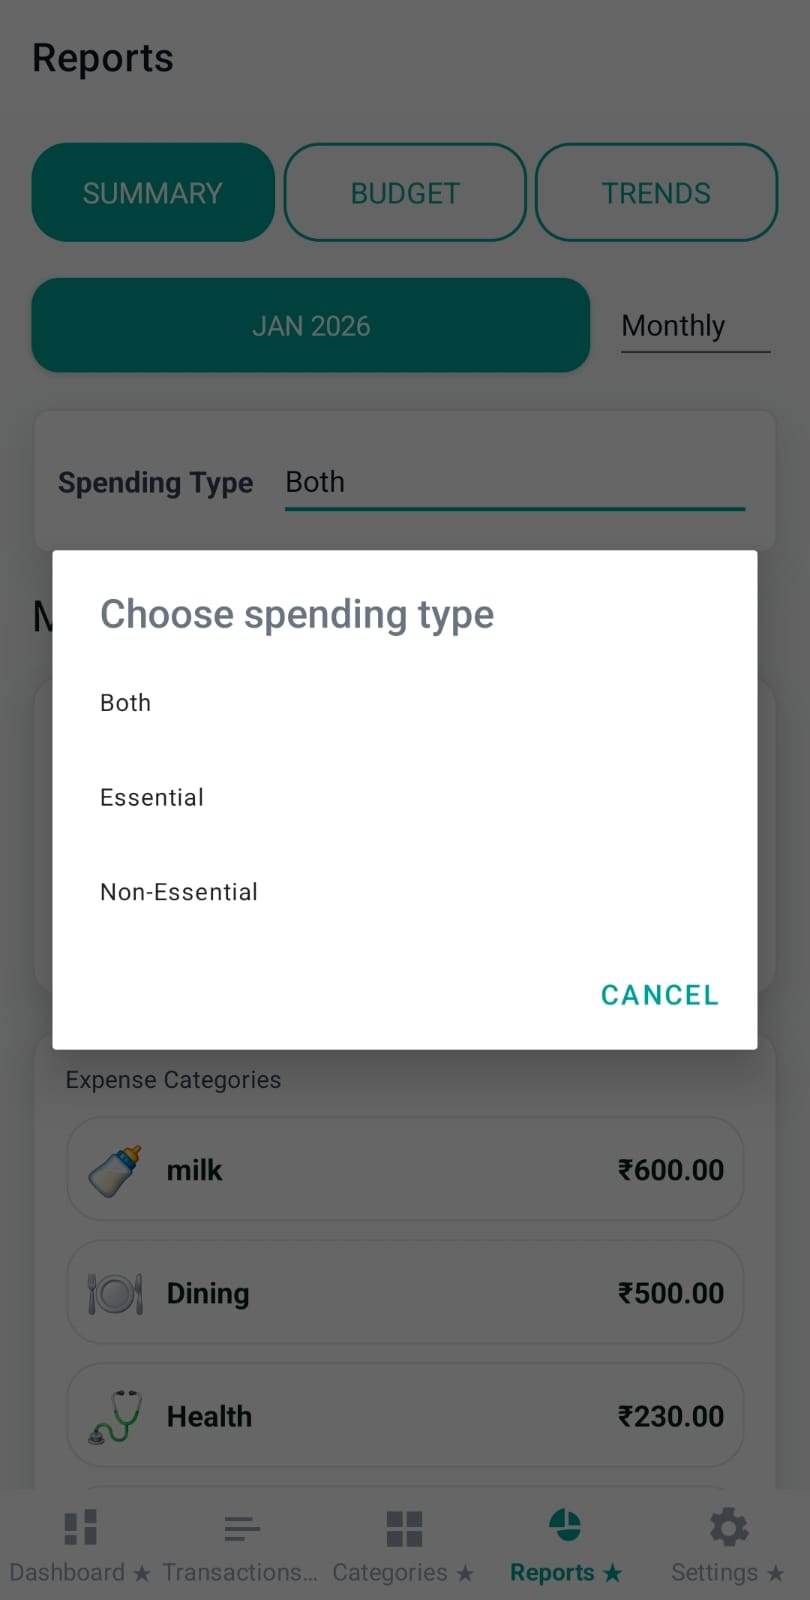
This filter narrows the dataset before charts are computed:
Important: Essential filtering impacts totals, category charts, and trend charts together (it is not “cosmetic”).
Summary focuses on “how this period went” and “where money went”. Internally, Pennie computes an overall period summary and (when you apply an essential filter) a filtered summary for the same range.
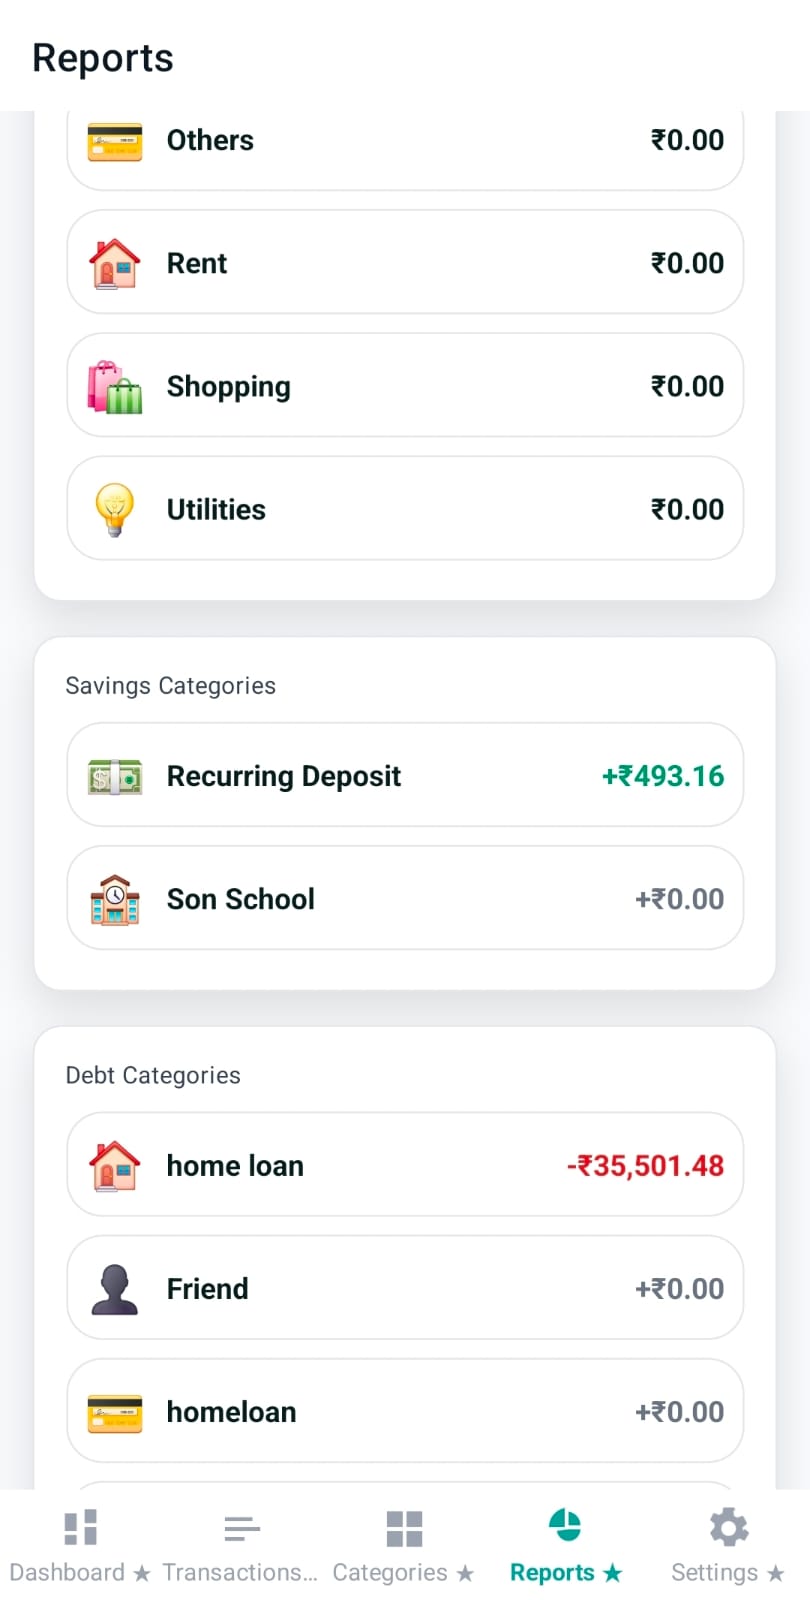
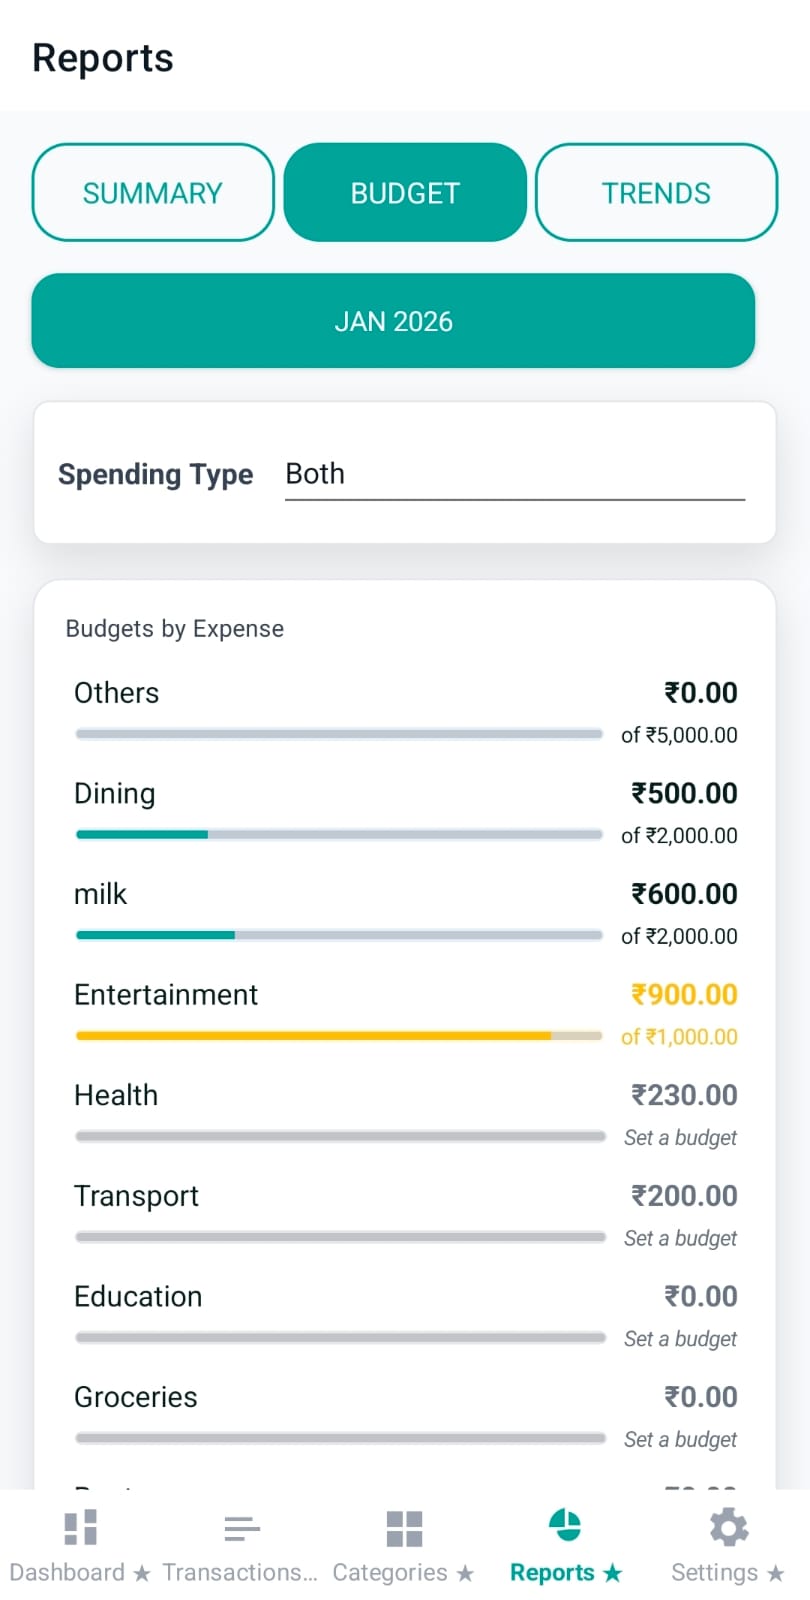
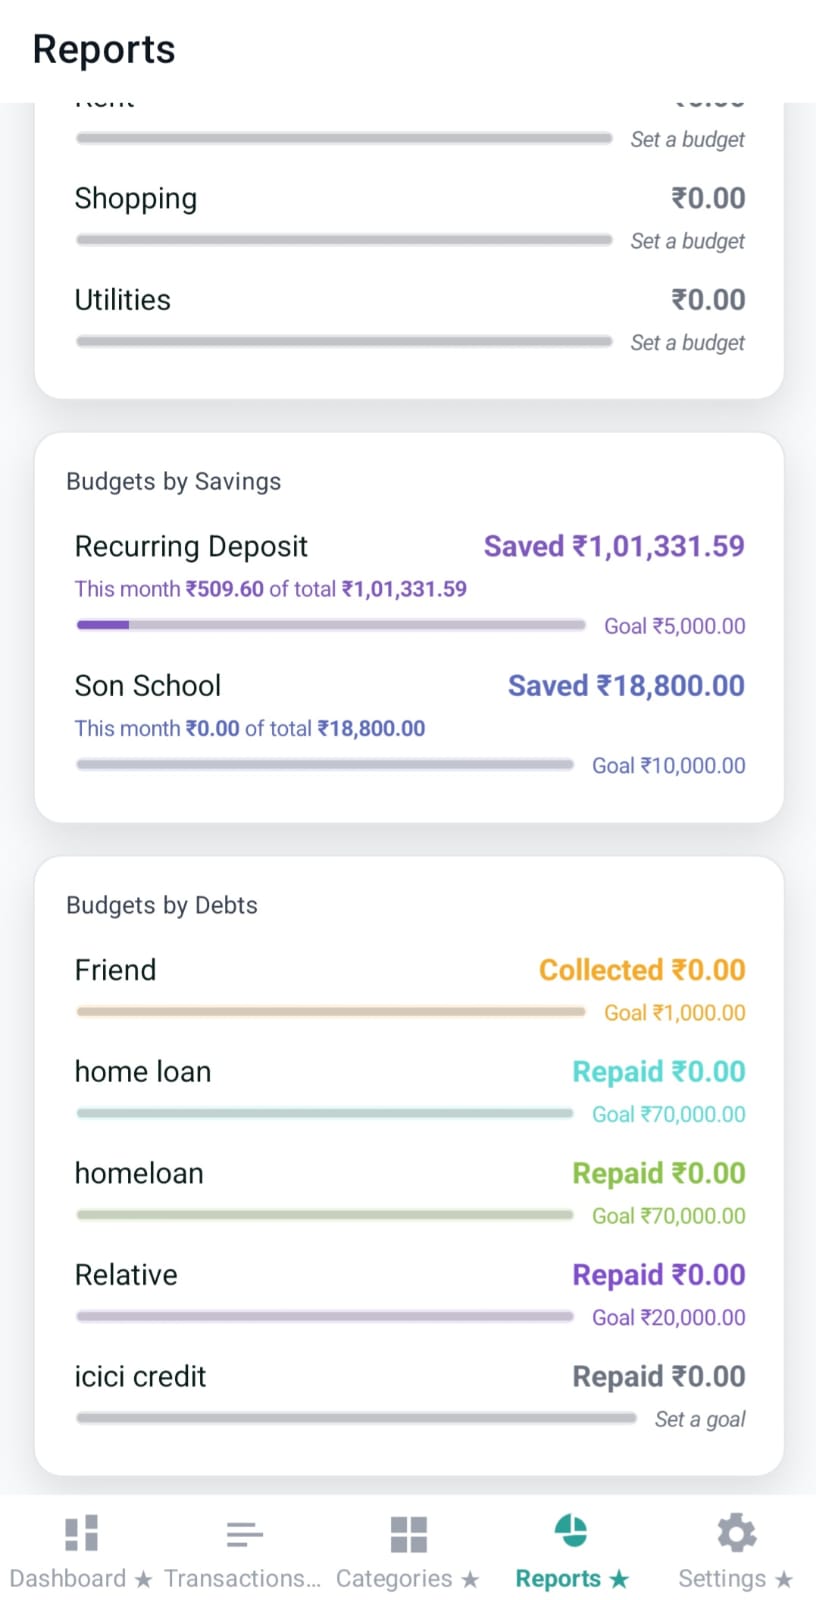
Budget converts category definitions into “usage rows” for the selected period. Each row typically shows:
Pennie builds budget usage for Expense, Savings, and Debt categories, and sorts rows so categories with meaningful budgets appear first.
Trends is designed for pattern-finding. Pennie provides two key filter controls:
Note: The “Daily trend” chart shows only for Weekly/Monthly ranges; longer ranges focus on monthly aggregation.
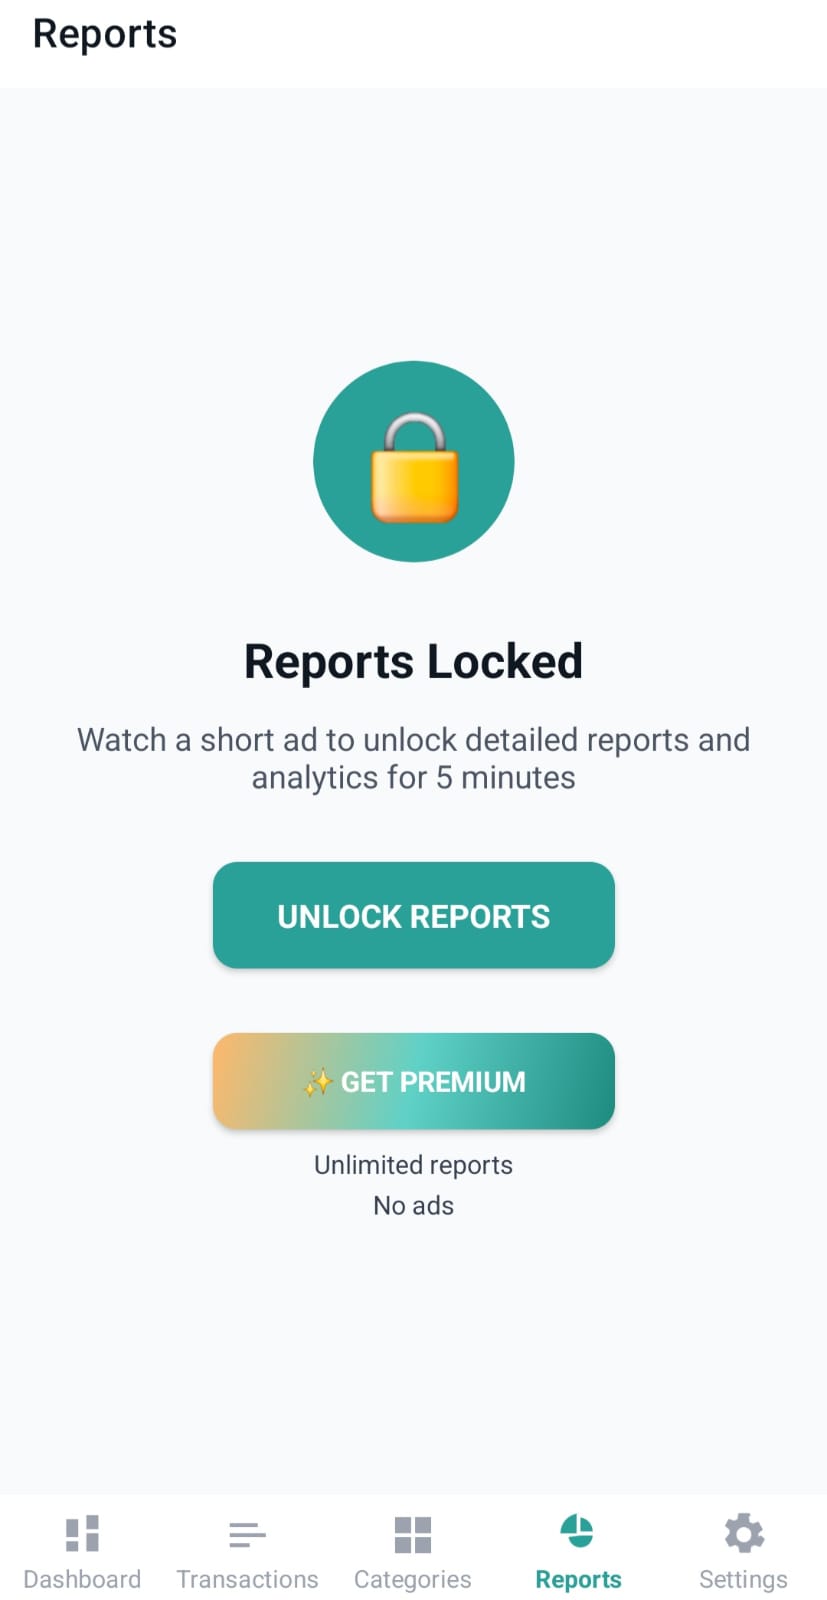
Pennie includes an access-gate flow for Reports. When enabled, non-premium users can unlock Reports for a short session by watching a rewarded ad. Premium users bypass this gate.
Settings is where Pennie stores device-level preferences and “permission-driven” features. It also hosts the entry points for finance-notification tracking (review flow, cleanup, and app selection).
The top banner is shown when a trial is available, active, or ended. It explains what Premium unlocks and provides a single CTA (start trial / upgrade).
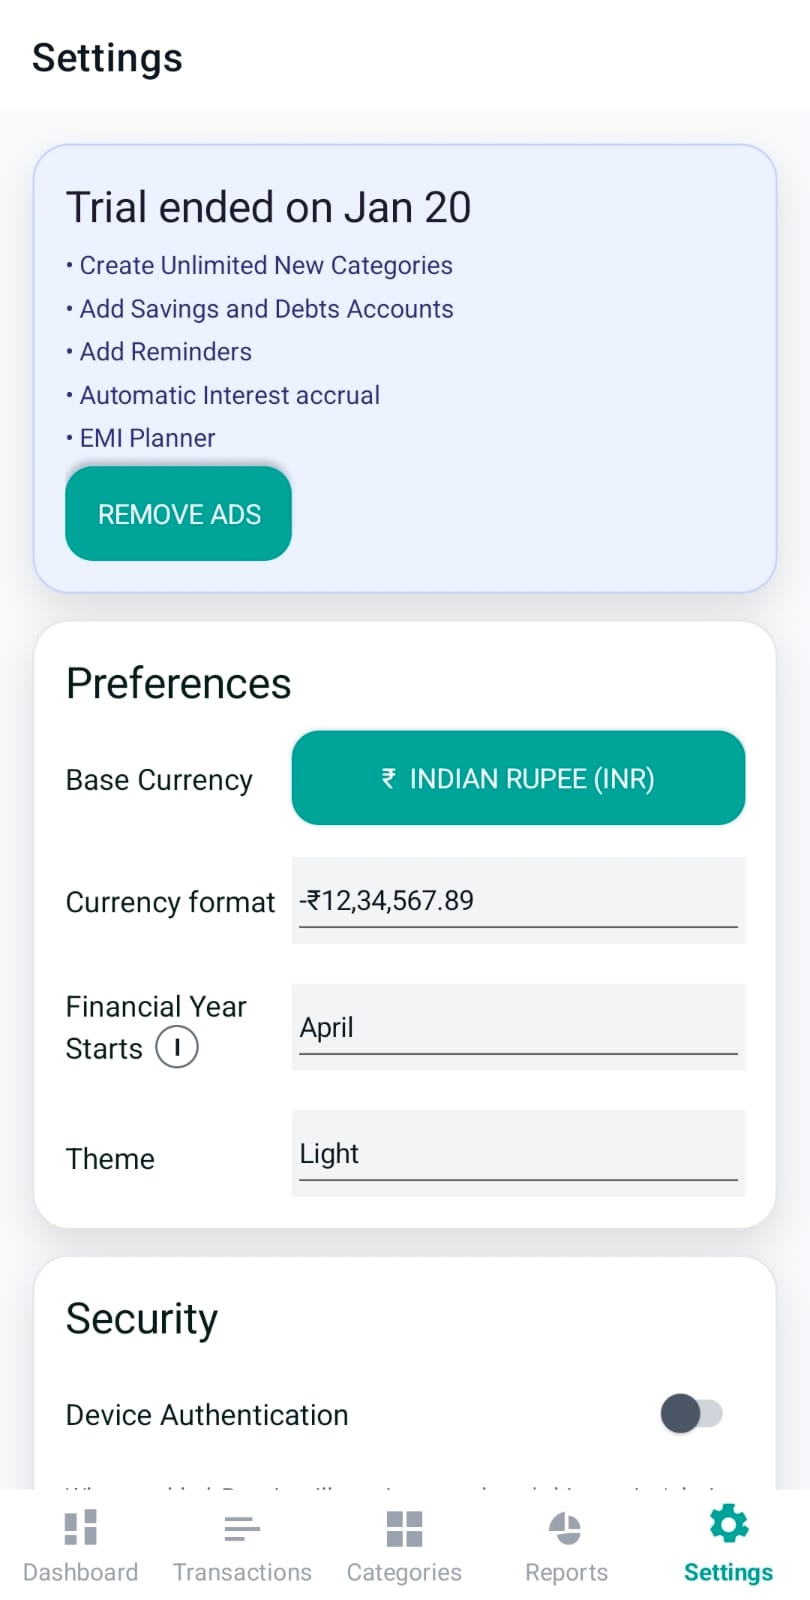
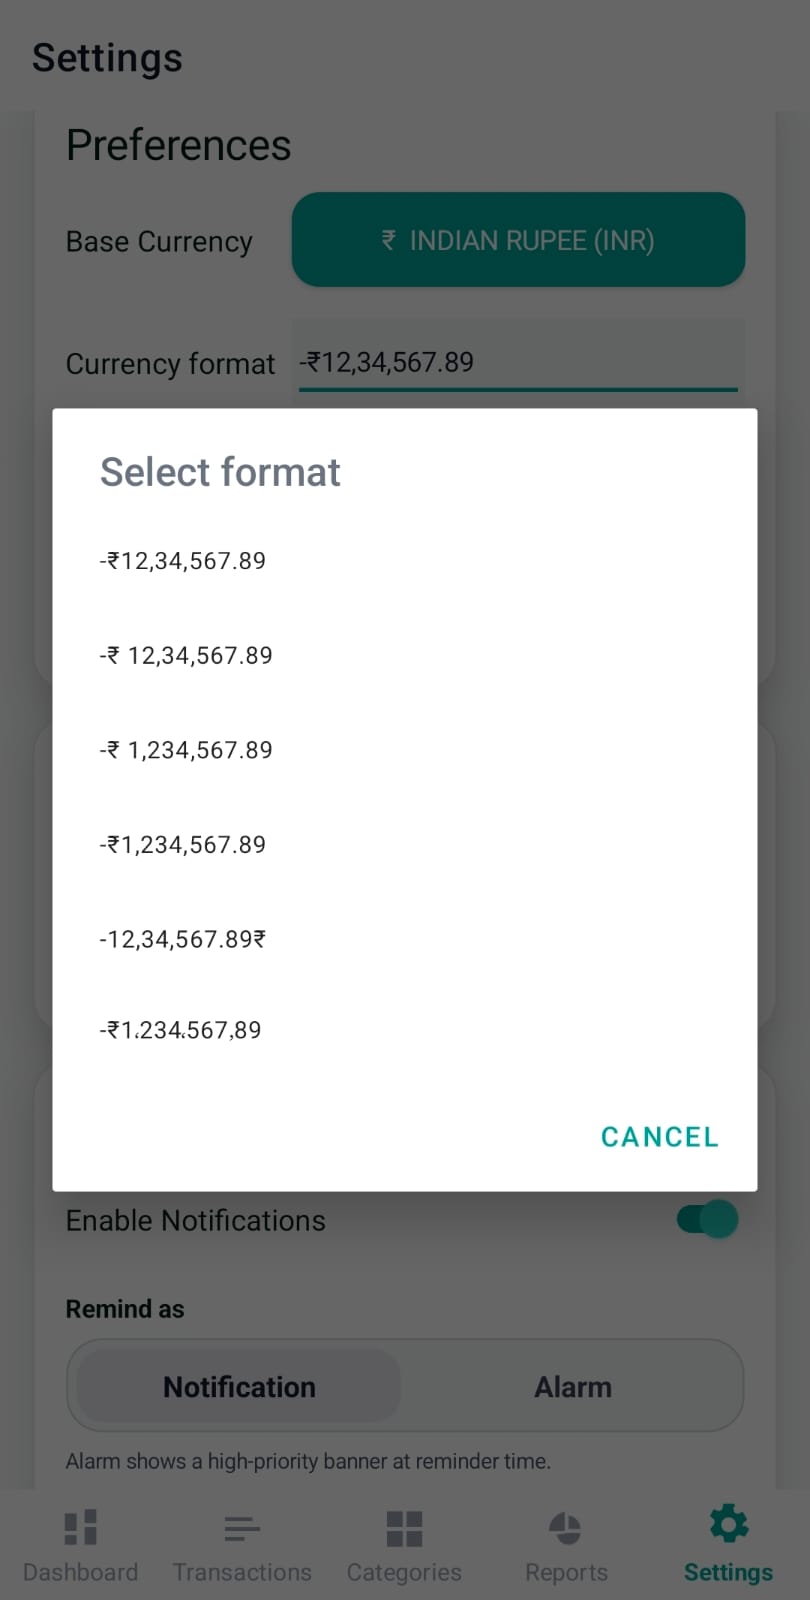
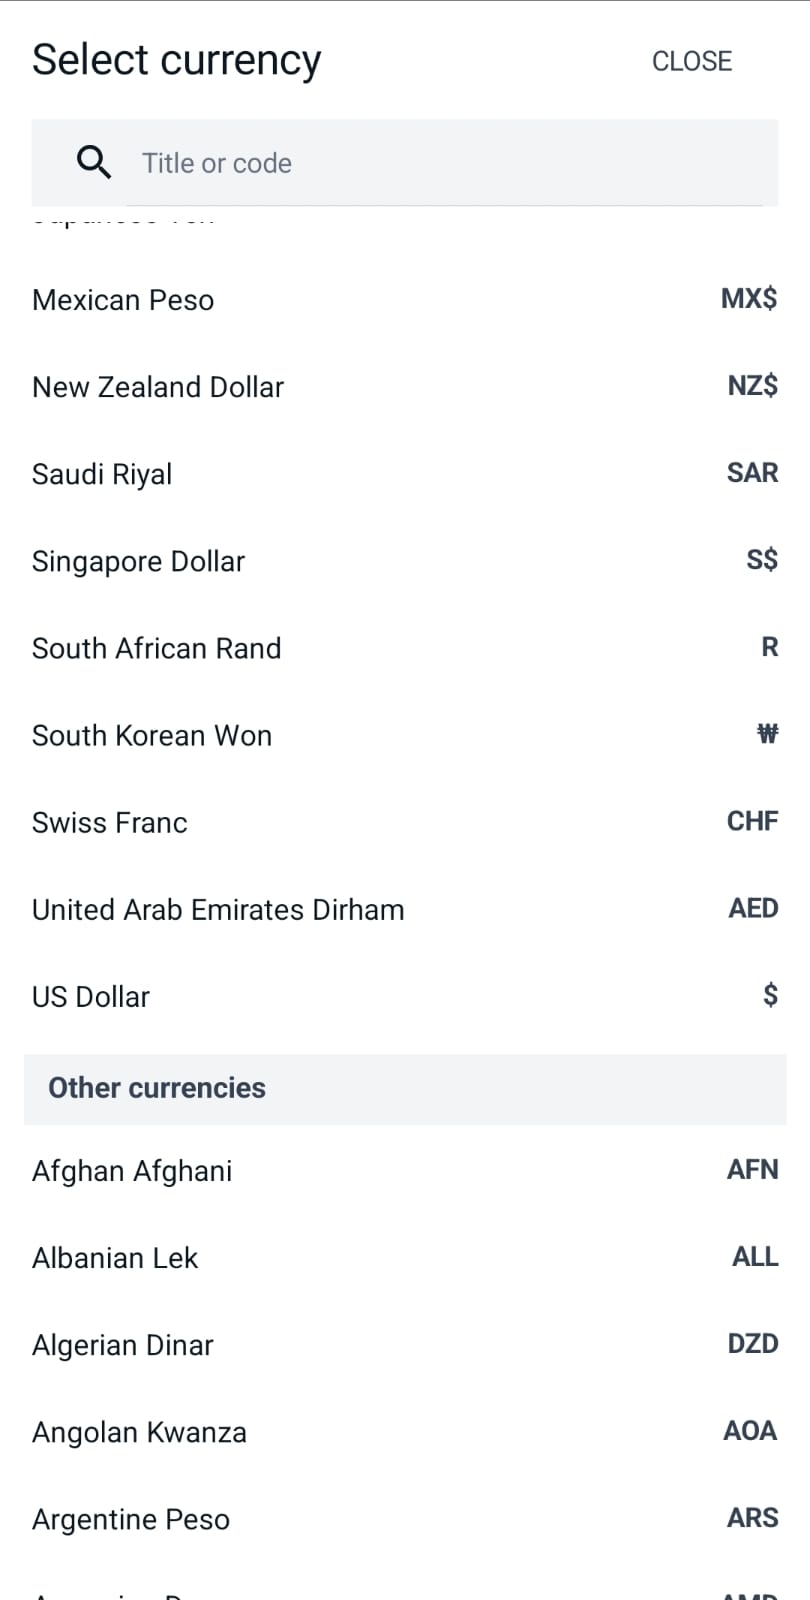
Preferences focuses on local formatting and UI choices:
Preferences also includes Bank message languages, so users can tell Pennie which languages their bank SMS and transaction alerts use before notification parsing starts.
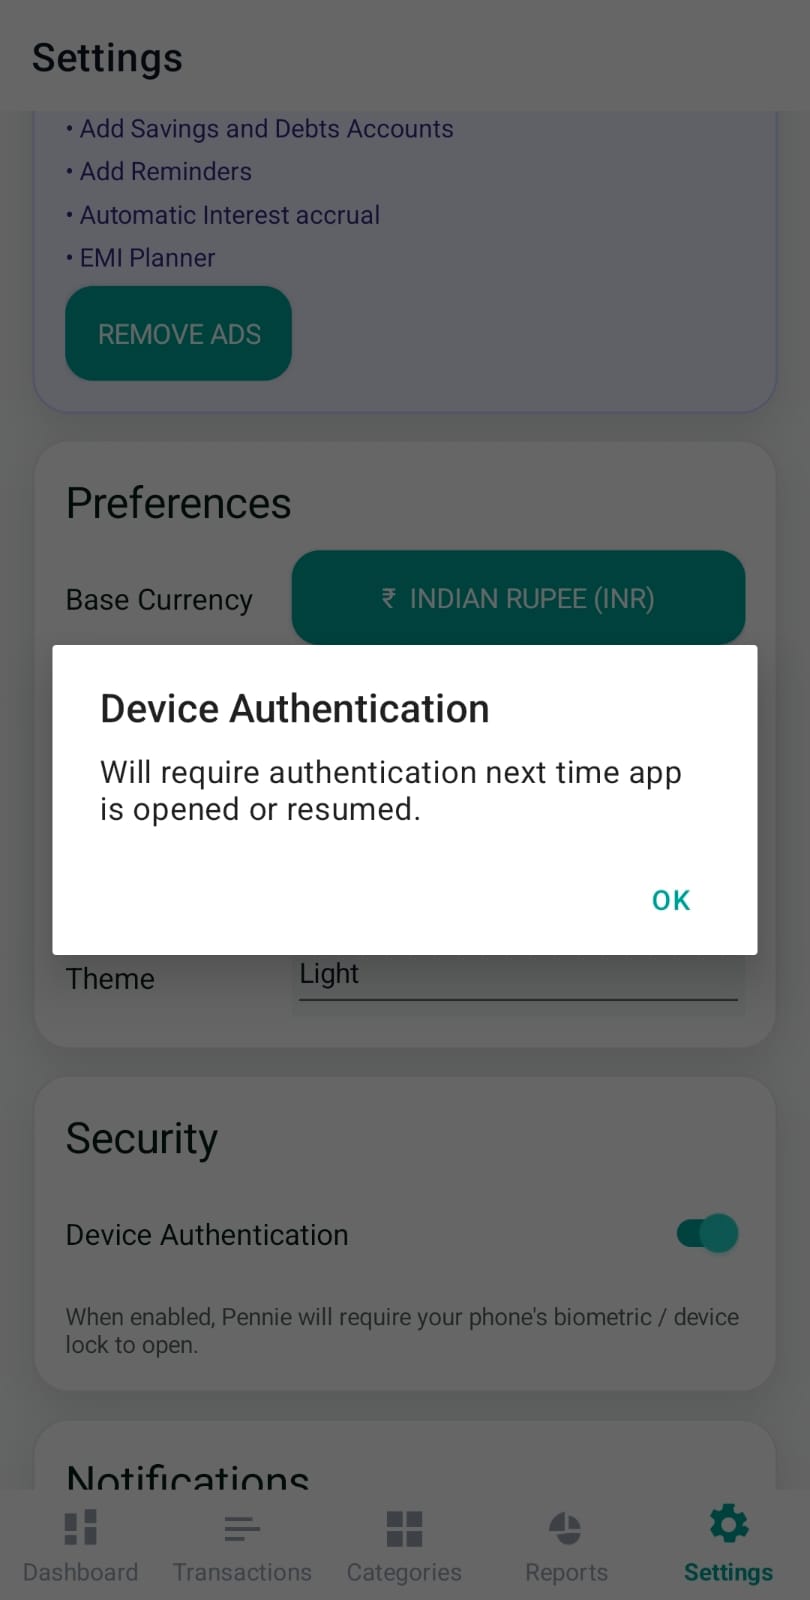
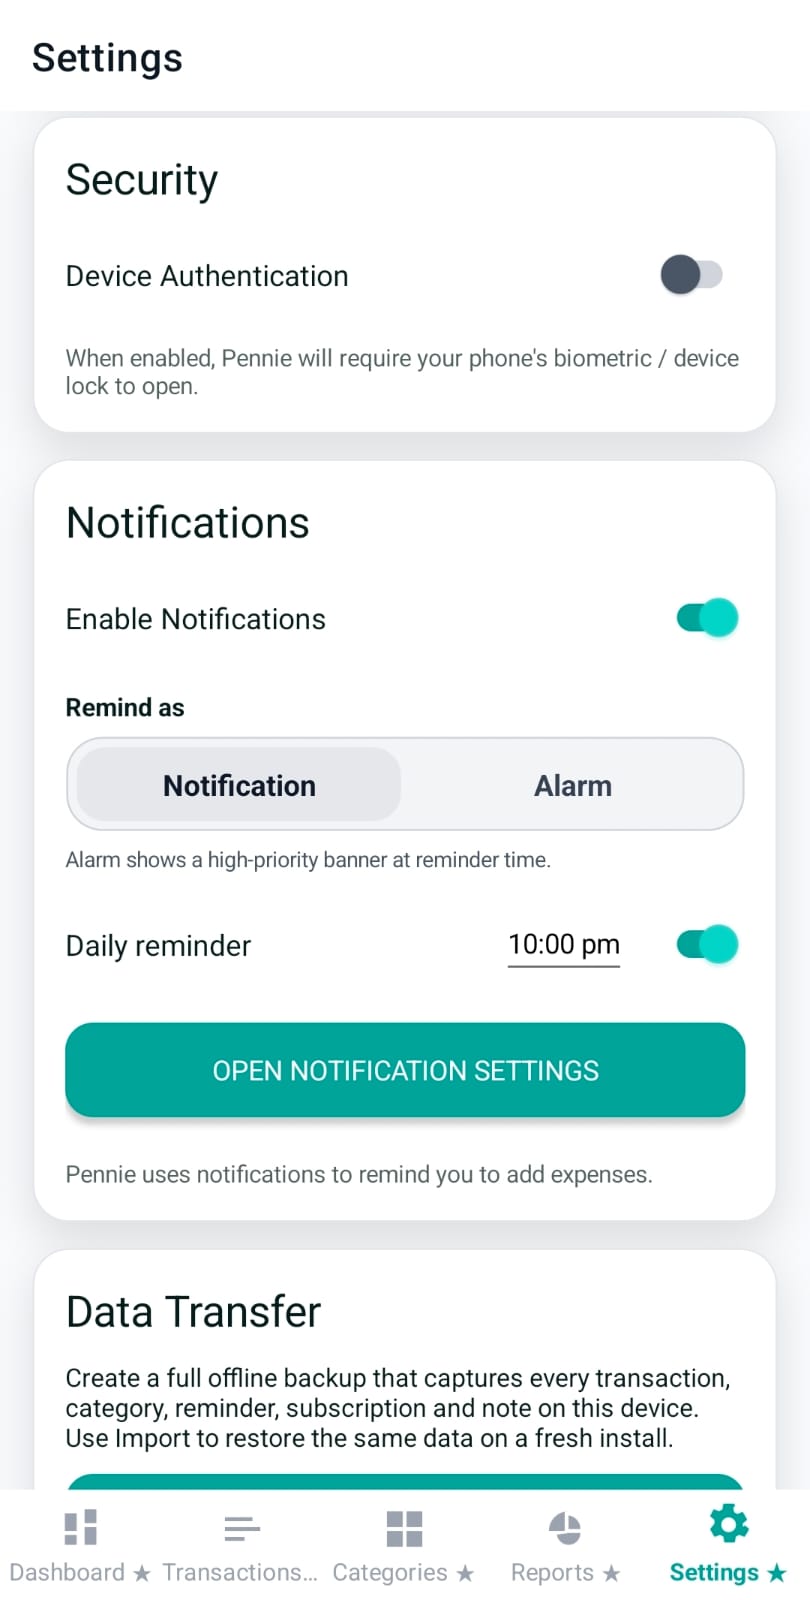
When enabled, Pennie requires biometric/device authentication whenever the app opens or resumes. Disabling it triggers an authentication check before the toggle is turned off.
This section controls all local reminders:
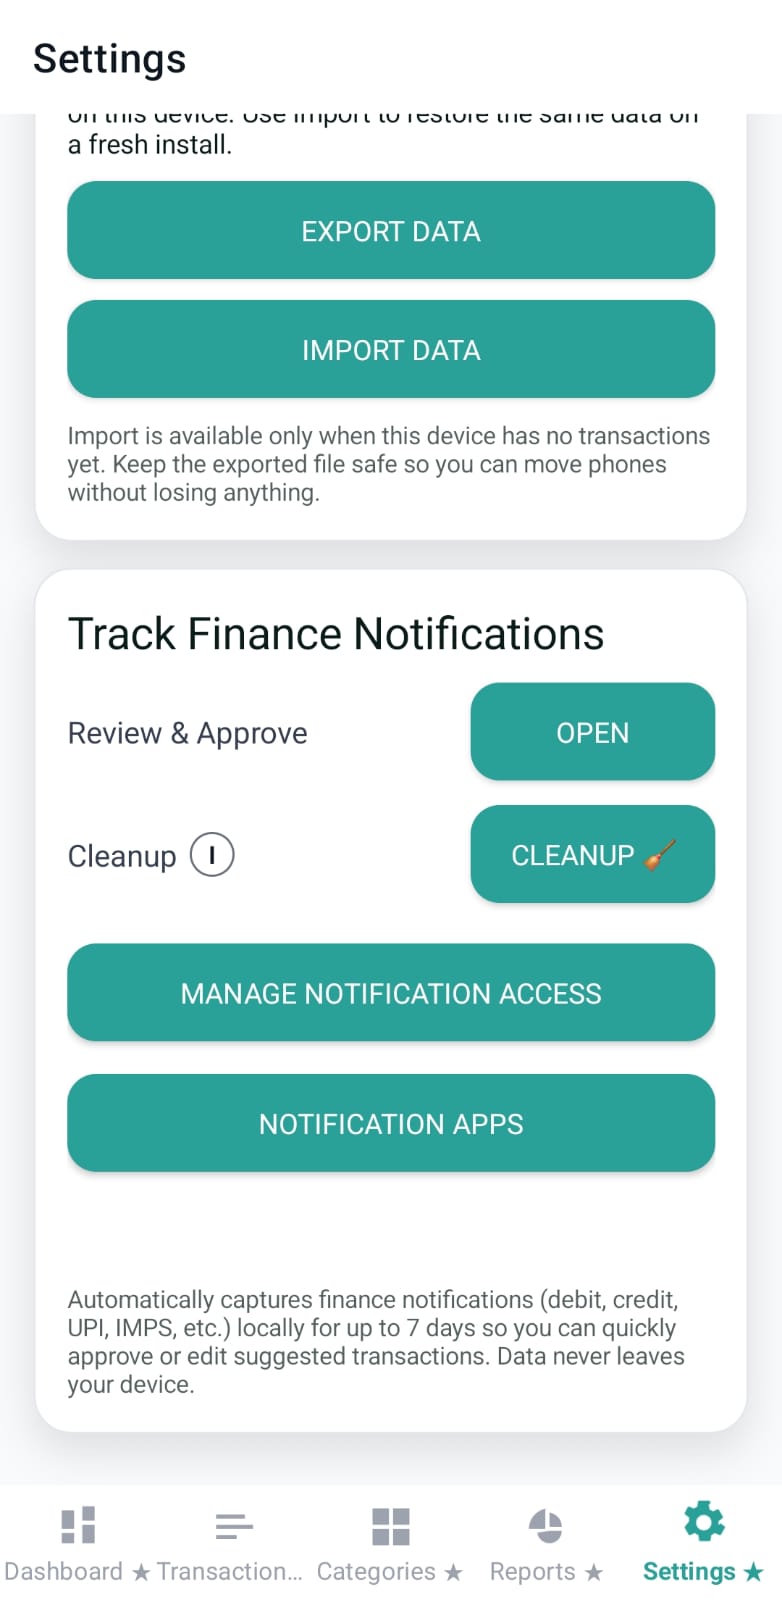
Pennie can create a full offline backup and restore it on a fresh install. These controls are premium-gated:
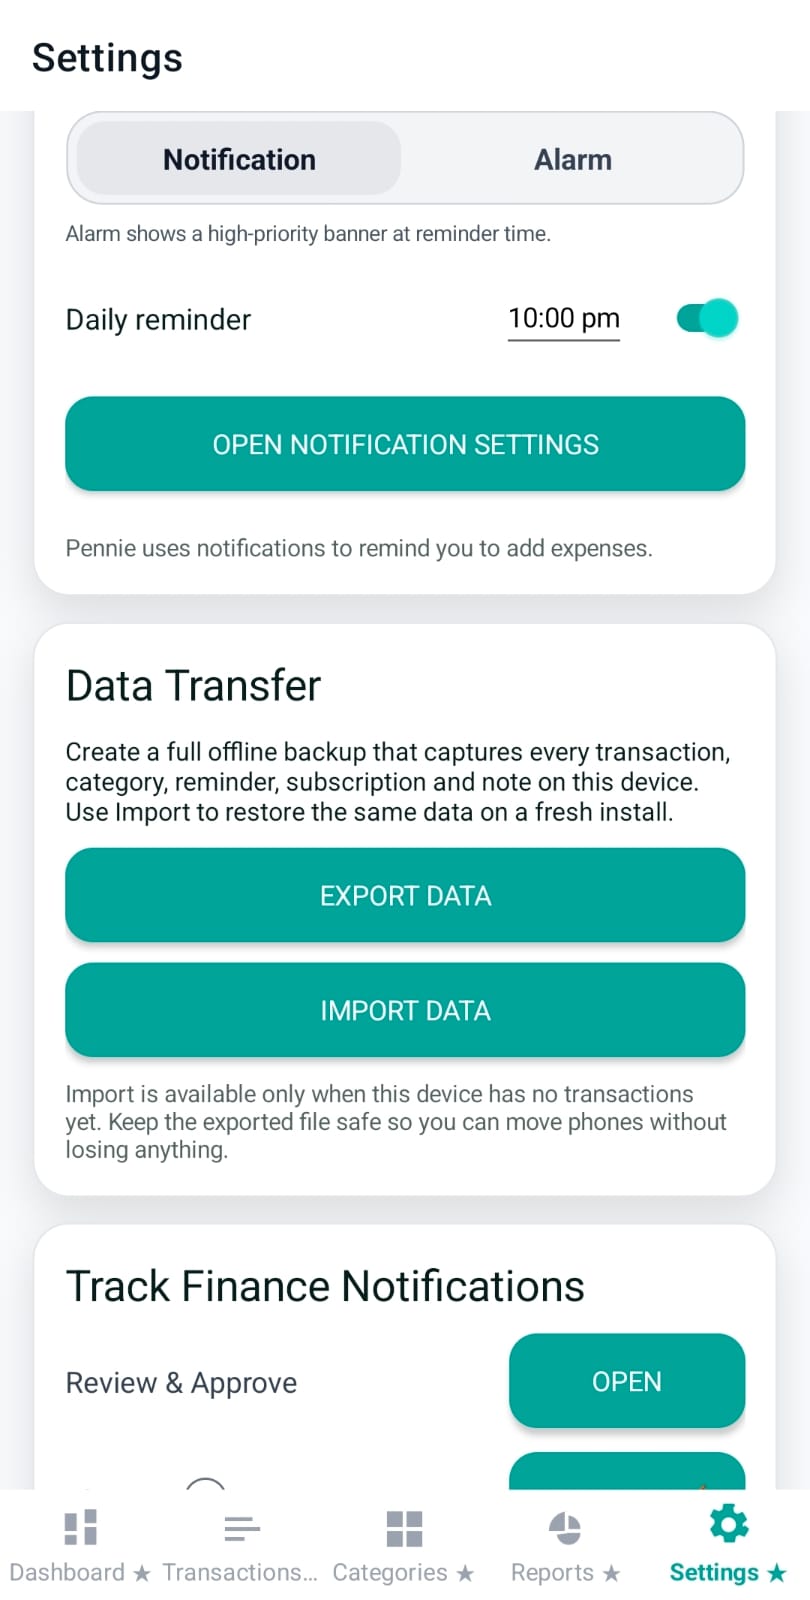
This card is the control center for automatic finance-notification capture. It includes:
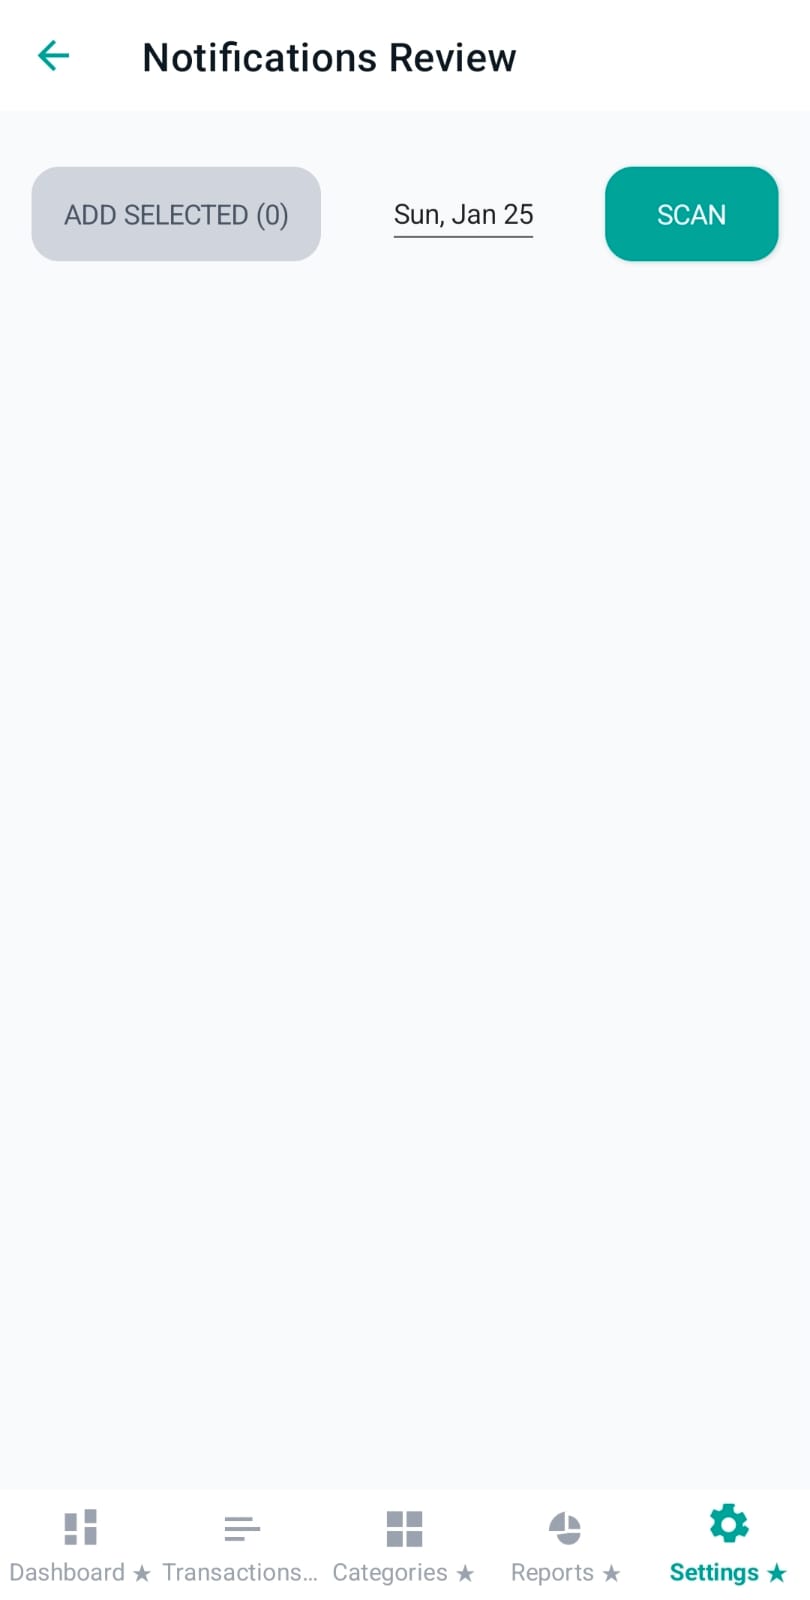
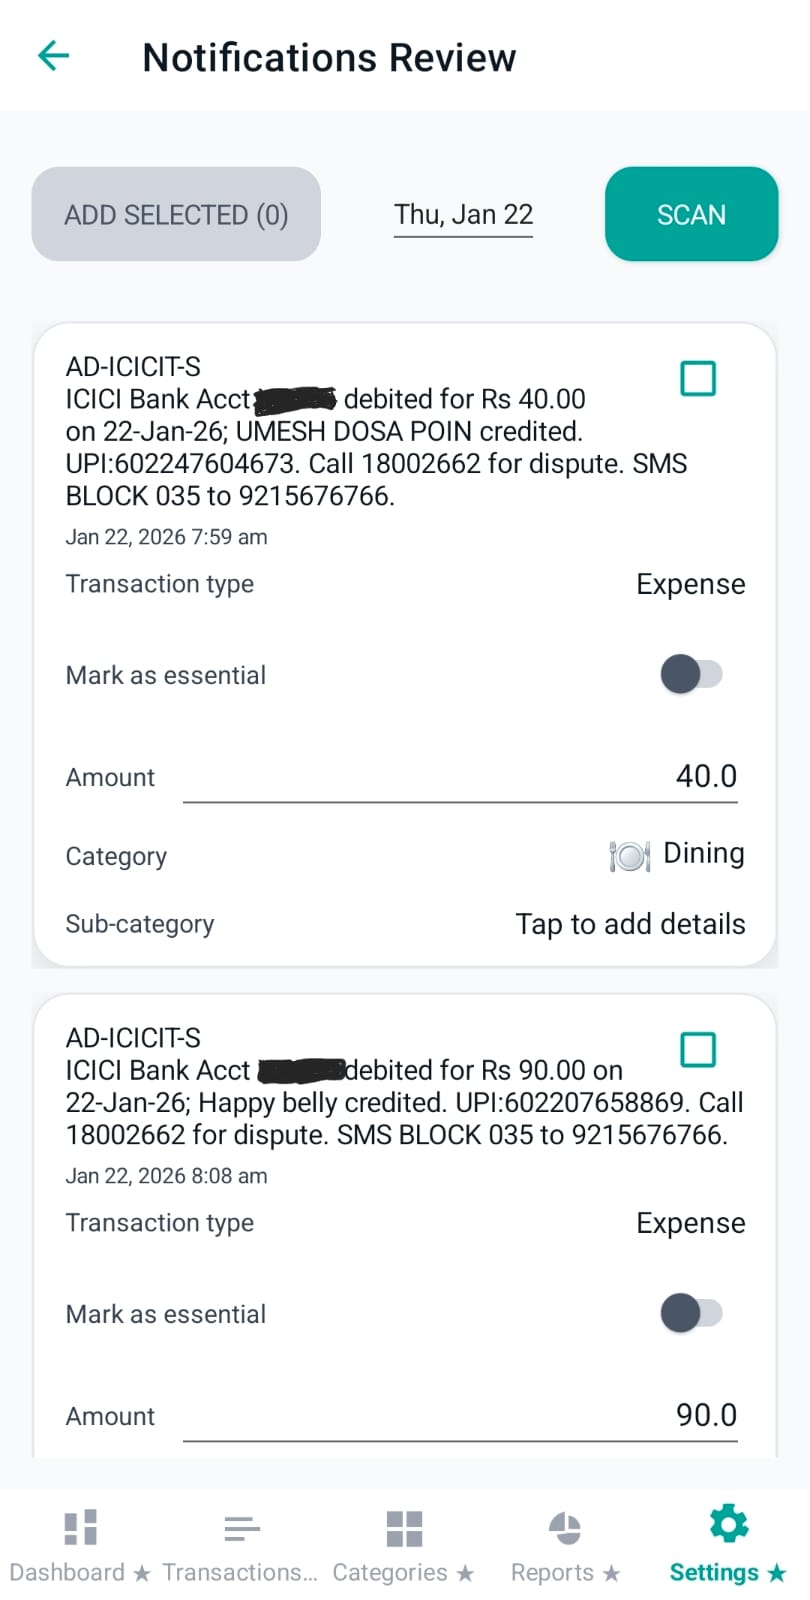
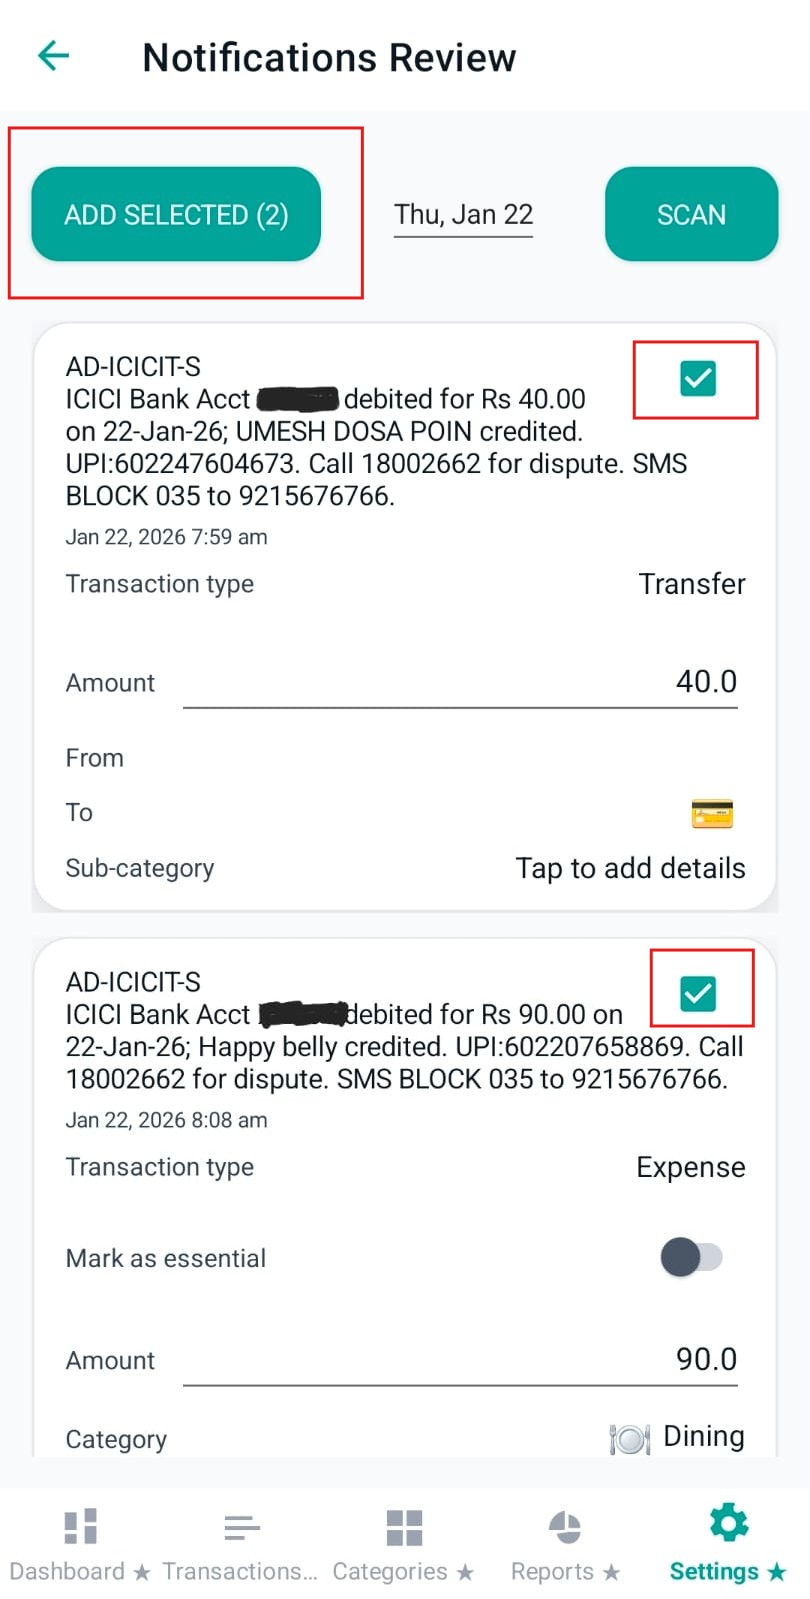
Notifications Review is where Pennie turns raw notification text into staged “candidate transactions”. You review each item, correct fields (type/category/amount), and then add the selected ones into the real Transactions database.
The header is optimised for a quick daily routine:
Each notification is shown with its original text (for auditability) and then an editable form:

When Transaction type is set to Transfer, Pennie requires:
Validation: source and destination cannot be the same category.
Tapping Sub-category opens a dedicated overlay. This prevents the main list from scrolling while you type. Pennie shows suggested sub-categories and applies your selection back to the staged item.

When you tap “Add Selected”, Pennie disables interactions briefly, commits the selected staged items as real transactions, and then shows a success message with the number added.
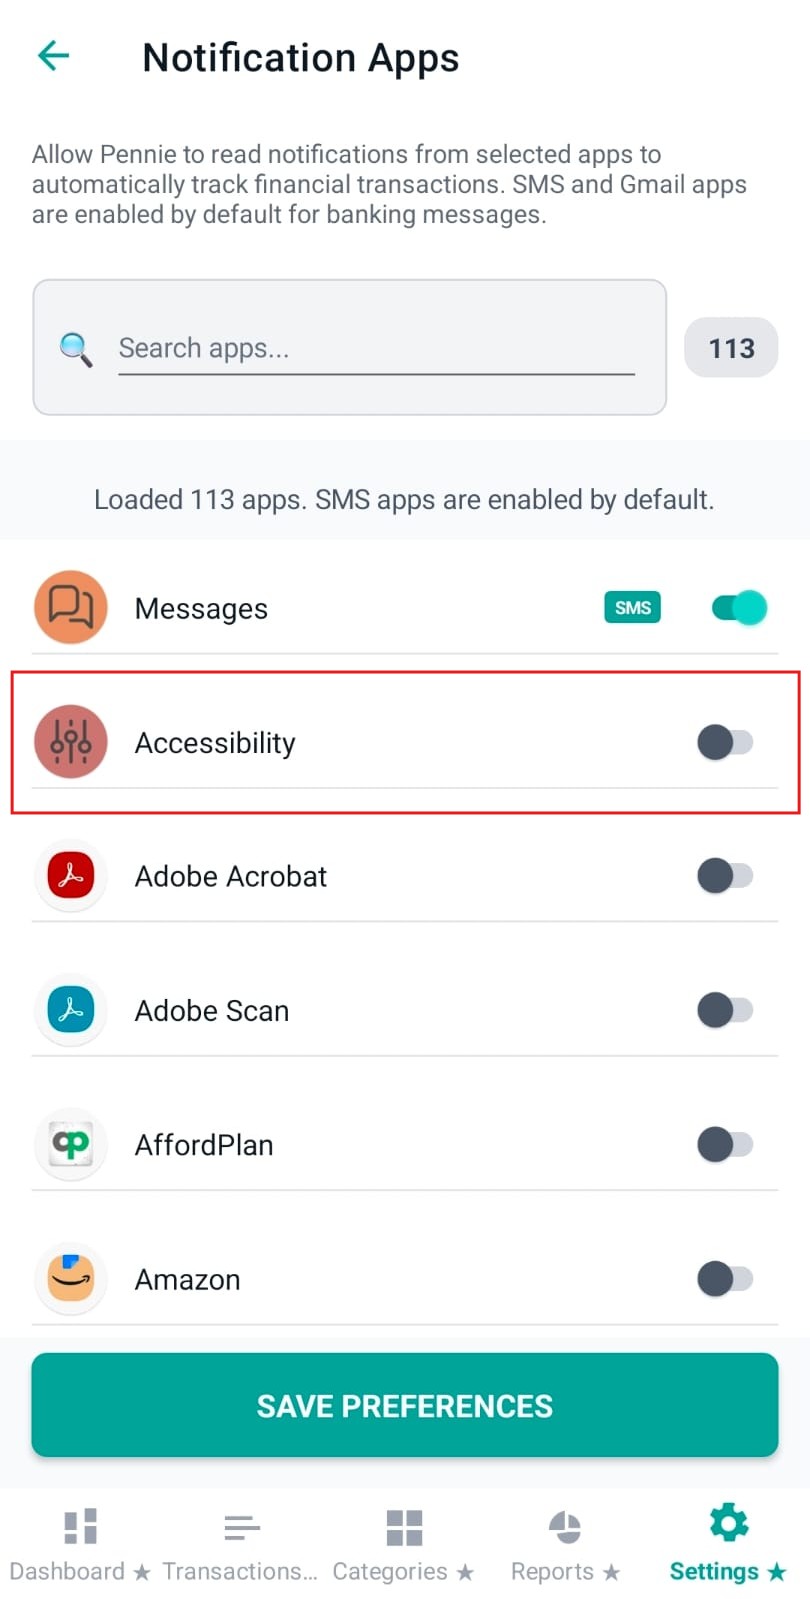
This page lets the user choose which installed apps Pennie is allowed to read notifications from. This is essential to reduce noise and keep finance parsing focused (banks, SMS apps, UPI, wallets).
At the top, Pennie explains what the feature does and then provides a search box:
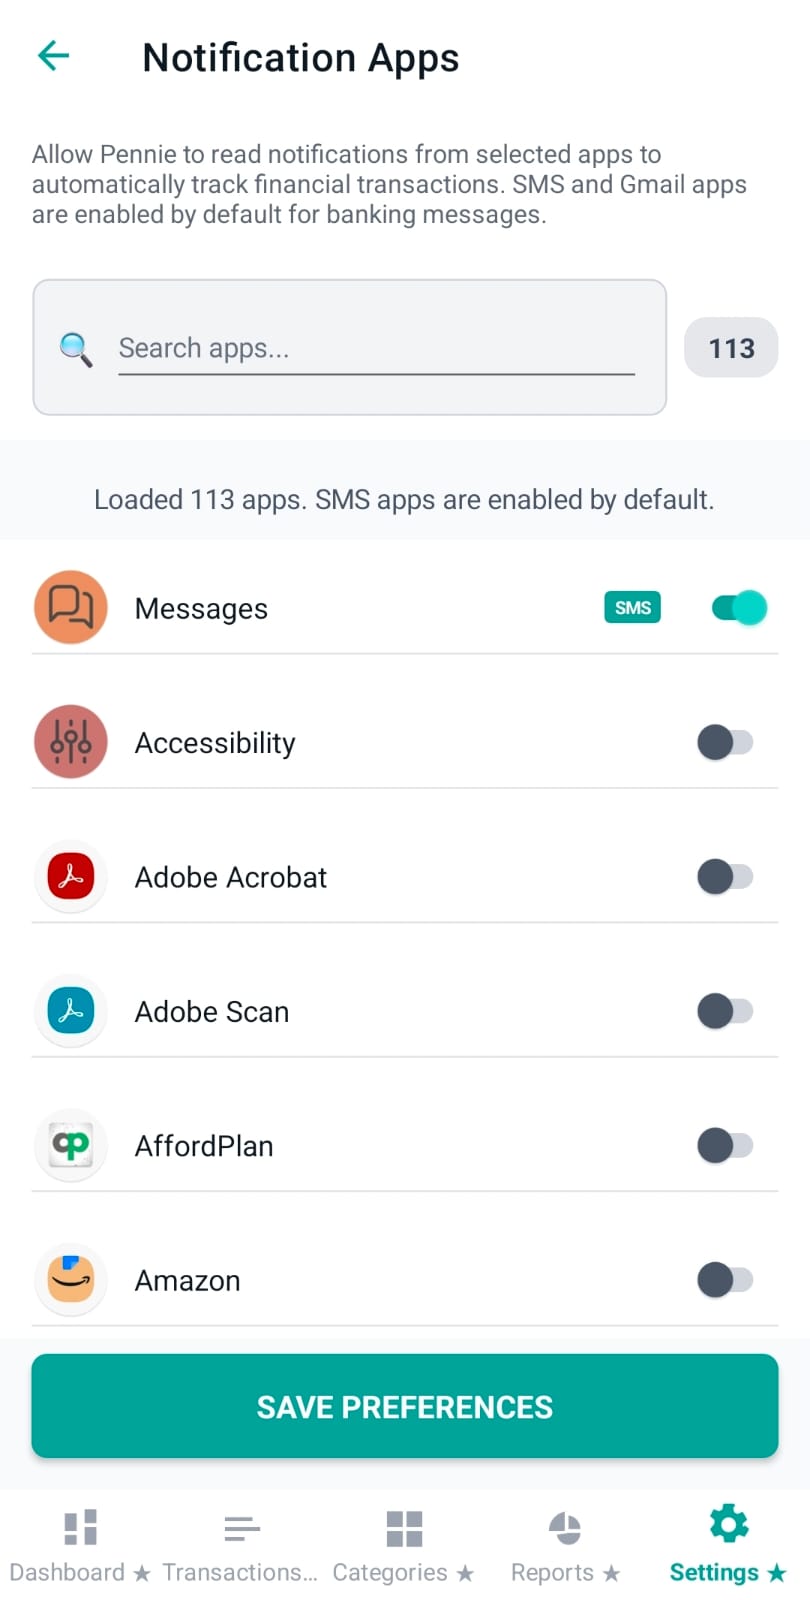
Each row includes:
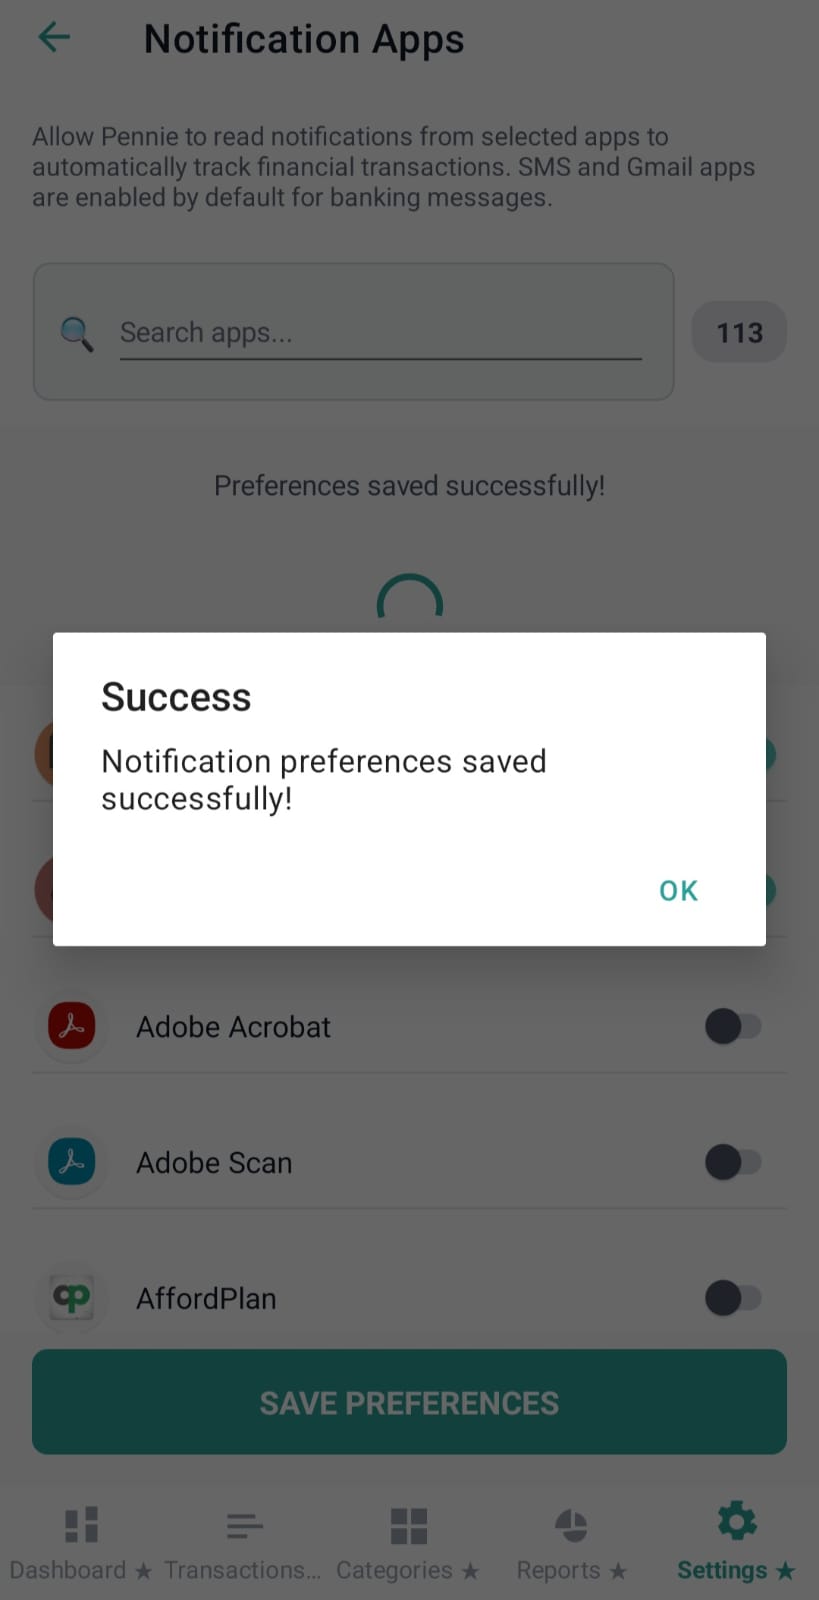
After changing toggles, tap “Save Preferences” to persist the selection. Pennie shows a success dialog and refreshes the status message.
Paste SMS is a lightweight helper for devices/flows where automatic notification capture is unavailable. You paste the raw message text, Pennie extracts the amount (if present), and then opens the Add Transaction page with prefilled fields.
The page has a single job: